· tutorial · 44 min read
Create an NFT Ticket & Warrant Canary with CashTokens Parsable NFTs (Token Pioneers Tutorial 4)
In this fourth tutorial in the Token Pioneers series, we’re going to take a deep look at the magical CashTokens parsable NFTs.
Table of Contents
- Intro
- What are Parsable NFTs
- Building with Parsable NFTs
- 1. Build a Basic NFT Ticket
- 2. Create a Warrant Canary with BCMR
- Conclusion
- Additional Builder Resources
Intro
So far in the Token Pioneers tutorial series we’ve discussed fungible tokens (FTs), (sequential) NFTs and BCMRs. Now we’re going to focus on the most interesting, versatile and, indeed, magical element of CashTokens: parsable NFTs.
By the end of this tutorial, you will understand how parsable NFTs work, both on-chain and in BCMRs, some basics of BCH Script — and you will build two parsable NFT projects.
This tutorial is suitable for developers, artists and new builders keen on understanding the most scalable smart contracts in the crypto space.
It is a good idea to do the previous tutorials in the Token Pioneers series before starting this, but it’s not strictly necessary.
What are Parsable NFTs
As mentioned in Tutorial 2, in the CashTokens specification, there are 2 types of NFTs: sequential and parsable. The difference between these two NFT types revolves entirely around what data you stuff into the on-chain NFT commitment field.
Sequential NFTs just have numbers in the commitment field and are well-suited to conventional, numbered NFT series, such as BCH Guru and Cash Ninjas. Sequential NFTs are very simple, at least when it comes to their commitment fields — and you can see an example of one in tutorial 2.
Parsable NFTs, however, encode data into builder-definable fields inside the commitment field. Yes, that’s right — a field that has fields! And you, oh creative master builder, get to define those fields!
Don’t worry! This will become clearer as we go on, I promise.
The corresponding BCMR for parsable NFTs is used to provide a key to those fields. The BCMR data for a parsable NFT is like the header in a spreadsheet and the parsable NFT commitment field contains a corresponding data row.
Where the Magic Happens
Parsable NFTs are where the deep magic of CashTokens happens.
Parsable NFTs are like little on-chain spreadsheet data rows stored in the NFT commitment field. They can preserve local state (i.e., the current value for some given variable for some on-chain dapp — or more than one) and enable BCH smart contracts to talk to each other.
This is huge!
Rivaling Ethereum Smart Contracts
This is, in fact, how BCH now has smart contract functionality that rivals that of Ethereum, while still remaining scalable — unlike Ethereum.
Detailed data can be extracted from these Parsable NFTs and then used by different applications. BCMR files work together with the on-chain data to enable clients, wallets, platforms, etc. to decode the meaning (like a spreadsheet header) of the fields in these little data rows we are calling parsable NFTs.
Parsable NFTs Actually Scale
These are not your grandpa’s funny JPEGs! BCH Parsable NFTs can be put to work on your complex, Web3 use cases. And, uniquely, they scale! Did I mention that yet?
Parsable NFTs can only hold up to 40 bytes of commitment data, but you can still do a lot with that — and this amount may be increased in the future.
Parsable NFTs also cost more in terms of transaction fees and dust output values than sequential NFTs (because they hold more data and thus need more block space). But BCH transaction fees are already so low that you might not notice.
And parsable NFTs can still be extended by off-chain BCMR metadata just like the sequential NFTs I’ve shown you in this series.
Parsable NFT Example
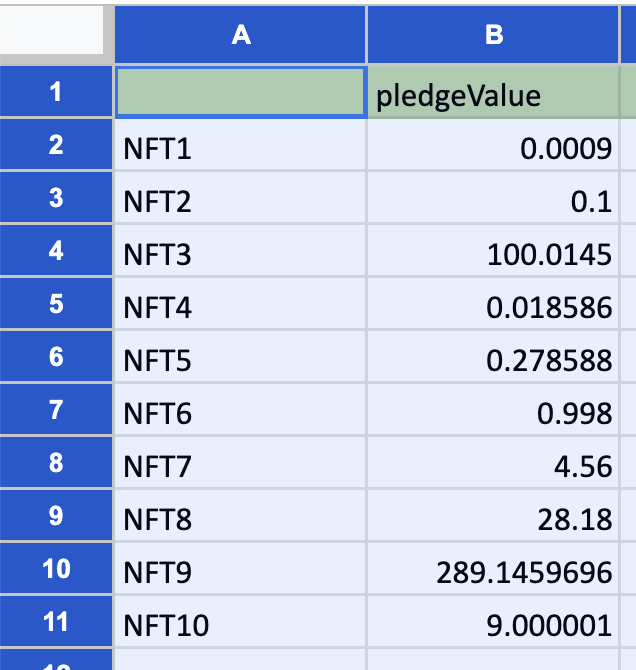
Here is a simple parsable NFT example from the BCMR CHIP by Jason Dreyzehner. Let’s analyze it!
            "fields": {
              "pledgeValue": {
                "name": "Pledge Value",
                "description": "The value pledged to the campaign in Bitcoin Cash.\n\nThis example demonstrates the additional capabilities of the 'number' encoding; clients are informed that pledge value can be aggregated (by addition) in views containing multiple NFTs to provide useful information to the user. For example, if the wallet holds two NFTs with Pledge Values of 123456 and 654321, the wallet can display a total of the user's pledges to this campaign: 0.00777777 BCH.",
                "encoding": {
                  "type": "number",
                  "aggregate": "add",
                  "decimals": 8,
                  "unit": "BCH"
                }
              }
            },
            "parse": {
              "bytecode": "006b00cf6b",
              "types": {
                "": {
                  "name": "Pledge Receipt",
                  "description": "An NFT of this category with a zero-length on-chain commitment (VM number 0). Where appropriate, user interfaces may display the ticker symbol of NFTs matching this type as CFC2023XAMPL-0.\n\nPledge Receipts are the only type of NFT demonstrated in this example, and they contain only one field: pledgeValue.",
                  "fields": ["pledgeValue"],
                  "uris": {
                    "icon": "ipfs://bafybeihnmh5bkbaspp3xfdanje74pekhsklhobzzraeyywq6gcpb3iuvey/0.svg",
                    "web": "https://example.com/campaign",
                    "custom-uri-identifier": "protocol://data-for-some-protocol"
                  }
                }
              }
Fields
            "fields": {
              "pledgeValue": {
                "name": "Pledge Value",
                "description": "The value pledged to the campaign...",
                "encoding": {
                  "type": "number",
                  "aggregate": "add",
                  "decimals": 8,
                  "unit": "BCH"
                }
              }
            },
This BCMR has a fields property that is a child of the nfts object. This is where the fields for this series of parsable NFTs are defined. Similar to how tags are defined at the top level of the file but actually used within identities, fields are defined first and assigned later.
A definition for one field is provided — pledgeValue.
The pledgeValue definition has a sub-property called encoding. In this example, pledgeValue is a number with up to 8 decimal places and is a unit of BCH. Further, when there are multiple parsable NFTs of this type in 1 wallet, they can safely have their pledgeValues added to each other to represent the total amount pledged to a given campaign — that is the meaning of the aggregate property.
What this means in terms of our spreadsheet analogy is that you have a spreadsheet with one column titled “pledgeValue”. There are as many data rows in this column as there are NFTs in this series. Each parsable NFT of this type under this identity is a new row in that metaphorical spreadsheet.
Parse.Types
            "parse": {
              "types": {
                "": {
                  "name": "Pledge Receipt",
                  "description": "...",
                  "fields": ["pledgeValue"],
                }
              }
            }
The parse object is a peer to fields. In parse.types, we can find one type, named Pledge Receipt.
Contrast that with the sequential NFT metadata we looked at in tutorial 2 from the BCH Gurus NFT series. There, in a sequential NFT, each unique NFT (“jpeg”) is its own type, numbered in series.
However, for this example parsable NFT, the type identifier field is blank. This is effectively a value of zero. As you’ve probably noticed, much numbering in programming starts from zero. And, in this example, there is only one parsable NFT, so there is only one type. That’s why they field can be blank. Pledge Receipt is the only, or default, type.
Whereas above, fields were defined. Here, a field is assigned to a type. Pledge Receipt has one field, pledgeValue.
"fields": ["pledgeValue"],
For the Pledge Receipt NFT type, there can be any number of instances, each with potentially a different pledgeValue. Or even identical values for this field.
You can think of each type as its own spreadsheet. The type is the spreadsheet, the assigned BCMR fields constitute the header and the individual NFTs are data rows.
Parse.Bytecode
            "parse": {
              "bytecode": "006b00cf6b",
              ...
            }
The bytecode at first may seem inscrutable. It certainly did to me! But don’t worry, it is easily decoded from hexadecimal and will soon be very clear to you.
The bytecode’s purpose is to parse and classify NFTs from the given identity. It is actually a hex-encoded script that runs in the BCH virtual machine (VM). This script breaks down the on-chain NFT commitmentof a given UTXO into its constituent parts:
- First, the NFT type.
- Then, the NFT fields.
BCH Script
The parse.bytecode field is interesting and takes us into BCH Script, i.e., opcodes.
BCH Script is an integral part of the BCH blockchain and is used in every part of its operations. In fact, it’s not actually true that you and I spend our BCH — only BCH scripts can spend BCH. We just provide the keys.
Every transaction involves scripts to process and validate them. Every transaction requires (a) a locking script that secures the funds and (b) an unlocking script that meets the conditions set by the locking script to spend the funds.
BCH Script itself is a deceptively simple scripting language. It is stack-based and similar to Forth, a language that first appeared more than 50 years ago.
BCH scripts can be built from a collection of operation codes, or opcodes. These opcodes are simple functions. You can also broadly think of them as verbs. They execute actions within the context of BCH transactions.
A stack is a simple data structure that you can imagine as a tall, thin box. Stack it full of dinner plates. The plate that went into the box first, comes out last (FILO). The plate that went in last, comes out first (LIFO).
When we put data into a stack, we call it a push. When we take data out of a stack, we call it a pop.
In BCH Script, there are two stacks: the main stack and the alternative stack (altstack).
- The main stack is the primary structure used for script execution, where most operations happen, including pushing, popping, math, evaluating covenant conditions, etc.
- The altstack serves as an auxiliary stack. It allows for temporary storage of data separate from the main stack, which can be useful in complex script operations. The ability to move data between these two stacks enhances the flexibility and functionality of script execution.
BCH Script is an important topic. If you want a full BCH Script tutorial, please let me know via tweet.
While bytecode may, at first, seem intimidating, just remember that every topic can be boiled down into its constituent parts and be clearly explained — especially in a system as efficient as Bitcoin. This will become clear, and fast!
Analyzing the Example BCMR’s Bytecode
In our example, the parse.bytecode has a value of 006b00cf6b. This is hexadecimal. BCH Script opcodes can be translated into hex for ease of use on the blockchain. There is a translation table for this on the outstanding documentation.cash.
Let’s break the bytecode string 006b00cf6b into two-character segments, starting from the left. In other words, 00, 6b, 00, cf, & 6b.
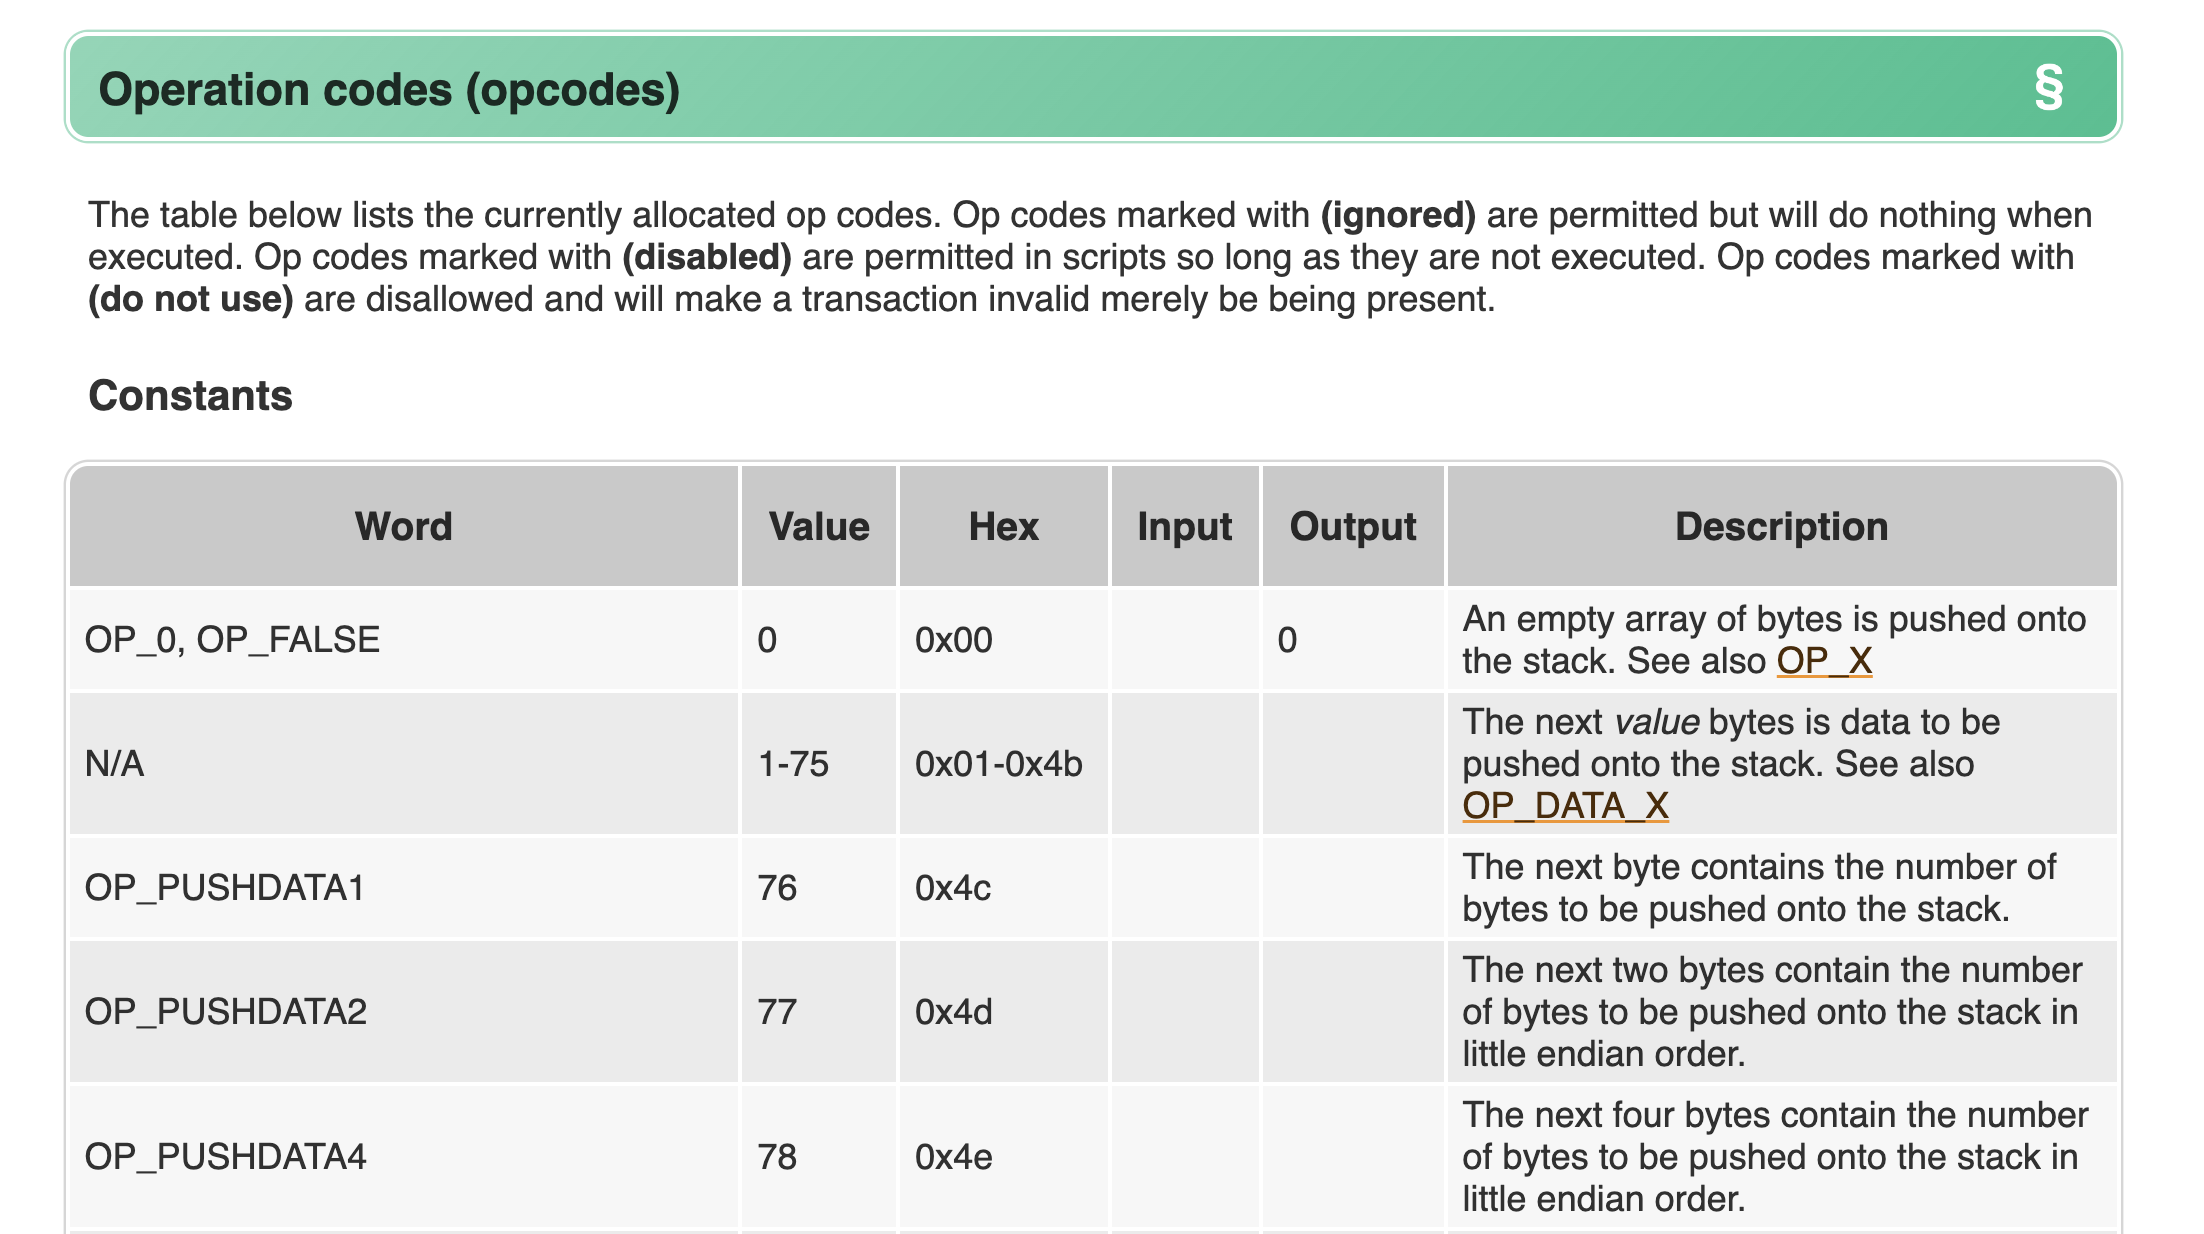
-
00: This opcode isOP_0. It pushes an empty array (a zero-length byte array) onto the stack. In many Bitcoin Cash scripts,OP_0is used to represent a “false” value or to provide a placeholder item on the stack. -
6b: This opcode isOP_TOALTSTACK. It moves the top item of the (main) stack to the alternative stack (or, altstack). In this case, it would move the empty array pushed byOP_0onto the altstack. -
00: AnotherOP_0, pushing a second empty array onto the main stack. -
cf: This opcode isOP_UTXOTOKENCOMMITMENT. It pops the item on the top of the stack and treats it as an input index. In other words, this opcode will see the zero from step 3, and use it to select the first input in the transaction (although the context we are in is not a real transaction). It will then push thecommitmentfield value of that UTXO (assuming it has one) onto the stack. If there is no NFT on the UTXO or thecommitmentfield is empty, it will push a zero to the stack. -
6b: Again,OP_TOALTSTACK. This moves the UTXO commitment data from the (main) stack to the altstack.
With that in mind, we now know that the bytecode string 006b00cf6b translates to this BCH Script (i.e., sequence of opcodes):
OP_0
OP_TOALTSTACK
OP_0
OP_UTXOTOKENCOMMITMENT
OP_TOALTSTACK
See How the Stacks Work
To get a better view of how the stacks work, visit ide.bitauth.com. The BitAuth IDE is similar to any other IDE, such as VSCode or Atom. Except, this one permits you to play with BCH Script!
This might seem challenging now, but I promise it gets easier!
On the BitAuth IDE, where it says “Choose a template to begin”, select “Scratch Pad”. At top right, for “Editor Mode”, select “BCH CHIPs VM”.
Delete the current code that came pre-filled and replace it with the following:
OP_0
OP_TOALTSTACK
OP_0
OP_UTXOTOKENCOMMITMENT
OP_TOALTSTACKIf you look closely, this is the same sequence of opcodes that we decoded from the parsable NFT’s BCMR bytecode of 006b00cf6b. Except now, each opcode is on its own line. This facilitates visualizing the stack operations.
Your IDE window should look like this:
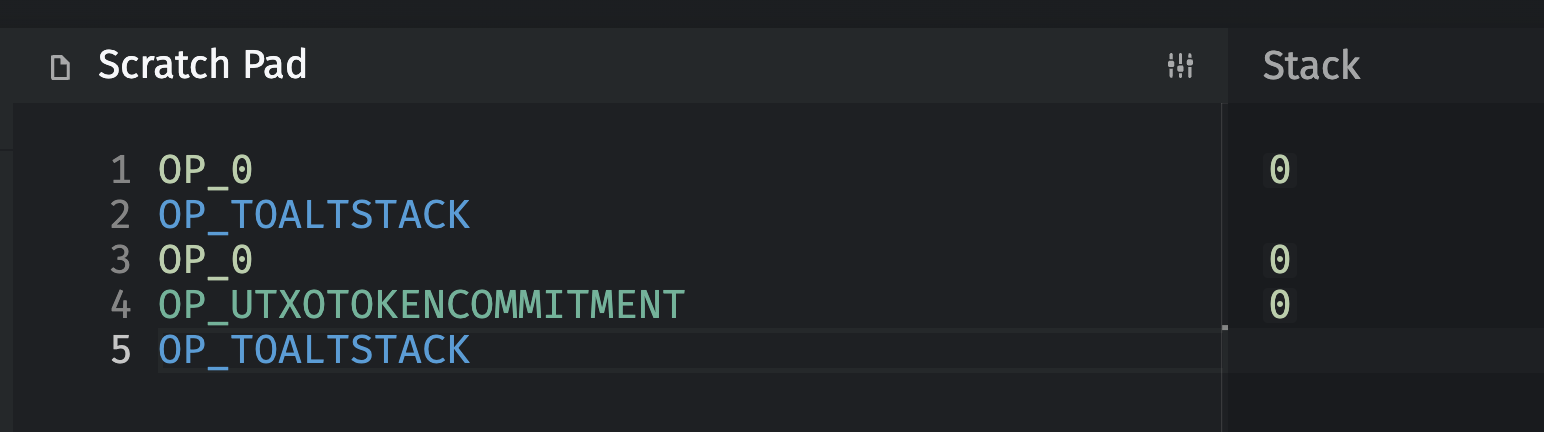
Here is what is happening, step by step:
- At step 1, we push a zero onto the (main) stack. This is pushed in the example parsed NFT BCMR above to indicate the NFT
type. If you look back at the example, there is only one NFT type, effectively numbered zero. So this zero represents that. This can also be considered a default type, and thus not in need of a specific type identifier. If there is more than one type, we would normally expect the type identifier to be the first value in thecommitment, and not to be manually added like this. - At step 2, we pushed the top item on the (main) stack to the altstack. So it disappears from the (main) stack.
- In step 3, we again push a zero onto the stack. This will be used as an input index in the next step.
- At step 4, we use (and consume) the 0 that is on the top of the stack from the previous step to grab the first transaction input. This opcode (
OP_UTXOTOKENCOMMITMENT) will then grab the value of the first input UTXO’scommitmentfield, and push it onto the stack. In this case, we are not working with a specific UTXO, so this opcode returns a zero. However, if we were working with a real NFT here, this would push the pledge value in BCH from the NFTcommitment, instead of the zero. This works as simply as this because there is only one field. - In the last step, we again push the top stack value to the altstack.
In the end, the (main) stack is left empty. This is important, as data in the stack is processed by locking and unlocking scripts. If there is data left in the altstack at the end of a transaction, it is ignored.
Now click where it says “Stack” to the right of “Scratch Pad” and the IDE will switch from showing you the (main) stack to showing you the altstack.
Your IDE window should now look like this:
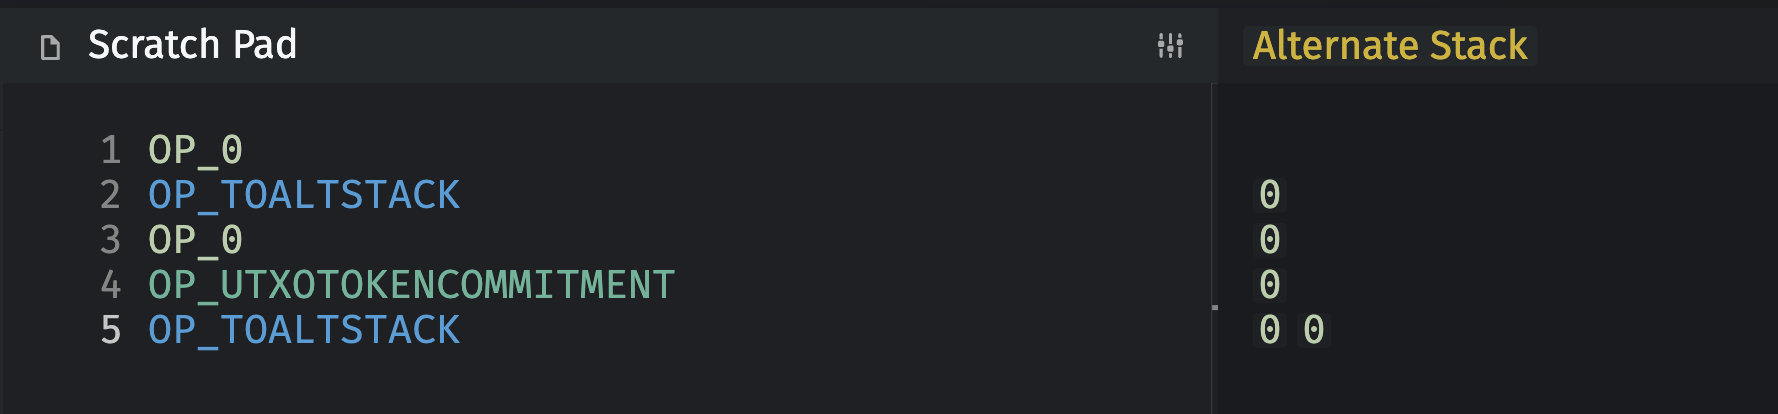
Here is what is happening, step by step, with the altstack:
- At step 1, the altstack is empty because the zero value is on the (main) stack.
- At step 2, we can see the zero (representing the NFT type) has been pushed onto the altstack.
- At steps 3 and 4, there is no change because the activity is happening on the stack.
- At the final step, there is a zero at the bottom of the altstack (representing the NFT type) and a BCH amount (
pledgeValue) on top of it. Since we are working without a specific NFT UTXO,OP_UTXOTOKENCOMMITMENTreturns a zero, and this zero is on the top of the stack.
The result of processing the bytecode (script) of 006b00cf6b is that the altstack ends up with two items:
- On the bottom: An empty byte array (from the first
OP_0andOP_TOALTSTACK), which represents the default NFT type. - Above that: A BCH amount that is the value of the lone NFT field (
pledgeValue), which came from executingOP_UTXOTOKENCOMMITMENT.
N.B. In BitAuth IDE, the bottom of the stack is on the left and the top on the right.
Order of Items on the Altstack
The BCMR standard expects that the bytecode script will create an altstack where the NFT type identifier is at the bottom of the stack (left on BitAuth IDE), and then NFT field values will come after it.
Here is one way to conceive of what a fully-processed bytecode should produce on the altstack.
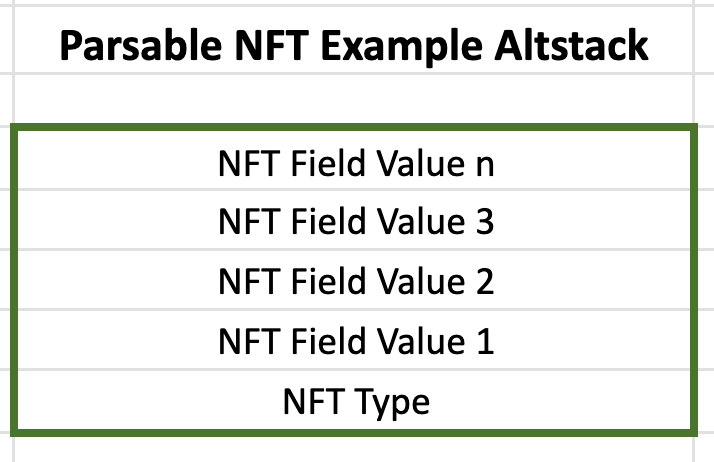
So, the bytecode script needs to return from bottom to top, with the type identifier first (at the bottom), and then the list of NFT field values after it.
The BCMR is the key to decoding all of this in client applications, wallets, etc., that interact with the blockchain and present users’ assets to them in a human-readable way.
Here’s how the BCMR root schema explains it:
On successful parsing evaluations, the bottom item on the altstack indicates the matched NFT type, and the remaining altstack items represent NFT field contents in the order listed (where
fields[0]is the second-to-bottom item, and the final item infieldsis the top of the altstack).
The Bytecode Parses the Parsable NFT Commitment Field
Why did everything get pushed to the altstack, you might wonder. It’s simply because the BCMR standard states that the bytecode script should pass this data to the altstack.
From there, wallets and other applications that need to display NFT details can grab the data and format or manipulate it appropriately.
The purpose of the bytecode script in the corresponding BCMR is simply to serve as a key that unlocks the format of the NFT commitment data, places it into a specific order and leaves it on the altstack.
This process allows a blockchain system to take an NFT, process it through a predefined script, and determine both its type and the various attributes or metadata it contains, based on how the data is arranged on the altstack after the script is run. This makes it possible to create NFTs that are more than just unique tokens; they can carry a range of data, making them suitable for more complex applications.
This kind of parsing allows for flexible and powerful handling of NFTs on the Bitcoin Cash blockchain, enabling scripts to categorize and process them based on their on-chain data.
More Bytecode Analysis
The bytecode 76a914e11bc0b45edb8c7caca8b63f4d02eca619dbc23088ac represents a script commonly known as a Pay-to-Public-Key-Hash (P2PKH) script. This script is widely used for standard BCH transactions. Here’s a breakdown of its components:
-
76 (OP_DUP): This operation duplicates the top stack item. In transaction scripts, it’s typically used to duplicate the public key hash.
-
a9 (OP_HASH160): This takes the top item from the stack (which is now the duplicated public key hash), hashes it using the SHA-256 algorithm, and then hashes the result again using the RIPEMD-160 algorithm.
-
14: This is a push operation that puts the next 20 bytes onto the stack. The 20 bytes following this opcode represent the public key hash (also known as the Bitcoin address in a hashed form). (
14in hex is20in decimal. Verify that here.) -
e11bc0b45edb8c7caca8b63f4d02eca619dbc230: This is the public key hash. It’s the hash of the public key of the recipient’s Bitcoin address. In a real transaction, this hash corresponds to the address where the bitcoins are being sent.
-
88 (OP_EQUALVERIFY): This operation checks if the top two items on the stack are equal. If they are not, the script fails. This is used to verify that the provided public key hash matches the hash in the locking script.
-
ac (OP_CHECKSIG): This checks the transaction’s signature against the public key. If the signature is valid, the script executes successfully, allowing the transaction to be included in a block.
In simple terms, this script is used in a BCH transaction to verify that the person trying to spend the bitcoins actually owns them. It requires the spender to provide a public key that hashes to the specified public key hash, along with a valid signature to prove ownership of the corresponding private key. This script structure is fundamental to ensuring security and ownership in Bitcoin transactions.
A Random BCH Transaction
Let’s take a look at a random BCH transaction. Go ahead and repeat this exercise for your own edification.
- Visit explorer.bitcoinunlimited.info.
- Click on the latest, or any, block.
- Click on transaction 1.
- Click on the Scripts tab.
- Grab output 0’s script. In my case, here it is:
OP_DUP OP_HASH160 8d5e5fe6e040fc558eb21bee02f2bd1ea1b19a4e OP_EQUALVERIFY OP_CHECKSIG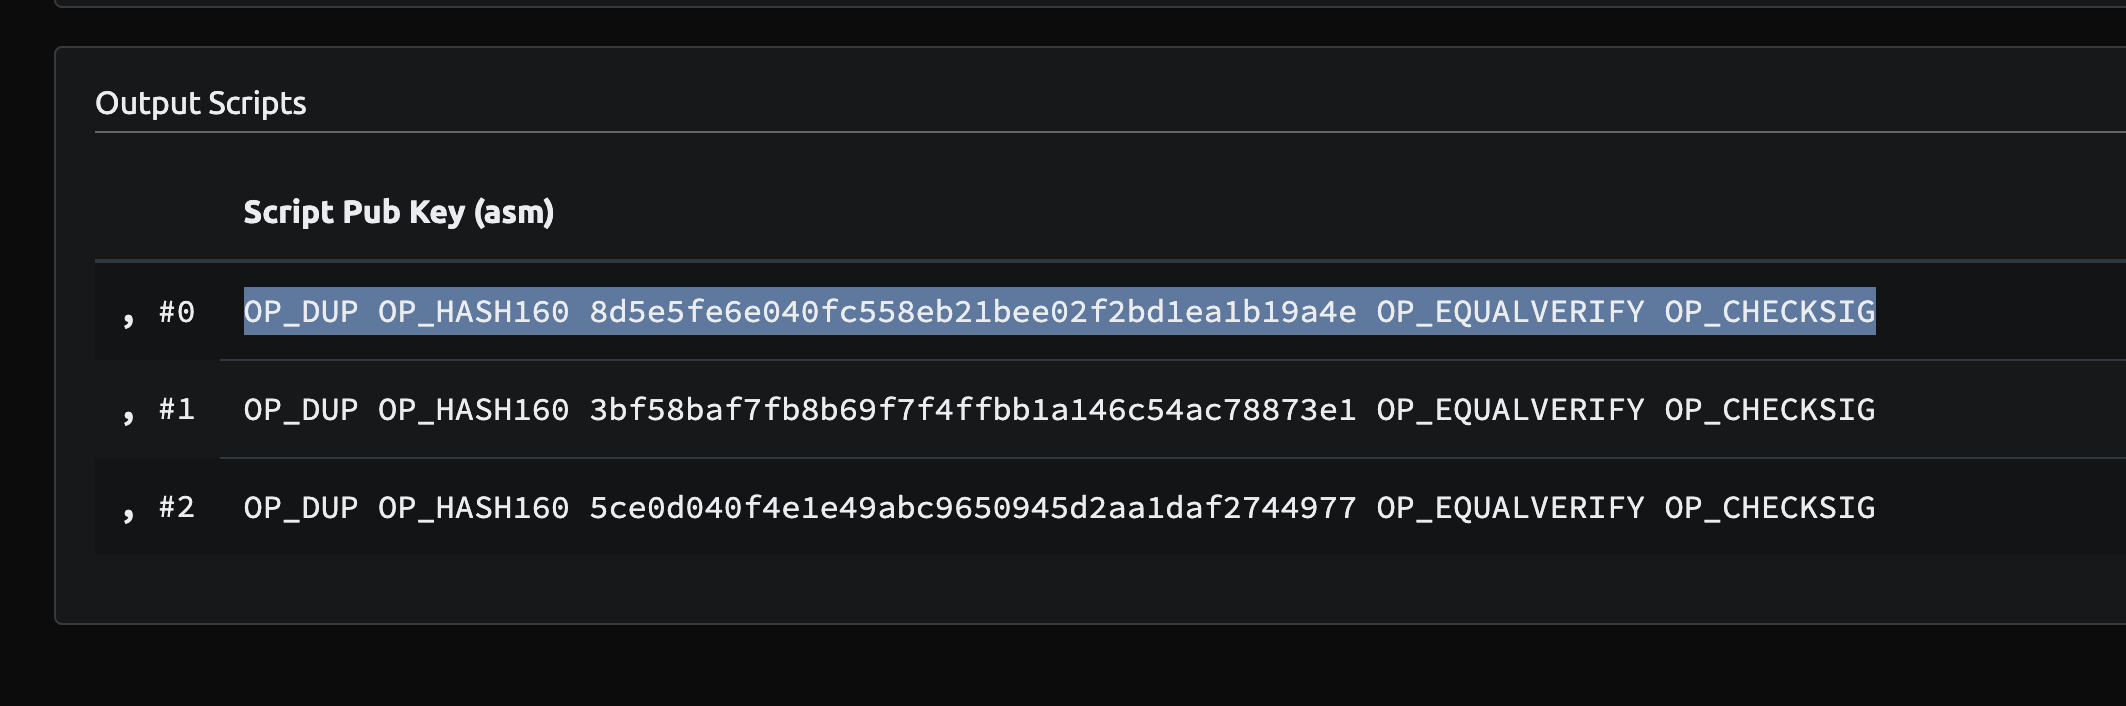
The BU explorer does us the favor of translating the hex bytecode into a more human-readable BCH Script format.
This works just like the above example, except the 14 is omitted because, while in hex format every byte is explicitly represented, in BCH Script format the length of the following public key hash is implicit.
In summary, this script says: “To spend this BCH, provide a public key that hashes to this specific value (8d5e5fe6e040fc558eb21bee02f2bd1ea1b19a4e), and a signature that proves you own the private key corresponding to that public key.”
This type of script is standard for transactions where BCH is sent to a single recipient’s address. It ensures that only the person who has the private key corresponding to the specified public key hash can spend the BCH.
Sequential NFT Bytecode
If parse.bytecode is not present in the BCMR, for example with a sequential NFT series, then the implicit bytecode is:
00d26b
This translates to:
OP_0 OP_UTXOTOKENCOMMITMENT OP_TOALTSTACK
This just means that the first input’s entire commitment gets sent to altstack. And, as we learned in tutorial 2, sequential NFT’s only have their sequence number (in hex) in their commitment.
We will explore a more complex parse.bytecode example below when we build a primitive ticketing dapp. Should be fun!
When to Put Data On-Chain
The topic of parsable NFTs raises the question of when data should be put in a BCMR and when it should go into the NFT commitment field on-chain.
For example, we have seen that NFT series will put just the hexadecimal number of their sequential NFT on-chain in the commitment field and then put a bunch of attributes into the BCMR file.
But, what about data you want to be forever preserved and immutable on-chain? Sure, the NFT commitment field today is only about 40 bytes, but it may be expanded in the future.
Here’s a thought from CashTokens.org:
Where possible, NFT issuers should prefer to issue sequential NFTs unless the intended use case requires parsable NFTs. Sequential NFTs are more efficient than parsable NFTs, reducing the bandwidth and transaction fees required to transfer each NFT. Because all metadata beyond the NFT’s identifier is stored off-chain and resolved using metadata registries, sequential NFTs have no meaningful limits on the composition or size of their associated metadata.
Parsable NFTs encode up to 40 bytes of metadata in their on-chain commitment. Encoding this metadata in the on-chain commitment allows each NFT to convey authenticated information to on-chain contract systems and sparsely-connected, off-chain systems at the cost of a slight increase in required transaction fees and dust output values. Parsable NFTs can encode a wide variety of NFT fields, data shared by all NFTs of a particular type…
BCH developer BitcoinCashAutist offers a more succinct guideline in the CashToken Devs group on Telegram:
if the data is to be read by a contract then commitment, else off-chain —BitcoinCashAutist \#
I personally think this is a pretty good starting guideline. Feel free to join CashToken Devs and share your thoughts as well!
Decision Matrix
Here’s a decision matrix to determine whether data should be stored on-chain or in a BCMR.
| Criteria | On-Chain | BCMR |
|---|---|---|
| Data size > 40 bytes? | No | Yes |
| Minimize transaction fees? | No | Yes |
| Sequential NFT? | No (sequence number only) | Yes |
| Accessed by other contracts? | Yes | No |
| Requires immutability? | Yes | No |
If the data size is greater than 40 bytes, for example, that won’t fit into the NFT commitment field, so it has to go off-chain — or at least the data has to be prioritized and no more than 40 bytes can go on-chain in a single NFT.
If you want minimal transaction fees, put the least amount of data on-chain possible.
If your data requires the immutability protections of the BCH blockchain, put it on-chain.
If your data needs to be accessed by on-chain contracts, then it absolutely must go on-chain.
And if you are building a sequential NFT, the best practice is to just put the sequence number in hex on-chain, and all of the attributes, images, etc. off-chain.
Building with Parsable NFTs
When building on BCH, it’s a good idea to build first on chipnet and with the Cashonize wallet. The Cashonize wallet can easily switch between mainnet and chipnet.
You’ll need some chipnet tBCH (which works like real BCH but has no value). You can get it at tbch.googol.cash. Be sure to select chipnet. You can also request chipnet tBCH in the Panmoni CashToken Builders group.
1. Build a Basic NFT Ticket
Ticketing is an interesting use case for Web3. Here are some cool things Web3 tickets (as NFTs) can do that your old paper tickets can’t:
- Web3 tickets can’t be counterfeited.
- Web3 ticket creation and resells can be tracked on-chain.
- Web3 ticket “scalping” can be price-capped and a portion of proceeds can be directed back to the ticket issuers.
- Web3 tickets can be refunded in an automated fashion.
- Web3 tickets can unlock additional benefits for ticket-holders, such as exclusive digital content, special merch, etc. This opens up new revenue streams and an enhanced experience.
- Web3 tickets can be treated as collectibles after the event.
- Web3 tickets can be traded in an online marketplace.
- Web3 tickets can be read by other on-chain smart contracts.
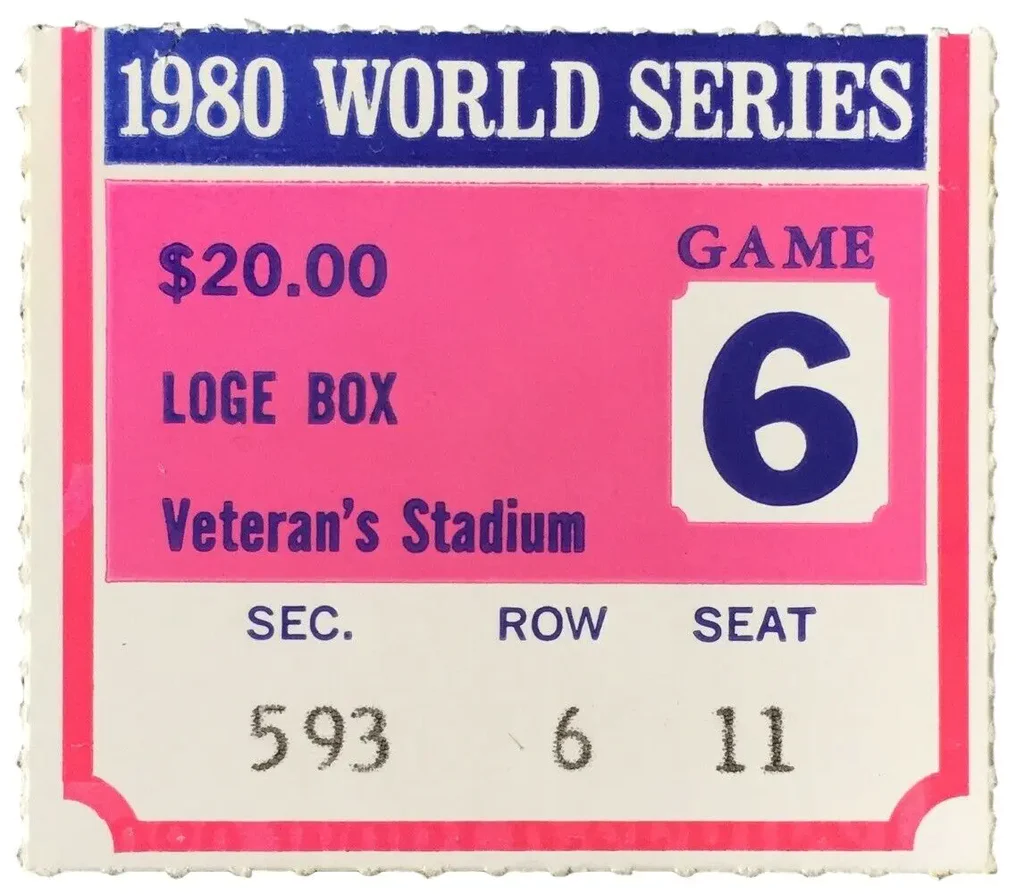
October 21, 1980
On October 21, 1980, I was watching the Philadelphia Phillies win the World Series against the Kansas City Royals from behind a TV set. I watched as Tug McGraw — one of my favorite baseball players with whom I actually got to throw the ball around with once — struck out the final Royals’ batter.
It was thrilling.
It would have been even more thrilling in person!
So, for a moment, let’s imagine that I was there on October 21, in the stands, and that I had an NFT ticket. What would that look like?
The Phillies played at Veterans Stadium, so let’s take that as our example. We will not capture all of the complexities of Veterans Stadium tickets, but let’s see how far we get.
Here is a ticket stub from that game in 1980.
I figure these are the factors we need to take into account to create the NFT ticket:
- Seating Level, which is based on seat height. At Veterans Stadium (sadly now demolished), there were roughly 7 ticket levels, each corresponding to a level in the stadium. 100 level tickets entitled you to a seat at field level. 700 level tickets were in the nosebleeds. In our example ticket, the Loge Boxes were on level 5.
- Seat Location: In our example ticket, this would be Section 593 Row 6, Seat 11.
- Gate: Many tickets also show what gate to use to enter.
- Date & Time: This would be the date and time of the planned baseball game. This data is implicit in our example ticket.
- Price: In case the ticket needs to be refunded, we should probably have the price. In our example, this is $20.00. (Based on a quick search, World Series tickets today are 20x more expensive, and that’s for the nosebleeds! Inflation!)
With that in mind, let’s design our NFT ticket!
Designing the Ticket
It looks like Seating Level can be inferred from the Section value in Seat Location. This would permit me to create just one type of NFT. If we have just one type of an NFT (as in the example above), then we can save space both on-chain and in our BCMR.
But I decided to make this ticket a little more complex than seemingly necessary in order to show you more of what is possible.
Remember, we are still just barely touching the outer limits of what is possible with BCH smart contracts!
With that in mind, I will create 7 ticket types, one for each seating level in the old Veterans Stadium. I’ll number the types 01 through 07.
And I will create 3 fields:
seatLocation: The seat location for the ticket, including section (3), row (2), seat number (2) and gate (single digit that maps one to one with alphabet). Fixed length of 8 characters always.dateTime: The UTC date and time in yyyyMMddHHmm format, e.g., 2032312121645, and is assumed to be always in UTC time, for simplicity’s sake. Fixed length of 12 characters always.price: The price of the ticket denominated in satoshis. Maximum 16 characters, variable length always.
So the ticket NFT commitment field will take this format:
<type><ticket-fields [seatLocation, date, price]>All of it will be numbers smooshed together without dividers and then converted to hex.
An important thing to note is that types 04 and 07 have only 2 of the 3 fields. The rest of the types have all 3 fields. This is based on some cursory research.
Draft BCMR
Before we start with any code, I think it’s a good idea to sketch out the BCMR, so we understand how these tickets will work. Here is my initial draft. Analyze it with the skills you learned in tutorial 3.
{
  "$schema": "https://cashtokens.org/bcmr-v2.schema.json",
  "version": { "major": 0, "minor": 1, "patch": 0 },
  "latestRevision": "2023-12-12T00:00:00.000Z",
  "registryIdentity": {
    "name": "Generic Ticketing dApp Token Registry",
    "description": "An example demonstrating how a metadata registry might publish information about a ticketing dApp.",
    "uris": {
      "icon": "https://example.com/registry-icon.svg",
      "web": "https://example.com/",
      "registry": "https://example.com/.well-known/bitcoin-cash-metadata-registry.json"
    }
  },
  "identities": {
    "0xexamplehash": {
      "2023-12-12T00:00:00.000Z": {
        "name": "Veterans Stadium Baseball Games",
        "description": "An identity for a hypothetical Veterans Stadium series of baseball game events. This decentralized application uses 7 types of parsable NFT and 3 fields.",
        "token": {
          "category": "0xexamplehash",
          "symbol": "VETERANS-BASEBALL",
          "nfts": {
            "description": "Tickets to baseball games at Veterans Stadium for any date.",
            "fields": {
              "seatLocation": {
                "name": "Seat Location",
                "description": "The seat location for the ticket, including section (3), row (2), seat number (2) and gate (single digit that maps one to one with alphabet). Fixed length of 8 characters always.",
                "encoding": {
                  "type": "number"
                }
              },
              "dateTime": {
                "name": "Date and UTC Time of Event",
                "description": "The date and time of the event in YYYYMMDDHHMM format, e.g., 2032312121645. Assumed time zone is UTC. Fixed length of 12 characters always.",
                "encoding": {
                  "type": "number"
                }
              },
              "price": {
                "name": "Price Paid",
                "description": "The price paid for the ticket. Maximum 16 characters, variable length always. Denominated in satoshis.",
                "encoding": {
                  "type": "number",
                  "unit": "satoshis"
                }
              }
            },
            "parse": {
              "bytecode": "",
              "types": {
                "01": {
                  "name": "100 Level Ticket",
                  "description": "The lowest level ticket.",
                  "fields": ["seatLocation", "dateTime", "price"],
                  "uris": {
                    "icon": "ipfs://bafxxx/1.svg",
                    "web": "https://example.com/about-veterans-baseball-game/level-100"
                  }
                },
                "02": {
                  "name": "200 Level Ticket",
                  "description": "Field-level boxes.",
                  "fields": ["seatLocation", "dateTime", "price"],
                  "uris": {
                    "icon": "ipfs://bafxxx/2.svg",
                    "web": "https://example.com/about-veterans-baseball-game/level-200"
                  }
                },
                "03": {
                  "name": "300 Level Ticket",
                  "description": "Terrace boxes.",
                  "fields": ["seatLocation", "dateTime", "price"],
                  "uris": {
                    "icon": "ipfs://bafxxx/3.svg",
                    "web": "https://example.com/about-veterans-baseball-game/level-300"
                  }
                },
                "04": {
                  "name": "400 Level Ticket",
                  "description": "Reserved for press and dignitaries.",
                  "fields": ["seatLocation", "dateTime"],
                  "uris": {
                    "icon": "ipfs://bafxxx/4.svg",
                    "web": "https://example.com/about-veterans-baseball-game/level-400"
                  }
                },
                "05": {
                  "name": "500 Level Ticket",
                  "description": "Upper level loge boxes.",
                  "fields": ["seatLocation", "dateTime", "price"],
                  "uris": {
                    "icon": "ipfs://bafxxx/5.svg",
                    "web": "https://example.com/about-veterans-baseball-game/level-500"
                  }
                },
                "06": {
                  "name": "600 Level Ticket",
                  "description": "Upper reserved and individual seats.",
                  "fields": ["seatLocation", "dateTime", "price"],
                  "uris": {
                    "icon": "ipfs://bafxxx/6.svg",
                    "web": "https://example.com/about-veterans-baseball-game/level-600"
                  }
                },
                "07": {
                  "name": "700 Level Ticket",
                  "description": "General admission seating.",
                  "fields": ["dateTime", "price"],
                  "uris": {
                    "icon": "ipfs://bafxxx/7.svg",
                    "web": "https://example.com/about-veterans-baseball-game/level-700"
                  }
                }
              }
            }
          }
        },
        "uris": {
          "icon": "https://example.com/veterans-baseball-game.svg",
          "web": "https://example.com/about-veterans-baseball-game",
          "registry": "https://example.com/.well-known/bitcoin-cash-metadata-registry.json",
          "support": "https://veterans-baseball-game-support.example.com/"
        }
      }
    }
  },
  "license": "CC0-1.0"
}
The lone identity in the BCMR so far is just for our fictional Veterans Stadium baseball games. Veterans Stadium also hosted Eagles football games, so, hypothetically, if implemented, the football game tickets could go under a second identity.
N.B. You can find all the code for this tutorial on GitHub.
Planning the Commitment
The above BCMR is missing the hash for its Identity Snapshot and for its token.category. We learned how to solve this in tutorial 3.
But, first, we need the parse.bytecode value. To figure it out, let’s first imagine some sample NFT commitment field values.
Type 04
Type 04 seats are Level 400, which are reserved for press and dignitaries, so there is no price (I’m guessing).
Here is a sample commitment field for type 04 tickets:
UTF-8 String: 0440101013202312121900
Hex: 30343430313031303133323032333132313231393030 (when treated as a UTF-8 string)
Bytes: 22 (of the hex)
04is the ticket type.40101013is Section 401, Row 01, Seat 01 and Gate C.202312121900is the date, 2023 12 12 and the time 19:00, and assumes UTC time.
Type 07
Type 07 seats are general admission seating, so there are no assigned seats. Therefore, with the type alone, the seating area can be determined.
UTF-8 String: 072023121219004300000
Hex: 303732303233313231323139303034333030303030
Bytes: 21
07is the ticket type.202312121900is the date and time.4300000is the number of sats the ticket cost, or 0.043 BCH.
All Other Types
All other types (01, 02, 03, 05, 06) have all 3 fields, so they follow the same basic format.
UTF-8 String: 0110101011202312121900104300000
Hex: 30313130313031303131323032333132313231393030313034333030303030
Bytes: 31
01is the ticket type (this will vary based on level).10101011is Section 101, Row 01, Seat 01, Gate A.202312121900is the date and time.104300000is the ticket price in satoshis, or 1.043 BCH.
Notes
- We leave the price data for last because it is variable in size. This will make it easier when creating the bytecode.
- When creating these NFTs, we can enforce that the type is always two characters, the
seatLocationis always 8 characters and thedateTimeis always 12. This will enable us to establish reliable bytecode. - Treating the commitment data as a decimal number can save bytes as it will result in a smaller hex. However, it will remove leading zeros and you may encounter other limitations.
- This example does not represent itself as being fully-optimized — premature optimization and all that — so just take that into account when building your own parsable NFTs.
Writing the Bytecode
Let’s go back to the BitAuth IDE and write our bytecode script. Clear out your current code but be sure to preserve (or replicate) the settings from the parsable NFT example section above.
1. Push the commitment.
OP_0
OP_UTXOTOKENCOMMITMENT
This will take the first input UTXO in the transaction and put its commitment on the stack.

For testing purposes, we can replace this with the the hex of the sample type 04 NFT commitment discussed above, with a 0x in front of it to signify that it is hex.
<0x30343430313031303133323032333132313231393030>
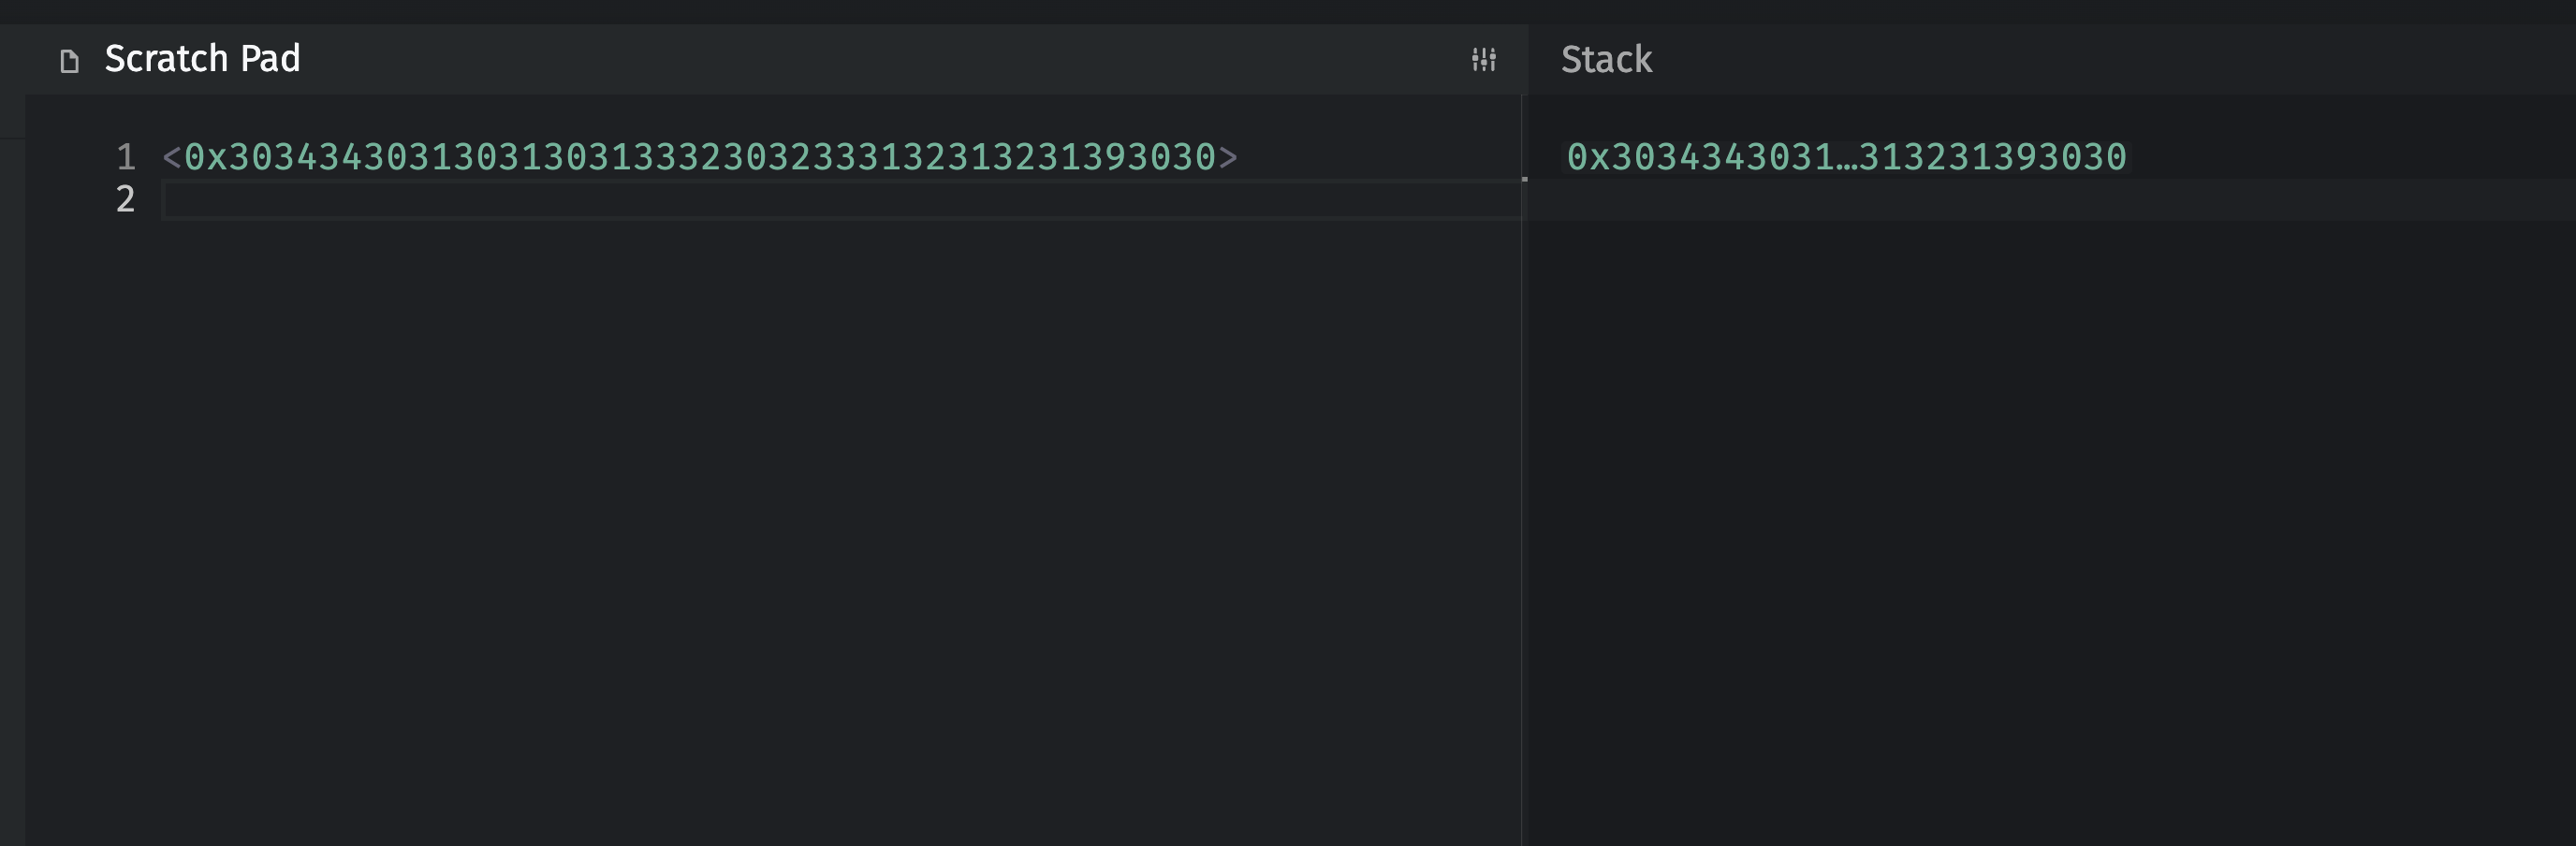
2. Split off the type
We will push a ‘2’ onto the stack and then split the commitment value after 2 bytes. This will split off the type identifier from the commitment and leave it at the top of the stack.
Finally, we will make a copy of the second-to-top stack and push it to the top of the stack.
OP_2
OP_SPLIT
OP_OVER
The state of the stack now is that 0x3034 (the string of ’04’) is at the bottom followed by the rest of the commitment value, followed by 0x3034 at the top of the stack.

3. If it is type 04
We want to see if this NFT is of type 04, so we push that value onto the stack in hex. We next test if the top 2 values on the stack are equal. If so, it will push a ‘1’ to the stack, if not, then a zero.
<0x3034>
OP_EQUAL
OP_IF
4. Get seatLocation
First, we push the the type identifier to the altstack. Then, we push an ‘8’ to the stack and split the remaining fragment of the commitment value after 8 bytes.
This results in a stack where the remaining commitment fragment is at the top (which now only contains the dateTime field), below it is the seatLocation and below that the type identifier.
So we copy the seatLocation hex to the top of the stack and push it to the altstack.
  OP_OVER
  OP_TOALTSTACK
  OP_8
  OP_SPLIT
  OP_OVER
  OP_TOALTSTACK
Here’s how our altstack is looking.
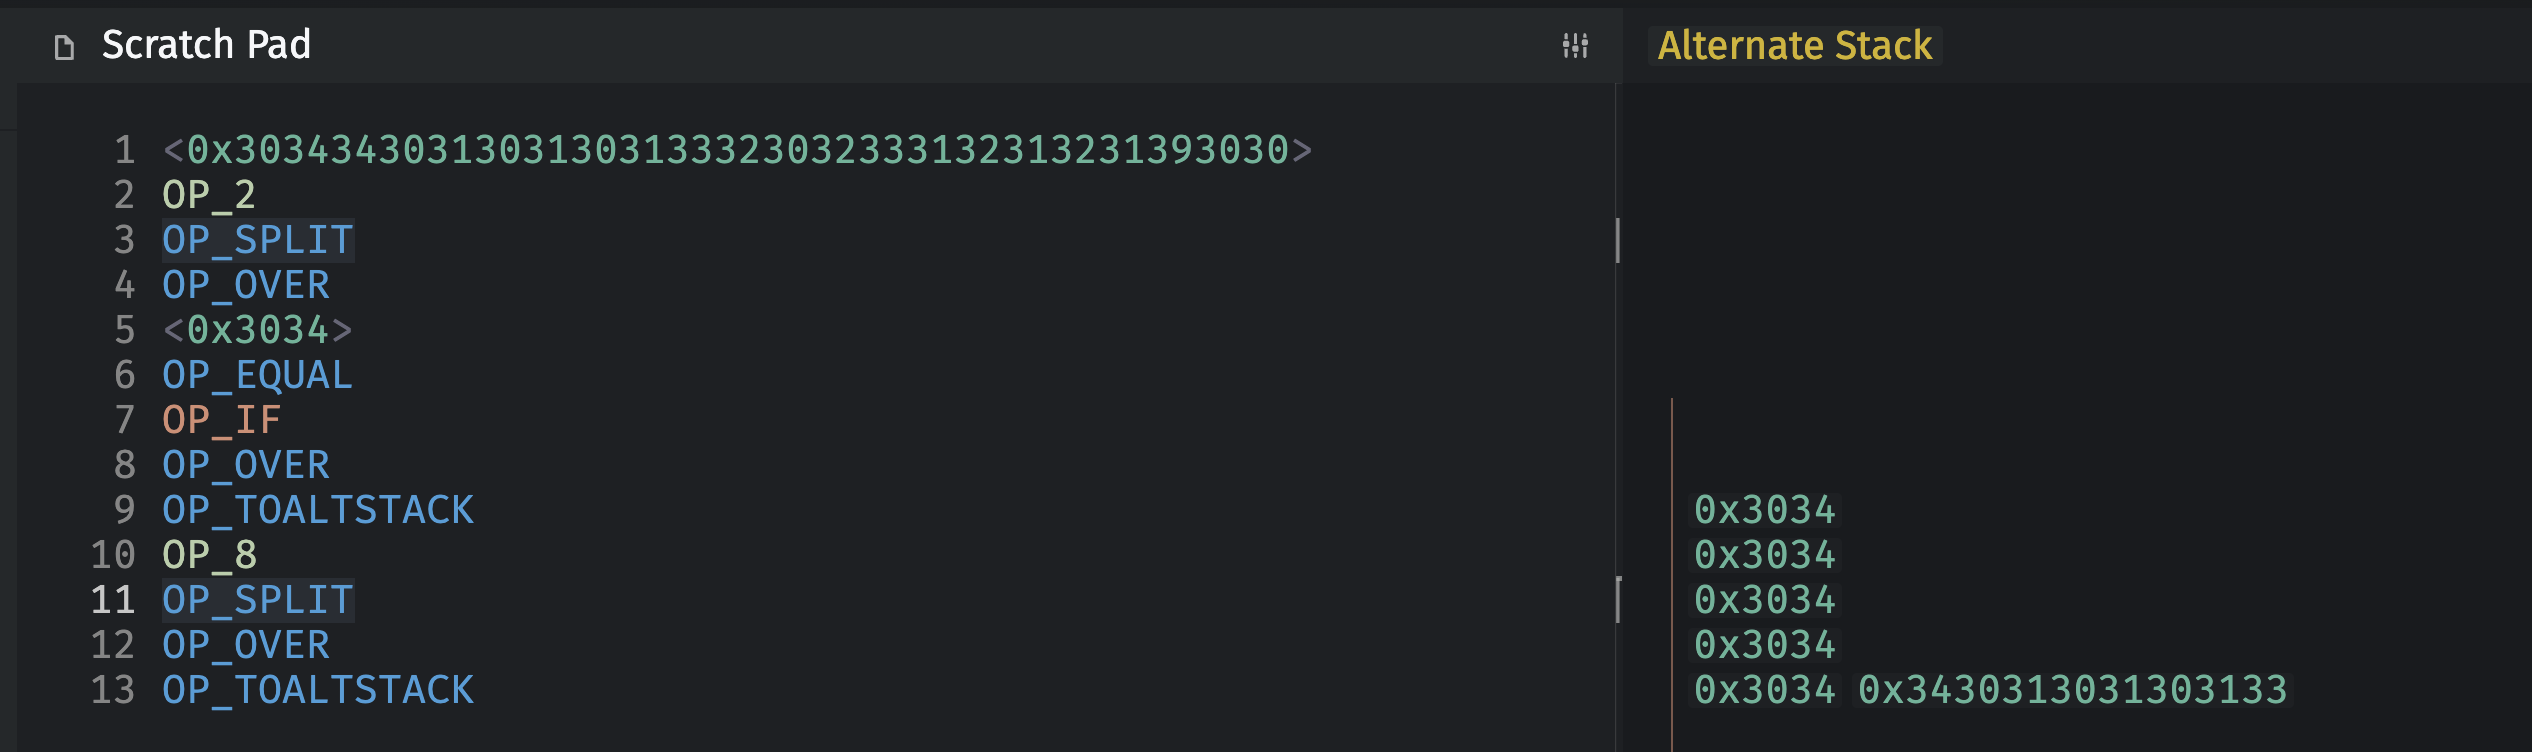
5. dateTime is left
The dateTime value is left on the top of the stack, so we just push it to the altstack.
OP_TOALTSTACKHere is the state of our altstack.
The stack is left with two values that are cleared outside of the if-else-else statement in step 9 below.
6. If it is type 07
If the NFT is type 04, the script will jump to step 9. If it is not type 04, then the script will process this section. It tests if the NFT has identifier 07, and, if so, it pushes the type identifier, the dateTime and the price to the altstack.
OP_ELSE
  OP_OVER
  <0x3037>
  OP_EQUAL
  OP_IF
    OP_OVER
    OP_TOALTSTACK
    OP_12
    OP_SPLIT
    OP_OVER
    OP_TOALTSTACK
    OP_TOALTSTACK
To test this, we can replace the first pushed value with a sample type 07 value, for example:
<0x303732303233313231323139303034333030303030>
Now, the script skips the type 04 section and the type 07 section is active.
At the completion of execution for the type 07 section, we see that on the altstack are the following values.
0x34333030303030
0x323032333132313231393030
0x3037
From bottom to top, that’s the type identifier, the seatLocation, the dateTime and the price.
Translating the values from hex to text:
4300000 // price in satoshis
202312121900 // date and time
07 // type
And here is the altstack as shown in BitAuth IDE.

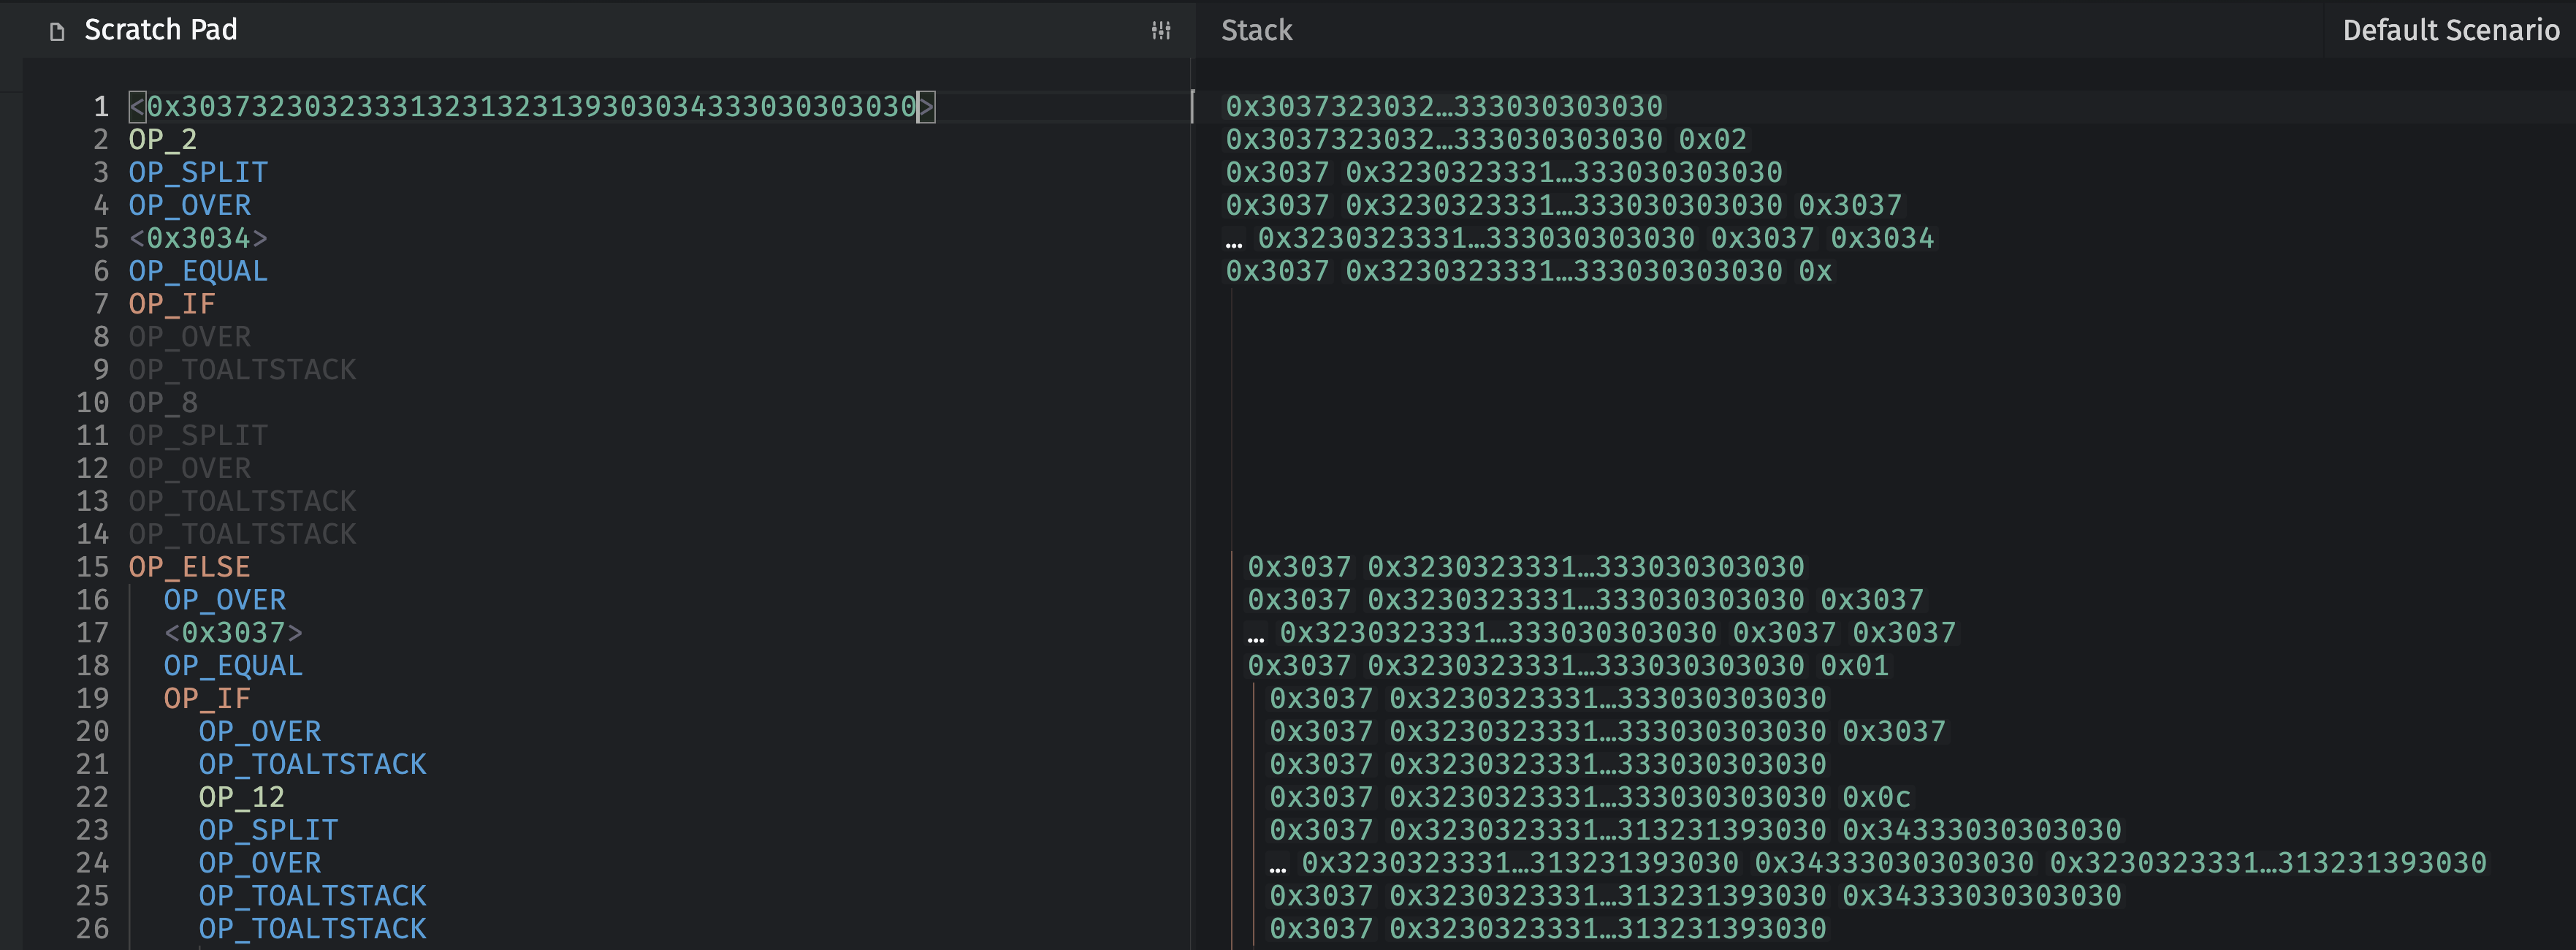
7. If it is any other type
If the NFT ticket is neither type 04 nor type 07, then this (catch-all) section is activated. It applies to all other types.
  OP_ELSE
    OP_OVER
    OP_TOALTSTACK
    OP_8
    OP_SPLIT
    OP_OVER
    OP_TOALTSTACK
    OP_12
    OP_SPLIT
    OP_OVER
    OP_TOALTSTACK
    OP_TOALTSTACK
	OP_DROP
  OP_ENDIF
To test this, we can replace the first pushed value with a sample type 01 value, for example:
<0x30313130313031303131323032333132313231393030313034333030303030>
Now, the script skips the type 04 and 07 sections. The catch-all section is active.

At the completion of execution for the catch-all section, we see that on the altstack are the following values.
0x313034333030303030
0x323032333132313231393030
0x3130313031303131
0x3031
From bottom to top, that’s the type identifier, the dateTime and the price.
Translating the values from hex to text:
104300000 // price in satoshis
202312121900 // dateTime
10101011 // seatLocation
01 // type
And here is the altstack as shown in BitAuth IDE. When the stacks get more than a few items, the app abbreviates the stack.

8. End the if-else
OP_ENDIF9. Clean up the stack
OP_DROP
OP_DROP
The Complete Script
Here is the complete script. You can also find this in the GitHub repo.
OP_0
OP_UTXOTOKENCOMMITMENT
OP_2
OP_SPLIT
OP_OVER // Stack: type, remainder, type
<0x3034>
OP_EQUAL // Compare with '04'
OP_IF
  // Logic for type '04'
  OP_OVER // push type
  OP_TOALTSTACK
  OP_8 // get seatLocation
  OP_SPLIT
  OP_OVER
  OP_TOALTSTACK // altstack: type, seatLocation
  OP_TOALTSTACK // altstack: type, seatLocation, dateTime
OP_ELSE
  OP_OVER
  <0x3037>
  OP_EQUAL // Compare with '07'
  OP_IF
    // Logic for type '07' dateTime, price
    OP_OVER
    OP_TOALTSTACK
    OP_12 // get dateTime
    OP_SPLIT
    OP_OVER
    OP_TOALTSTACK
    OP_TOALTSTACK // altstack: type, dateTime, price
  OP_ELSE
    // Logic for all other types
    OP_OVER
    OP_TOALTSTACK
    OP_8 // get seatLocation
    OP_SPLIT
    OP_OVER
    OP_TOALTSTACK
    OP_12 // get dateTime
    OP_SPLIT
    OP_OVER
    OP_TOALTSTACK
    OP_TOALTSTACK // altstack: type in hex, seatLocation, dateTime, price
    OP_DROP // clear an extra stack item for these types
  OP_ENDIF
OP_ENDIF
OP_DROP
OP_DROP // clear the stack.
In the GitHub repo, there is both a clean/uncommented version of the script as well as this one above.
Convert the Script to Bytecode
To convert the script to bytecode for use in your BCMR, visit documentation.cash and consult the opcode translation table.
For example, OP_0 is 00 and OP_IF is 63.
I created a Python script convert.py that is in the GitHub repo. It does not yet handle all opcodes, but it handles all of the ones I needed for this example. Anyone is free to expand on it — I may do so — or it is even likely a tool already exists for this.
Here the output it gave me.
00cf527f780230348763786b587f786b6b67780230378763786b5c7f786b6b67786b587f786b5c7f786b6b7568687575
Let’s break it down.
| Hex Code | Opcode/Description |
|---|---|
| 00 | OP_0 |
| cf | OP_UTXOTOKENCOMMITMENT |
| 52 | OP_2 |
| 7f | OP_SPLIT |
| 78 | OP_OVER |
| 02 | (signalling will push 2 bytes next) |
| 3034 | (04) |
| 87 | OP_EQUAL |
| 63 | OP_IF |
| 78 | OP_OVER |
| 6b | OP_TOALTSTACK |
| 58 | OP_8 |
| 7f | OP_SPLIT |
| 78 | OP_OVER |
| 6b | OP_TOALTSTACK |
| 6b | OP_TOALTSTACK |
| 67 | OP_ELSE |
| 78 | OP_OVER |
| 02 | (signalling will push 2 bytes next) |
| 3037 | (07) |
| 87 | OP_EQUAL |
| 63 | OP_IF |
| 78 | OP_OVER |
| 6b | OP_TOALTSTACK |
| 5c | OP_12 |
| 7f | OP_SPLIT |
| 78 | OP_OVER |
| 6b | OP_TOALTSTACK |
| 6b | OP_TOALTSTACK |
| 67 | OP_ELSE |
| 78 | OP_OVER |
| 6b | OP_TOALTSTACK |
| 58 | OP_8 |
| 7f | OP_SPLIT |
| 78 | OP_OVER |
| 6b | OP_TOALTSTACK |
| 5c | OP_12 |
| 7f | OP_SPLIT |
| 78 | OP_OVER |
| 6b | OP_TOALTSTACK |
| 6b | OP_TOALTSTACK |
| 75 | OP_DROP |
| 68 | OP_ENDIF |
| 68 | OP_ENDIF |
| 75 | OP_DROP |
| 75 | OP_DROP |
Indeed, the bytecode version matches with the BCH Script version.
Create Minting NFT on Chipnet
As described in tutorial 2 of this series, our first step in creating a new NFT series, is to create a minting NFT.
We can keep things simple by using the Cashonize CreateTokens form, just like in tutorial 2.
- Visit Cashonize.com and decide if you want to experiment on chipnet first or go straight to mainnet. Configure your wallet accordingly.
- Click on the CreateTokens tab when ready.
- It will select and present the pre-genesis transaction hash for you. Be sure to update your BCMR with this.
- Upload your completed BCMR to IPFS. (I recommend nft.storage.)
Here is my filled-out form and BCMR.

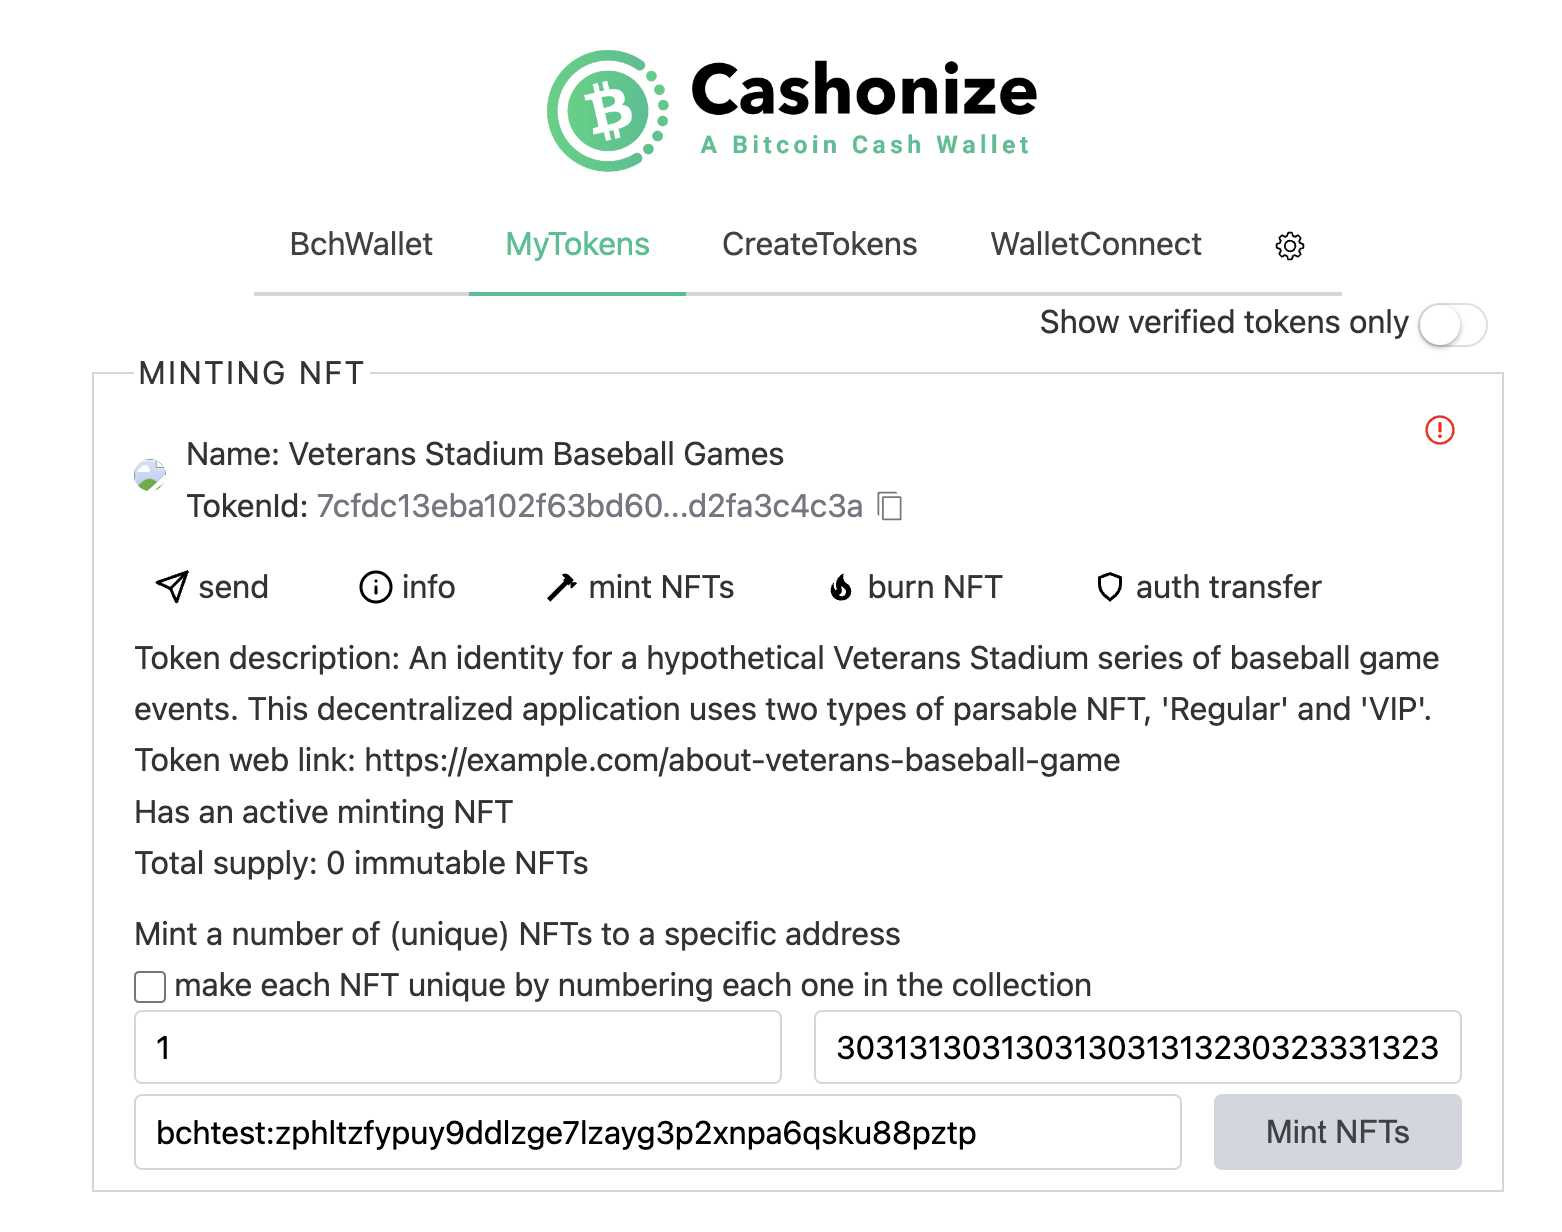
- Once the form completes processing, visit the MyTokens tab to see your new minting NFT!
- Click mintNFTs below it, uncheck the “make each NFT unique” checkbox and fill in the fields.
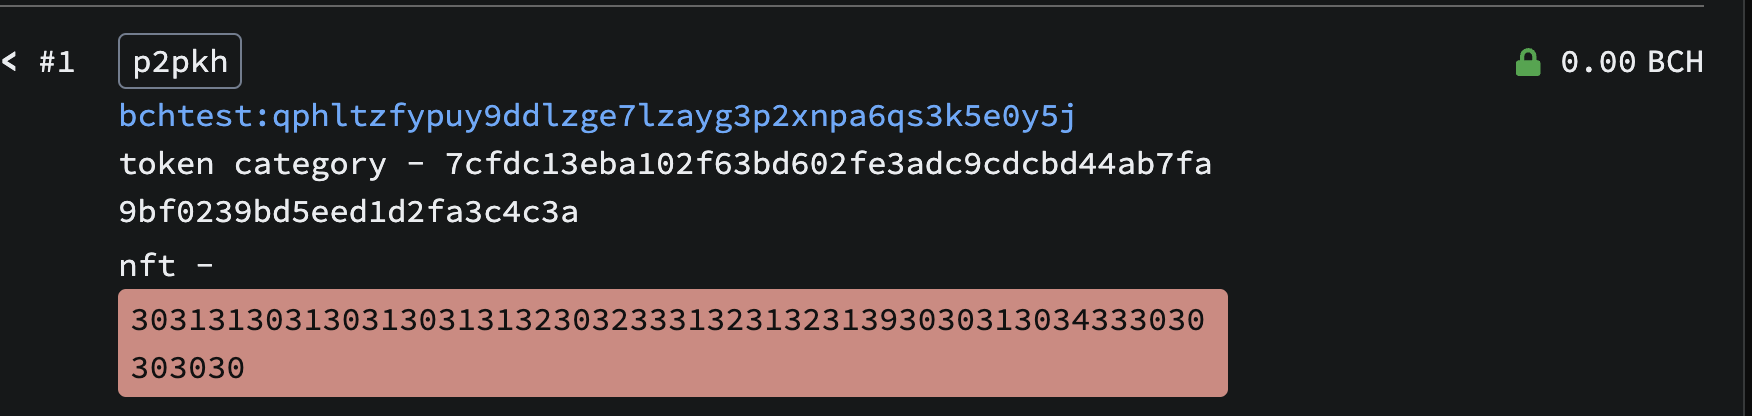
I selected 1 NFT, with commitment 30313130313031303131323032333132313231393030313034333030303030 and for destination address I used the token-aware address on the front page of the Cashonize wallet.
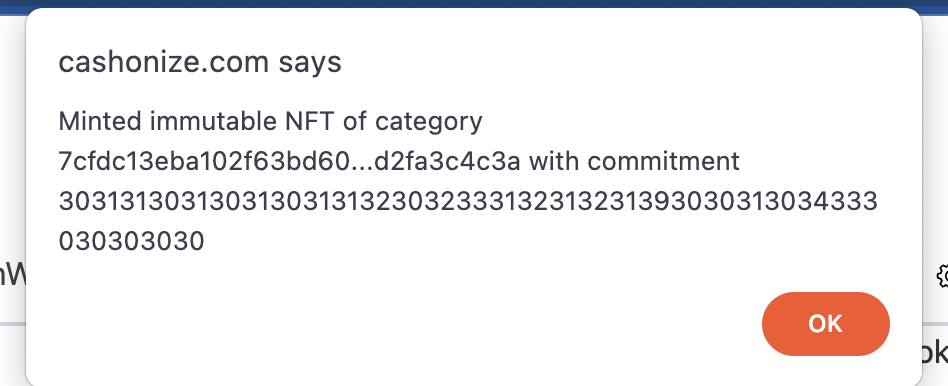
Here is the success message I got:
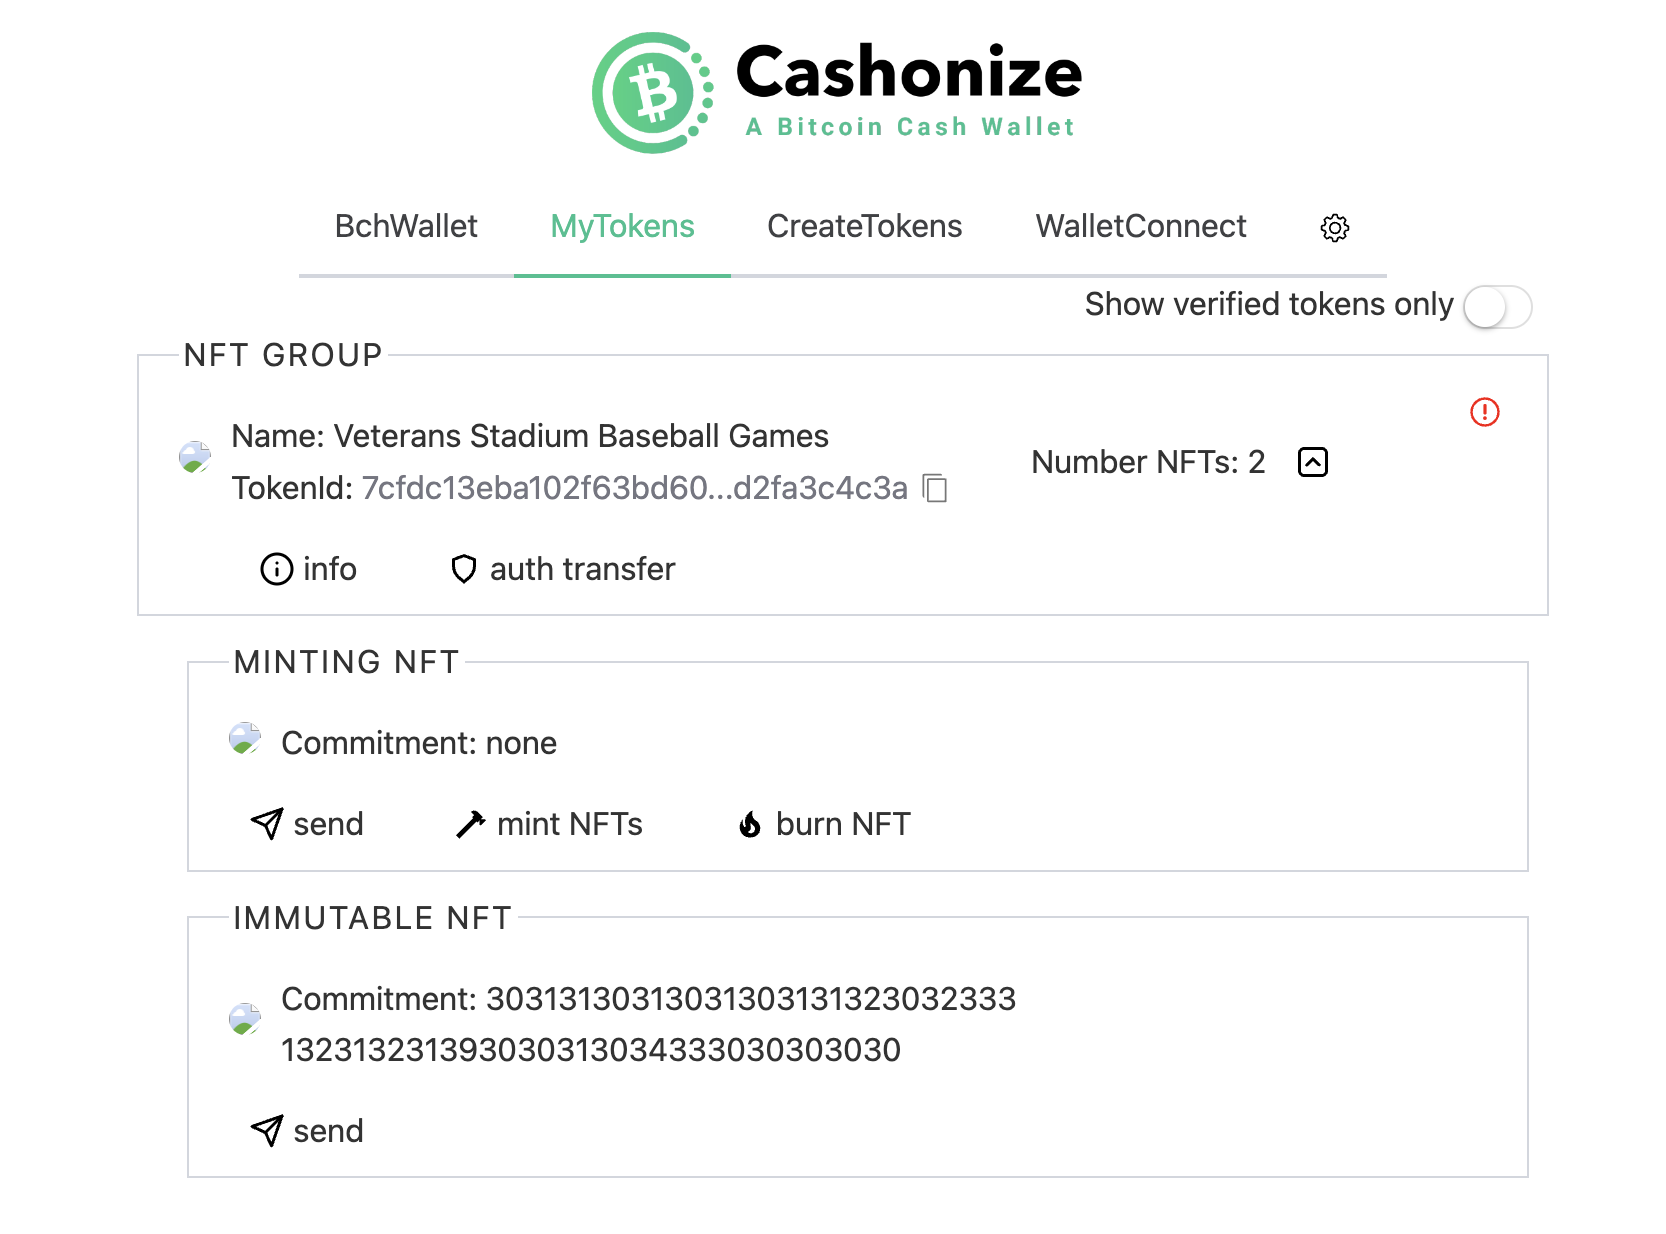
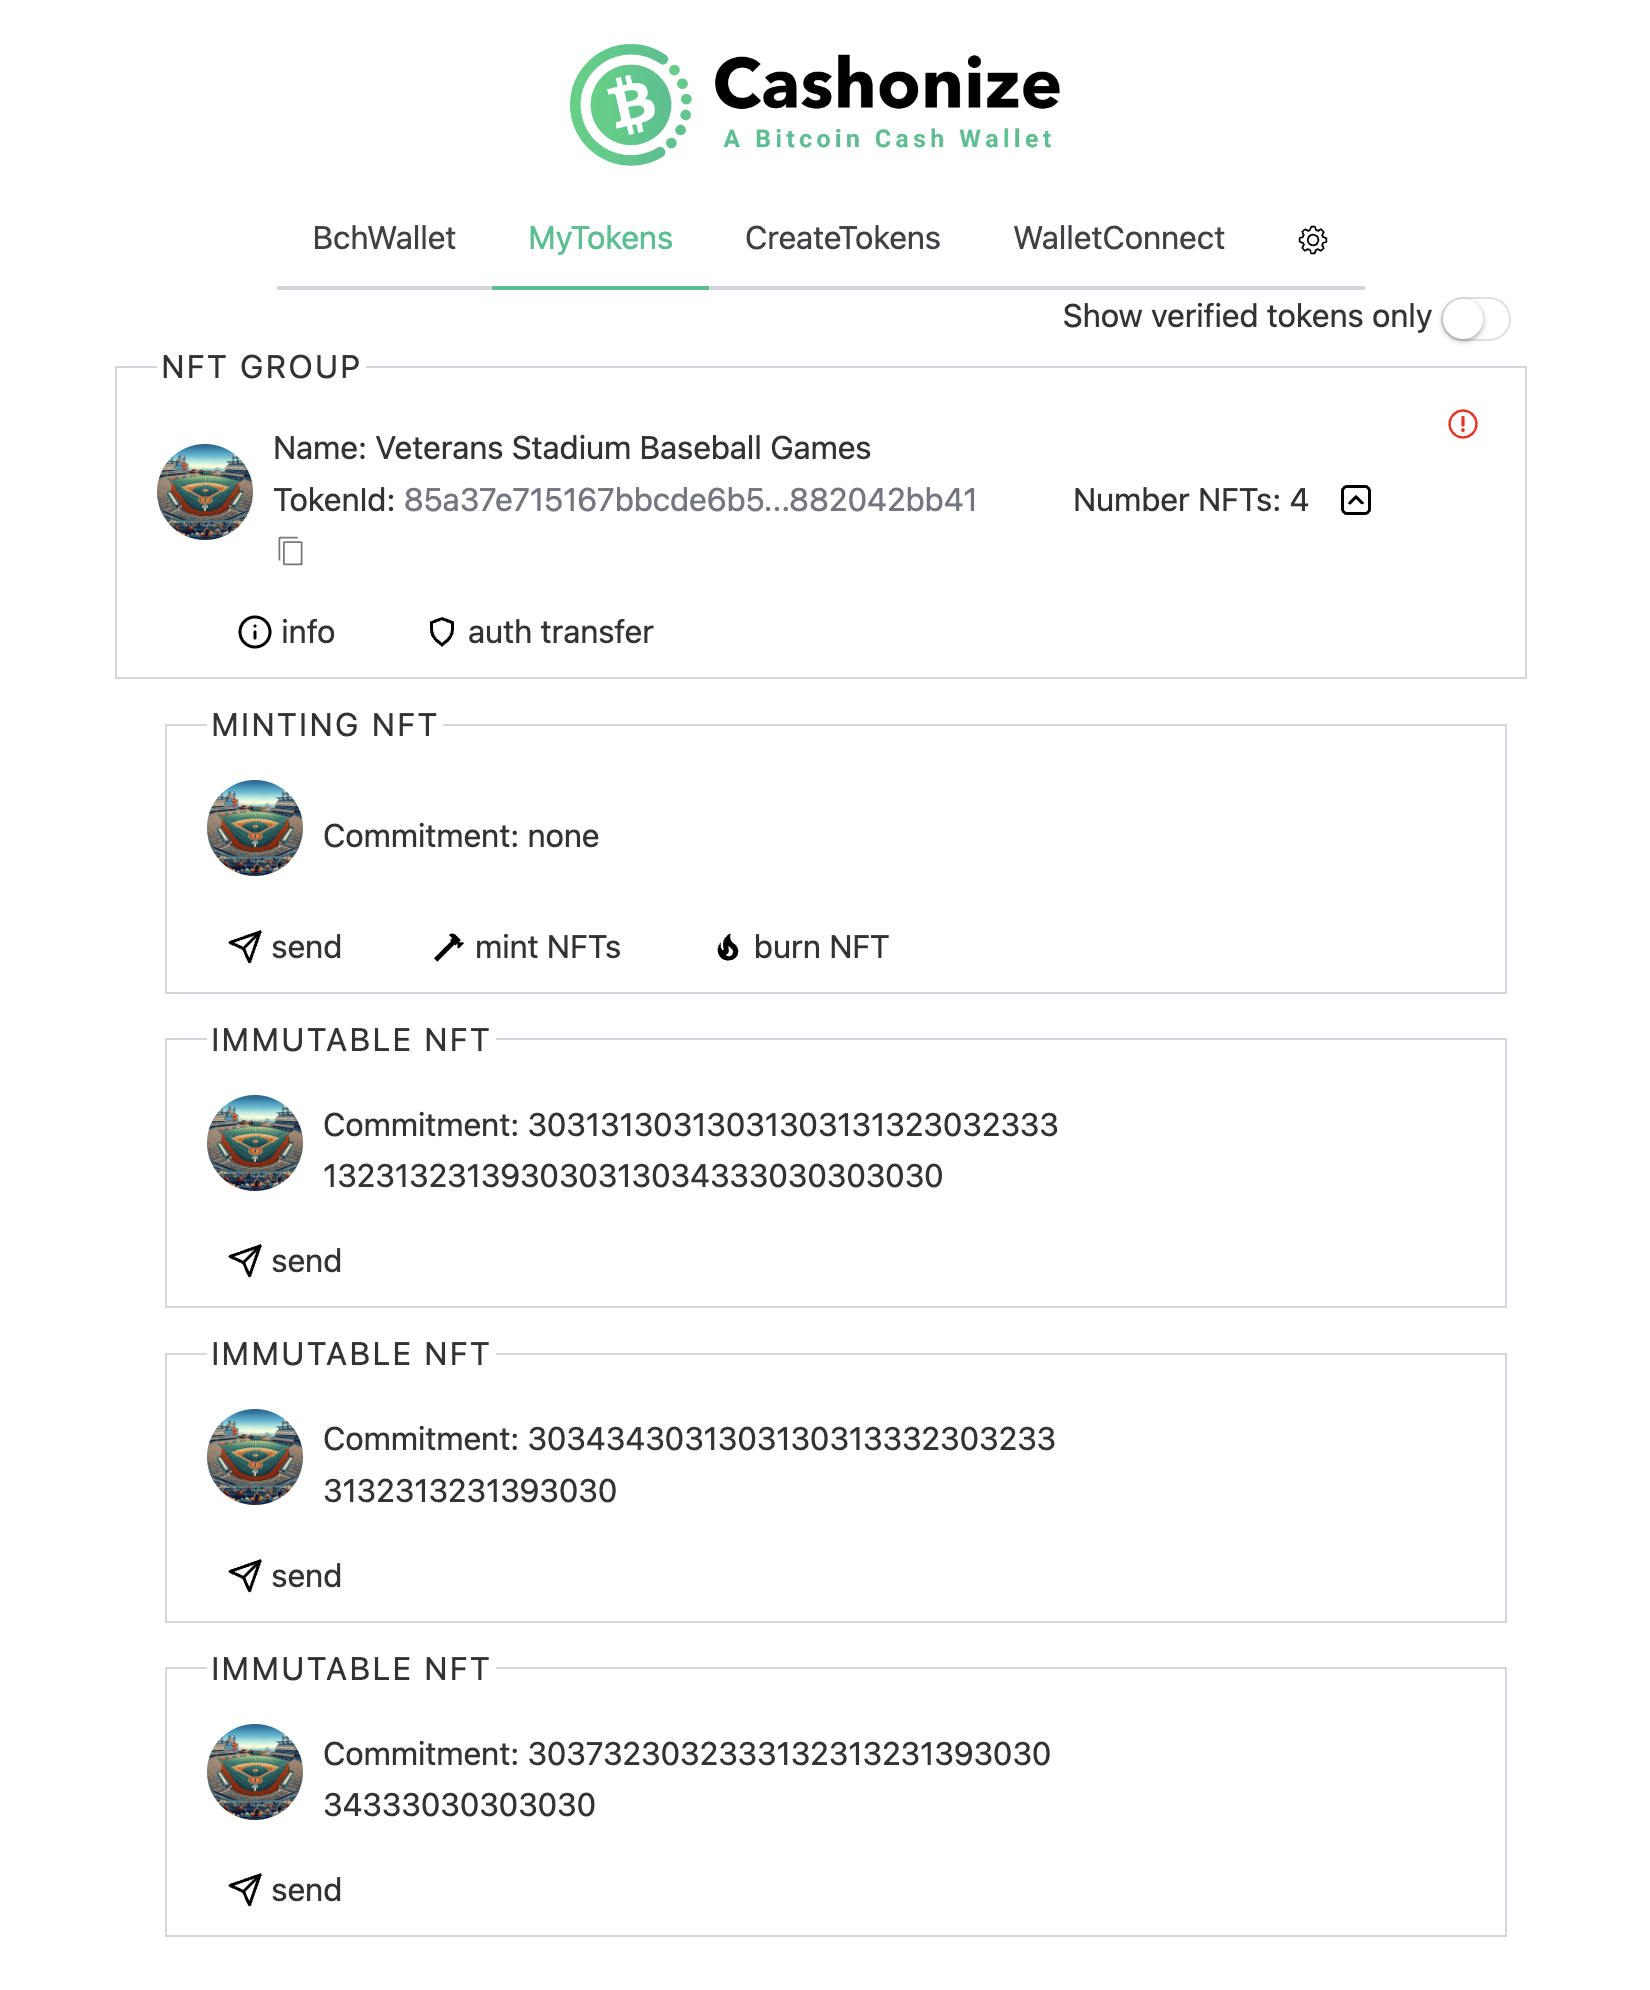
Here is my MyTokens page after minting the first ticket:
Feel free to explore the transaction where I minted the NFT ticket.
Success!
Create Ticket on Mainnet
In Cashonize, you can switch to mainnet and repeat this process.
I updated my BCMR and here is my final ticket.
- Minting NFT transaction.
- Type 07 Immutable NFT transaction.
- Type 04 Immutable NFT transaction.
- Type 01 Immutable NFT transaction.
Because we can chain transactions on BCH (the limit for which was raised 2 years ago), I was actually able to creating the minting NFT and the 3 NFT tickets in the same block.
However, the metadata will not load on Cashonize until the transaction(s) have at least 1 confirmation. You can monitor for new blocks at cash.coin.dance.
As of the time of writing, no wallets have parsing functionality yet, so this is how the NFTs look in Cashonize.
Here is how they look in Electron Cash, before manually importing the metadata, and after.


Here is the Paytaca BCMR indexer output:
{
  "name": "Veterans Stadium Baseball Games",
  "uris": {
    "web": "ipfs://bafkreie3d44v6bhfyqvup6rdeta7iztzvqrpwrbfai4wxqc6k6rtjd5ely/",
    "icon": "ipfs://bafybeicdicjjgkdk4r3kcsjaiuwwomnpf3uwvaksj73yvc3miobt7xfhv4/baseball.png",
    "support": "ipfs://bafkreie3d44v6bhfyqvup6rdeta7iztzvqrpwrbfai4wxqc6k6rtjd5ely/#support"
  },
  "token": {
    "symbol": "VETERANS-BASEBALL",
    "category": "85a37e715167bbcde6b559e1caa383e081ddb2c0b305be867e4fe4882042bb41"
  },
  "description": "An identity for a hypothetical Veterans Stadium series of baseball game events.",
  "is_nft": true
}
Here are some other links you can explore.
Full-Featured Web3 Ticketing Dapp?
If you’re interested in learning how to build this out into a full-fledged Web3 ticketing dapp, let me know via tweet! I can make a tutorial that walks you through it, step by step.
The 40-Byte Commitment Limit
When building your dapps, keep in mind the 40-byte limit for NFT commitment fields.
While Roman UTF-8 characters or decimal numbers take up fewer bytes, characters with variable-length encoding, such as the Kanji “柴犬,”, can use more.
In UTF-8, the size can range from 1 to 4 bytes per character, depending on the character’s complexity. “柴犬” in UTF-8 is likely to take several bytes for each character.
This is where the BCMR comes in quite handy, as it permits you to off-load metadata that need not be on-chain.
TASK: Create your Ticket NFT for 10,000 XRBF
Create your ticket NFT and share what you did in the Panmoni CashTokens channel on Telegram.
The reward for successful completion of the task is 10,000 XRBF.
2. Create a Warrant Canary with BCMR
A warrant canary is a proactive communication to the public that the government has not served the issuing organization or individual in question with a secret subpoena for customer data as of a specific date.
Some subpoenas come with gag rules and/or criminal penalties for disclosing their existence.
So, the idea of a warrant canary is that the organization or individual can proactively announce that there has been no secret subpoena as of yet. They can update this statement on a regular basis. And when/if they receive a secret subpoena, they can remove (or stop updating) the warrant canary, thus implicitly signaling that they have received a subpoena for customer data.
Tech service providers, journalists, media outlets, dissidents, etc. can all make use of a warrant canary. Warrant canaries are an act of deterrence against secret subpoenas and other forms of oppression. They permit people to take action when they are no longer updated, such as moving their accounts or protesting.
Create the Message

The warrant canary message could be as simple as “The FBI has not been here.” Or it could get quite complex. Cloudflare, for example, has multiple warrant canaries.
A good message includes a promise as to how often people should expect it to be updated.
Here is an example JSON warrant canary message for a fictitious VPN company.
{
  "organization": {
    "name": "Red Canary VPN, incorporated",
    "uris": {
      "icon": "ipfs://bafybeicws2uqjbbcie7wvvjrer2fdgimr27xzylmebvdgmt3oeyad2o3zy/redcanarywc.png",
      "web": "https://www.example.com",
      "x": "https://x.com/example",
      "facebook": "https://www.facebook.com/example",
      "linkedin": "https://www.linkedin.com/company/example"
    }
  },
  "statement": "As of the date of this document, Red Canary VPN, incorporated has received no legal orders that we would be prohibited from disclosing, such as national security letters or gag orders.",
  "lastUpdated": "2023-12-29",
  "validUntil": "2024-01-29",
  "signature": {
    "type": "PGP",
    "value": "-----BEGIN PGP SIGNATURE-----\n...\n-----END PGP SIGNATURE-----"
  },
  "additionalInformation": {
    "noEncryptedDataRequests": true,
    "noBackdoorsInstalled": true,
    "noUserInformationDisclosed": true
  },
  "contactInformation": {
    "legalDepartmentEmail": "[email protected]"
  },
  "disclaimer": "This warrant canary is provided for informational purposes only and should not be considered legal advice."
}
Once complete, we upload the file with the message to IPFS.
NFT Commitment
We could create the NFT commitment any number of ways. Here are two.
- Create a short message such as “The FBI has not been here.” and encode it as hex:
5468652046424920686173206E6F74206265656E20686572652E. This one is short enough to fit in the NFTcommitmentfield. - Upload a more detailed JSON (or other) file to IPFS, hash it and put the CID and hash into the
commitment. However, this uses more bytes than what can currently fit into an NFTcommitment!
Even just the CID in hex is 59 bytes — too big. So, for now, let’s put the SHA256 hash and IPFS link into the BCMR, and the SHA256 hash into the commitment field.
Write the BCMR
This is really just another example of a parsable NFT with one type and one field, just like the example we looked at above. So the parse.bytecode is the same.
{
"$schema": "https://cashtokens.org/bcmr-v2.schema.json",
"version": { "major": 0, "minor": 1, "patch": 0 },
"latestRevision": "2023-12-30T00:00:00.000Z",
"registryIdentity": {
"name": "Generic Warrant Canary Dapp Token Registry",
"description": "An example demonstrating how a metadata registry might publish information about a warrant canary dapp.",
"uris": {
"icon": "ipfs://bafybeicws2uqjbbcie7wvvjrer2fdgimr27xzylmebvdgmt3oeyad2o3zy/warrantcanaryservice.png",
"web": "https://example.com/",
"registry": "https://example.com/.well-known/bitcoin-cash-metadata-registry.json"
}
},
"identities": {
"762f5b4007005579cad829954db5d6306c5b598ffc04fb9406aee3668af1a2c9": {
"2023-12-29T00:00:00.000Z": {
"name": "Red Canary VPN, incorporated",
"description": "An identity for a fictitious VPN company that is issuing warrant canaries.",
"token": {
"category": "762f5b4007005579cad829954db5d6306c5b598ffc04fb9406aee3668af1a2c9",
"symbol": "REDCANARY-WC",
"nfts": {
"description": "Warrant canaries issued by the fictitious Red Canary VPN, incorporated.",
"fields": {
"cid-hash": {
"name": "CID Hash",
"description": "The SHA256 hash of the IPFS Content Identifier of the warrant canary statement.",
"encoding": {
"type": "hex"
}
}
},
"parse": {
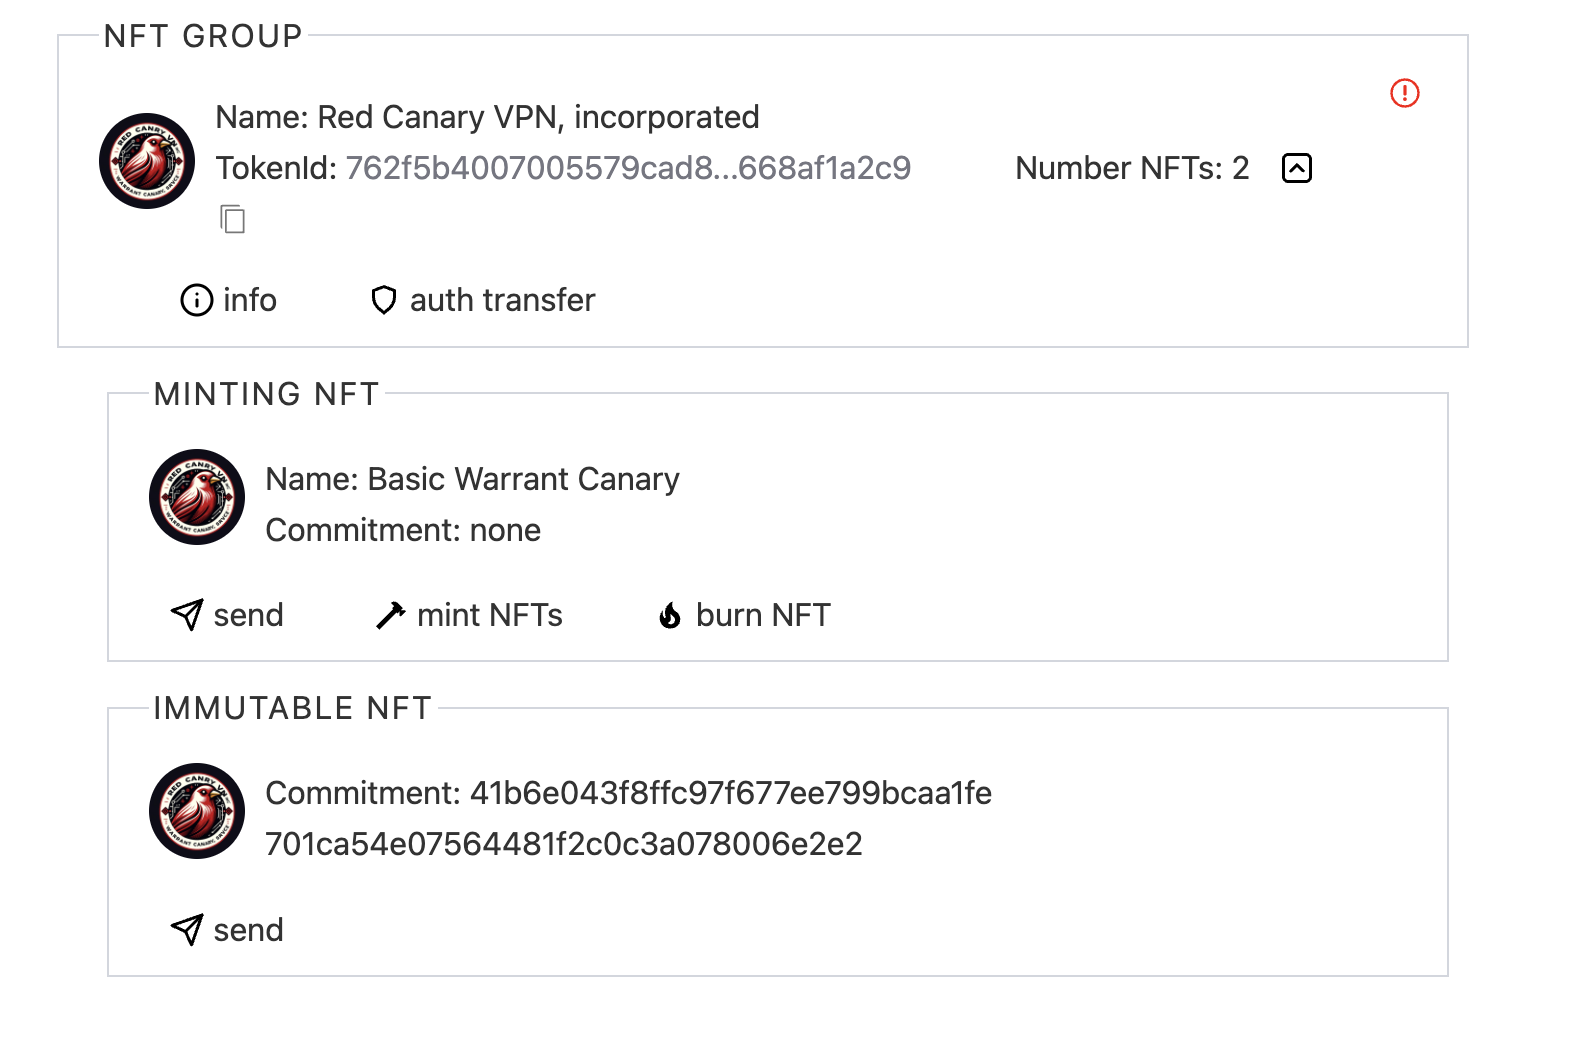
"bytecode": "006b00cf6b",
"types": {
"": {
"name": "Basic Warrant Canary",
"description": "A basic warrant canary for Red Canary VPN, first issued on Dec 30, 2023.",
"fields": ["cid-hash"],
"uris": {
"icon": "ipfs://bafybeicws2uqjbbcie7wvvjrer2fdgimr27xzylmebvdgmt3oeyad2o3zy/redcanarywc.png",
"web": "https://example.com/warrantcanary.html"
},
"extensions": {
"ipfs-url": "ipfs://bafkreicbw3qeh6h7zf7wo7xhtg6kuh7hahffjydvmreb6lamhidyabxc4i",
"cid-hash": "41B6E043F8FFC97F677EE799BCAA1FE701CA54E07564481F2C0C3A078006E2E2"
}
}
}
}
}
},
"uris": {
"icon": "ipfs://bafybeicws2uqjbbcie7wvvjrer2fdgimr27xzylmebvdgmt3oeyad2o3zy/redcanarywc.png",
"web": "https://example.com/warrantcanary.html",
"support": "https://example.com/support.html"
}
}
}
},
"license": "CC0-1.0"
}Create the NFT
Here is the minting NFT transaction.
Here is the transaction where the immutable NFT was created.
Here is what the NFTs look like in the Cashonize wallet, shortly after the first confirmation.
Regular Updates
Warrant canaries only work if they are regularly updated such that the public could notice that updates have stopped. No more updates, after all, means that the warrant canary is no longer valid!
One update strategy would be to omit the validUntil property from the warrant canary JSON, and just keep updating the authhead (with the authUpdate.js script) on a regular basis. Clients could simply see when the authhead was last updated to see the last update date for the warrant canary, and thus make a judgment about its continued validity.
Alternatively, perhaps a new immutable NFT could be created with a new hash together with the authhead, and the BCMR updated correspondingly.
For an organization, such as Cloudflare, that has multiple warrant canaries, I expect each one would be a new type within its single corporate BCMR identity.
Luckily, BCH transactions are costing about 1/10th of a cent, so if an entity with one warrant canary updated it monthly, it would cost roughly 1.2 cents of a USD, or USD$0.012, per year. This is negligible.
The issue of warrant canary design and update still requires thought and feedback. However, hopefully it has helped you develop your parsable NFT mental model.
Full-Featured Web3 Warrant Canary Dapp?
If you’re interested in learning how to build this out into a full-fledged Web3 warrant canary dapp, let me know via tweet! I can make a tutorial that walks you through it, step by step.
TASK: Submit your Warrant Canary for 15,000 XRBF
Create any parsable NFT warrant canary and share your work in the Panmoni CashTokens channel on Telegram.
The reward for successful completion of the task is 15,000 XRBF.
Conclusion
We started this tutorial with a basic understanding of what parsable NFTs are and their distinction from sequential NFTs, then gradually unpacked the deeper functionalities that make them such a powerful tool on the Bitcoin Cash blockchain.
Through hands-on projects, we explored how to design and create NFT tickets for a hypothetical event at Veterans Stadium, addressing real-world considerations like seating, pricing, and event dates. This exercise not only illustrated the practical utility of parsable NFTs but also demonstrated their potential in offering secure, transparent, and efficient solutions for ticketing systems.
The warrant canary project further highlighted how parsable NFTs can be used for more than just asset representation. By creating a proactive communication system, we showcased an innovative approach to maintaining transparency and trust in digital services, an application that’s especially relevant in our increasingly digital world.
As we conclude this tutorial, it’s evident that CashTokens parsable NFTs open up a realm of possibilities for developers, artists, and innovators. Whether it’s creating tamper-proof tickets, establishing trust with warrant canaries, or exploring new applications, the power of these NFTs lies in their flexibility and scalability.
Remember, the examples provided are just the tip of the iceberg. The true potential of parsable NFTs on the Bitcoin Cash blockchain is limited only by your creativity and understanding of this technology. So, keep experimenting, keep learning, and most importantly, keep building. The future of blockchain applications is bright, and with tools like CashTokens, you’re well-equipped to be a part of this exciting journey.
Next Steps for Builders and Enthusiasts
Now that you’re equipped with this knowledge, the next steps are all about application and experimentation:
-
Do the Tasks: Complete the tasks mentioned in this tutorial to earn up to 25,000 XRBF. You can also earn more than 13,000 XRBF from previous tutorials.
-
Experiment with Parsable NFTs: Start creating your own parsable NFTs. Experiment with different metadata structures, bytecodes and use cases. What other applications can benefit from the unique properties of parsable NFTs?
-
Dive Deeper into BCH Script: Understanding the scripting language can open new doors for creating complex and interactive NFTs.
-
Engage with the Community: Join CashToken Devs, participate in discussions, and collaborate on projects. Your contributions can make a significant impact.
-
Stay Informed: Keep up with the latest developments in the BCH ecosystem. New tools, features, and improvements are continually emerging. Follow @BitcoinCashSite and/or subscribe to r/BCHCashTokens.
Support the Tutorial Series
Want more tutorials? I accept donations to fund this critical work of educating new BCH builders about how to build permissionless, unstoppable dapps with CashTokens on Bitcoin Cash. You can also sponsor my work and get benefits in return.
bitcoincash:qz3pxmwda8gd42wa8k9yfxcwhcaapeuhygjc8mc4m8
Thank You
Thank you to Mathieu Geukens and BitcoinCashAutist who provided helpful pointers in the CashToken Devs Telegram group.
Thank you to toorik, anonymous, William Patrick, S0me_N0b0dy and na for their support of the flipstarter that makes this “Token Pioneers” tutorial series possible. Please visit BitcoinCashSite.com/about to see the complete list of 55+ community members who have funded my work since 2019.
Additional Builder Resources
- A decent intro to Bitcoin Script: https://komodoplatform.com/en/academy/bitcoin-script/
- Why the full transaction context is included for the BCMR parse.bytecode: https://t.me/cashtoken_devs/5864
- Discussion around including the full transaction context. https://github.com/bitjson/chip-bcmr/pull/7
- BitAuth IDE: Write and Debug Custom Bitcoin Scripts
- How to Write Custom Bitcoin Scripts in Bitauth IDE
- Free mentoring: https://twitter.com/GeorgeDonnelly/status/1740093415268749563
You can find a complete listing of CashTokens resources at BitcoinCashSite.com/cashtokens.