· tutorial · 31 min read
Mint your First NFTs on Bitcoin Cash (Token Pioneers Tutorial 2)
Learn how to mint your first NFTs with CashTokens on Bitcoin Cash.
Table of Contents
- How NFTs Work On-Chain
- NFT Metadata
- Mint Your First Non-Fungible CashToken (NFT)!
- Next
- Support the “Token Pioneers” Tutorial Series
- Your Feedback Matters
NFTs on BCH are, quite simply, AMAZING. They’re so much more than just cute jpegs!
Here’s what BCH CashTokens NFTs can do:
- Be your regular old grandpa’s NFTs and represent a file on-chain, showing you have an irrevocable claim to ownership of that file, just like the Bored Apes and all that other fun NFT collecting and trading.
- Act as irrevocable on-chain bits of text (“strings” in programmer talk; i.e., a sequence of characters). We call these commitments.
- Build decentralized applications (dapps) that benefit from BCH blockchain security! Including dapps that call other dapps, coordinate with each other and coordinate with sidechains! This is a big deal!
BCH NFTs are also simple to mint and don’t require complex bridging or side-chaining, like on other chains. When using CashTokens, you are creating NFTs on the BCH L1. They are miner-validated, which means they exist on-chain at the same level as BCH itself, with the same security and irrevocability benefits.
Let’s not forget that CashTokens NFTs are very inexpensive to mint and trade because they exist on BCH, a major blockchain with sub-cent fees! This makes it easier to build with your NFTs and grow.
Use Cases
Here are just a few of the things you can build with BCH NFTs:
- NFT games
- NFT marketplaces
- NFT ticketing apps
- NFT collectibles platforms
- virtual real estate
- content subscription models
- domain name systems
- decentralized identity solutions
- loyalty and rewards programs
- asset licensing, e.g. for music
- direct sales of music and films.
Build with Us
The BCH CashTokens builders’ community is growing fast! Feel free to join either, or both, of these Telegram groups to get support and talk with other builders:
To get an intro to BCH CashTokens in general as well as fungible CashTokens, see Tutorial 1 in the Token Pioneers series.
How NFTs Work On-Chain
As mentioned in Tutorial 1 of this series, the May 2023 BCH CashTokens upgrade added a new field to UTXOs called token_data. This field has multiple subfields. FTs (fungible tokens) only use the amount and category fields.
NFTs (non-fungible tokens) use category, just like fungible tokens, and the two nft fields:
capability: If the value isminting, it permits the holder to create more NFTs of the samecategoryand with anycommitment. These new NFTs can havemintingormutablecapability. If the value ismutable, it permits thecommitmentfield to be changed when spending the NFT to a new UTXO. If the capability isnone, then the NFT can be spent (i.e., moved to another UTXO), but thecommitmentcan not be changed and it can not be used to mint new NFTs. NFTs with thenonecapabilityare often shown as “Immutable” in wallets and block explorers.commitment: The NFT message that can be up to 40 bytes.
NFTs do not use the amount field, as there can only be 1 NFT per UTXO. In this way, the amount of NFTs on a UTXO is implied. If there is data for the nft fields, then there is 1 NFT. If not, then there are 0 NFTs on that UTXO, and the nft fields will be omitted.
NFTs and FTs can share the same category. Unlike FTs, NFTs can not be merged or divided. However, it is likely possible to fractionalize an NFT by holding it in a contract and issuing fungible tokens against it.
My BCH Guru (A Sample NFT)
Here’s my BCH Guru #2447, a good-looking ninja training in the wilderness who knows which asset to hold!

It was minted in this transaction, which I found because the BCH Guru website gave me the transaction ID:
a972fcfd7b79fca0c7fe69f81aee0ceab5157cc327d5bd5e7fafb4a4273750b9
Here is what the transaction looks like on the SalemKode explorer.
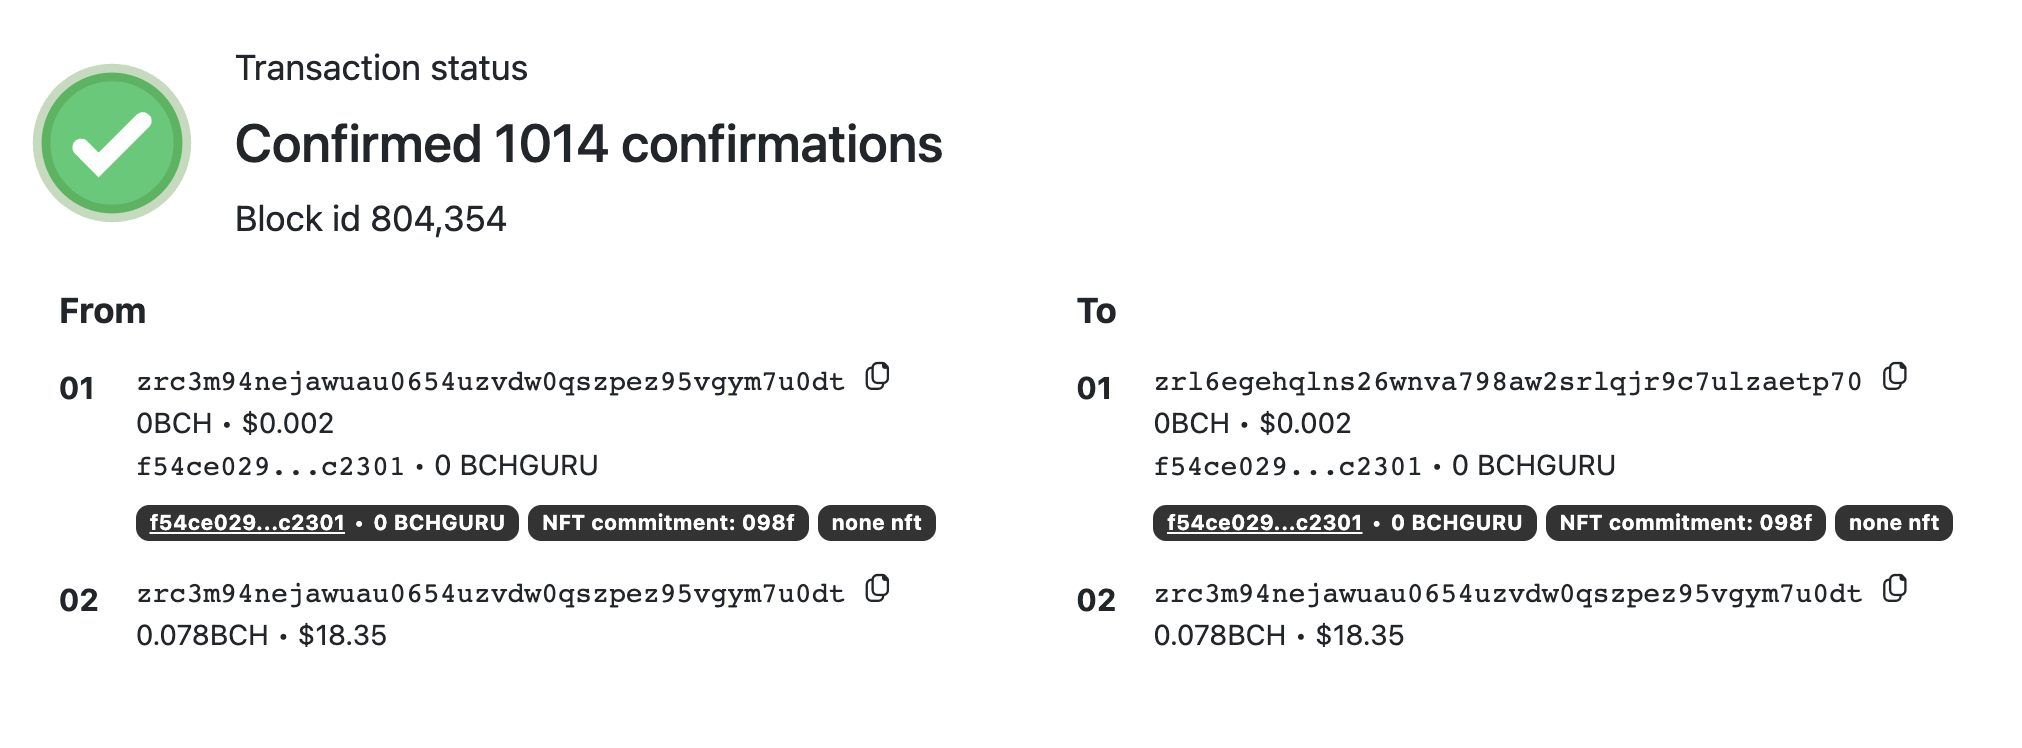
On both the from (input) and to (output) sides of the transaction, you can see that it shows the category of the non-fungible token, the commitment (quite small!) and the capability (none).
And here is what that minting transaction looks like on-chain. (Tutorial 1 shows you how to get the raw transaction in JSON format for any transaction.)
{
    "txid": "a972fcfd7b79fca0c7fe69f81aee0ceab5157cc327d5bd5e7fafb4a4273750b9",
    "hash": "a972fcfd7b79fca0c7fe69f81aee0ceab5157cc327d5bd5e7fafb4a4273750b9",
    "version": 2,
    "size": 397,
    "locktime": 0,
    "vin": [
        {
            "txid": "03e0a28decfc08fc136449397526960d65c5a3cdd8dc9236b202d49146d5b77b",
            "vout": 447,
            "scriptSig": {
                "asm": "114266f9531557d8f090c78a74fdb5884dd2e908ddb4aeefd802bab9362adbf859904a2ea508a9ba14332125be0aa120ca48760e69f1055870c80abd20bfb921[ALL|FORKID] 031cd9371f9f7c8b5d1a2b2b75663f85621efc82fe32eed6b869b9dd4234ebdc2f",
                "hex": "41114266f9531557d8f090c78a74fdb5884dd2e908ddb4aeefd802bab9362adbf859904a2ea508a9ba14332125be0aa120ca48760e69f1055870c80abd20bfb9214121031cd9371f9f7c8b5d1a2b2b75663f85621efc82fe32eed6b869b9dd4234ebdc2f"
            },
            "sequence": 0
        },
        {
            "txid": "411cbe00cafb6438e7716e304c03b0ed0ec570d8cefdf355c8437efa6da78a5a",
            "vout": 1,
            "scriptSig": {
                "asm": "6e2e4eaff06aac33f8087c6767d40d4e9da74f9642a989a5ff5d332651b213406d664aba1fb5ff107c9890e9be96dc2c781c6fc5d0cc92cc9ede0262c38a933f[ALL|FORKID] 031cd9371f9f7c8b5d1a2b2b75663f85621efc82fe32eed6b869b9dd4234ebdc2f",
                "hex": "416e2e4eaff06aac33f8087c6767d40d4e9da74f9642a989a5ff5d332651b213406d664aba1fb5ff107c9890e9be96dc2c781c6fc5d0cc92cc9ede0262c38a933f4121031cd9371f9f7c8b5d1a2b2b75663f85621efc82fe32eed6b869b9dd4234ebdc2f"
            },
            "sequence": 0
        }
    ],
    "vout": [
        {
            "value": 0.00001,
            "n": 0,
            "scriptPubKey": {
                "asm": "OP_DUP OP_HASH160 ffaca33707e70569d3677c53f5ca80fe090cb8f7 OP_EQUALVERIFY OP_CHECKSIG",
                "hex": "76a914ffaca33707e70569d3677c53f5ca80fe090cb8f788ac",
                "reqSigs": 1,
                "type": "pubkeyhash",
                "addresses": [
                    "bitcoincash:qrl6egehqlns26wnva798aw2srlqjr9c7ucgw898pu"
                ]
            },
            "tokenData": {
                "category": "f54ce0297a4017cc922aacde5f7abe7a8397a1058b879f5eb9e2a643d4ec2301",
                "amount": "0",
                "nft": {
                    "capability": "none",
                    "commitment": "098f"
                }
            }
        },
        {
            "value": 0.07790415,
            "n": 1,
            "scriptPubKey": {
                "asm": "OP_DUP OP_HASH160 f11d96b3ccbaee778fd52bc131ae782020e445a3 OP_EQUALVERIFY OP_CHECKSIG",
                "hex": "76a914f11d96b3ccbaee778fd52bc131ae782020e445a388ac",
                "reqSigs": 1,
                "type": "pubkeyhash",
                "addresses": [
                    "bitcoincash:qrc3m94nejawuau0654uzvdw0qszpez95v0wgqjfjc"
                ]
            }
        }
    ]
}
Here is the actual NFT on output 0 of the transaction:
{
            "value": 0.00001,
            "n": 0,
            "scriptPubKey": {
                "asm": "OP_DUP OP_HASH160 ffaca33707e70569d3677c53f5ca80fe090cb8f7 OP_EQUALVERIFY OP_CHECKSIG",
                "hex": "76a914ffaca33707e70569d3677c53f5ca80fe090cb8f788ac",
                "reqSigs": 1,
                "type": "pubkeyhash",
                "addresses": [
                    "bitcoincash:qrl6egehqlns26wnva798aw2srlqjr9c7ucgw898pu"
                ]
            },
            "tokenData": {
                "category": "f54ce0297a4017cc922aacde5f7abe7a8397a1058b879f5eb9e2a643d4ec2301",
                "amount": "0",
                "nft": {
                    "capability": "none",
                    "commitment": "098f"
                }
            }
        },
Under tokenData, you can see the BCH Guru category:
f54ce0297a4017cc922aacde5f7abe7a8397a1058b879f5eb9e2a643d4ec2301
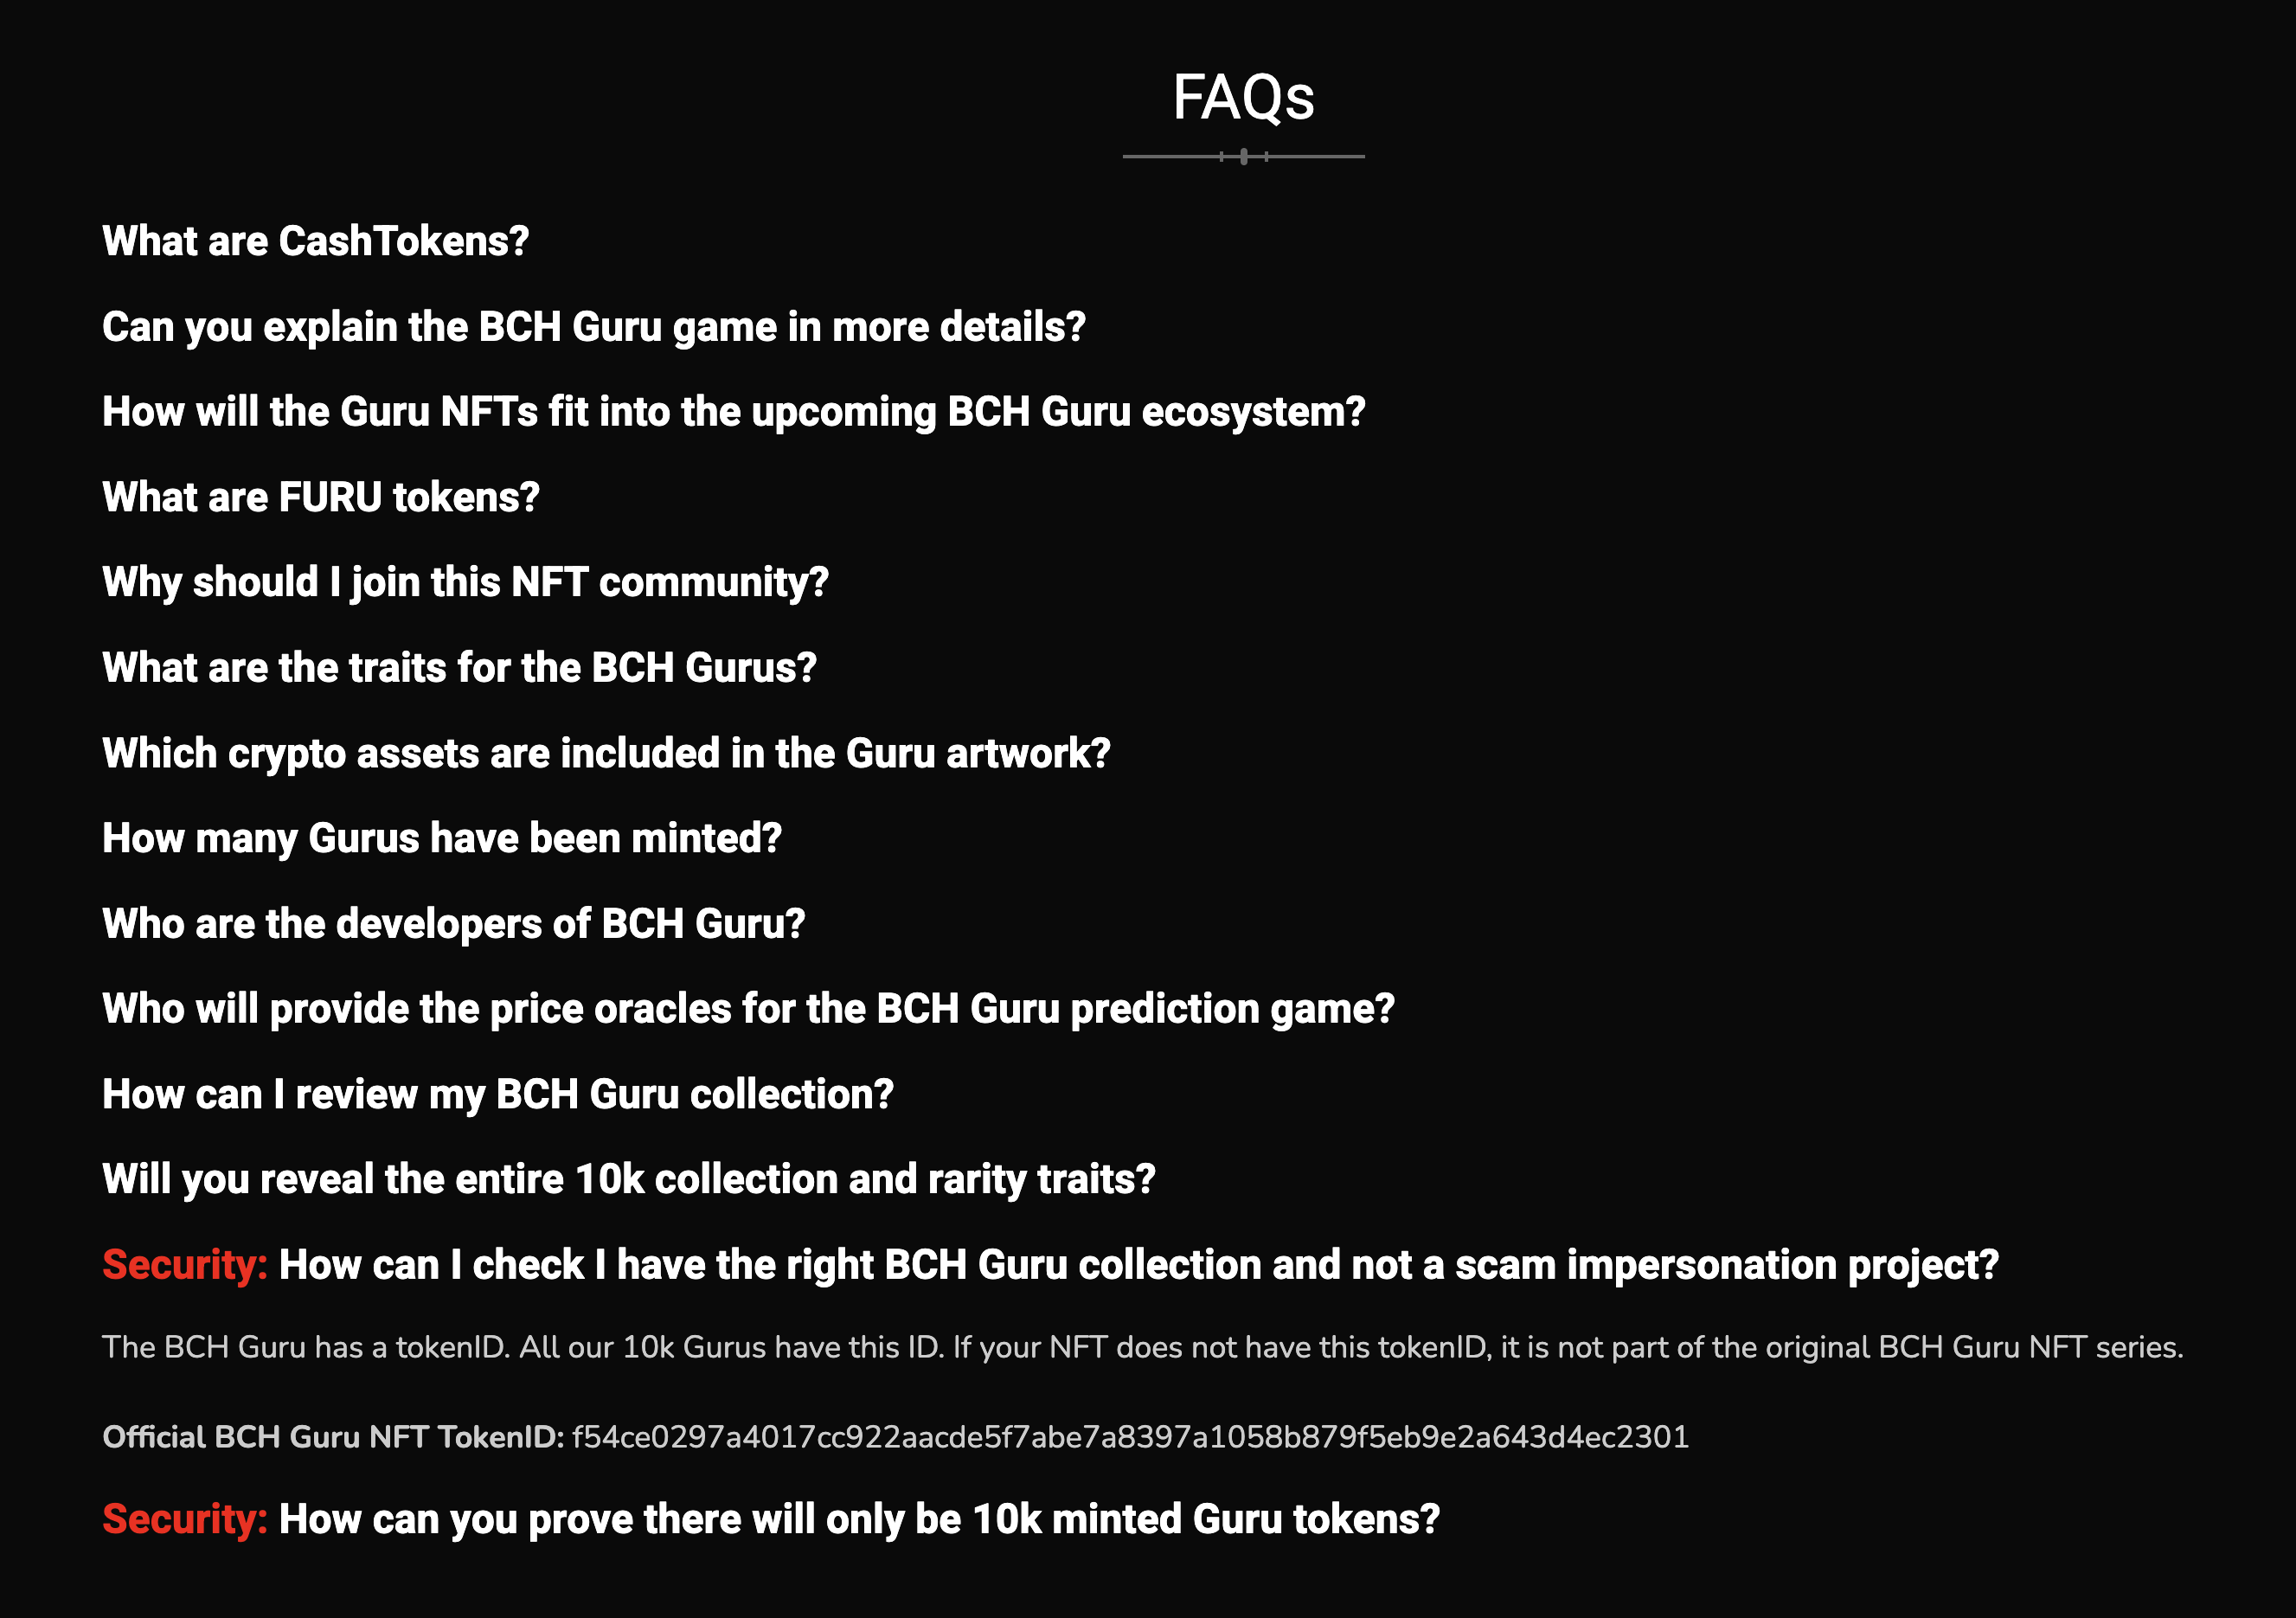
You can verify that this is the correct category value by visiting nfts.bch.guru and reading the FAQs. Do a search on the page for the category you are buying and see if it matches.
When buying CashTokens, always attempt to verify that you are buying the right
category. As a reminder from Tutorial 1, it’s important to note that token names, tickers, descriptions, etc. — i.e., everything about the branding — is not stored on-chain. It is stored in metadata files off-chain. We’ll learn more about metadata soon.
The amount on my BCH Guru NFT is zero because the NFT count is implicit, as mentioned above. The capability is none, which means I can’t change my NFT’s commitment nor can I mint more of the same category. And the commitment is “098f”. The hexadecimal notation for 2447 is 098f.
Yes, it’s that straightforward! And yes, you, too, can mint your own NFTs. I’ll teach you how below.
Tracking Down the authhead
Speaking of metadata, let’s track down the BCMR metadata for my BCH Guru # 2447 NFT. We can do this a couple different ways.
I could visit otr.cash, or another BCMR registry (server), and see if it has the metadata for BCH Gurus. However, otr.cash only has data for Gurus up until number 2000.
So, mine’s not there.
Using the Paytaca BCMR Indexer
Fortunately, Paytaca is building a BCMR indexer, so we can query them. We can find the authhead via their API, like this:
https://bcmr.paytaca.com/api/authchain/CATEGORY/head/
I want the authhead for BCH Gurus, so I will visit this link in my browser:
Side note: The
authheadis part of the BCMR (Bitcoin Cash Metadata Registries) specification. In the simplest terms, theauthheadof a givencategoryis the latest update to its metadata — kind of analogous to how the “chain tip” is the most recently created block on a a blockchain. We’ll have more on metadata in a future tutorial, so don’t worry!
Paytaca’s BCMR indexer API gave me this result:
{"authchain_head": {"txid": "6472de227a3d71fc8b2f18e4507a858f8b0cfd56f1b4ec2bede9f367e84b8572", "owner": "bitcoincash:qz8mrhv7ahv3w5fvuatv2s289j652650rcaytjezke"}}Grab the value for txid here, which is:
6472de227a3d71fc8b2f18e4507a858f8b0cfd56f1b4ec2bede9f367e84b8572
And drop it into your favorite BCH block explorer, for example SalemKode or Blockchair.
Here is the transaction on SalemKode:
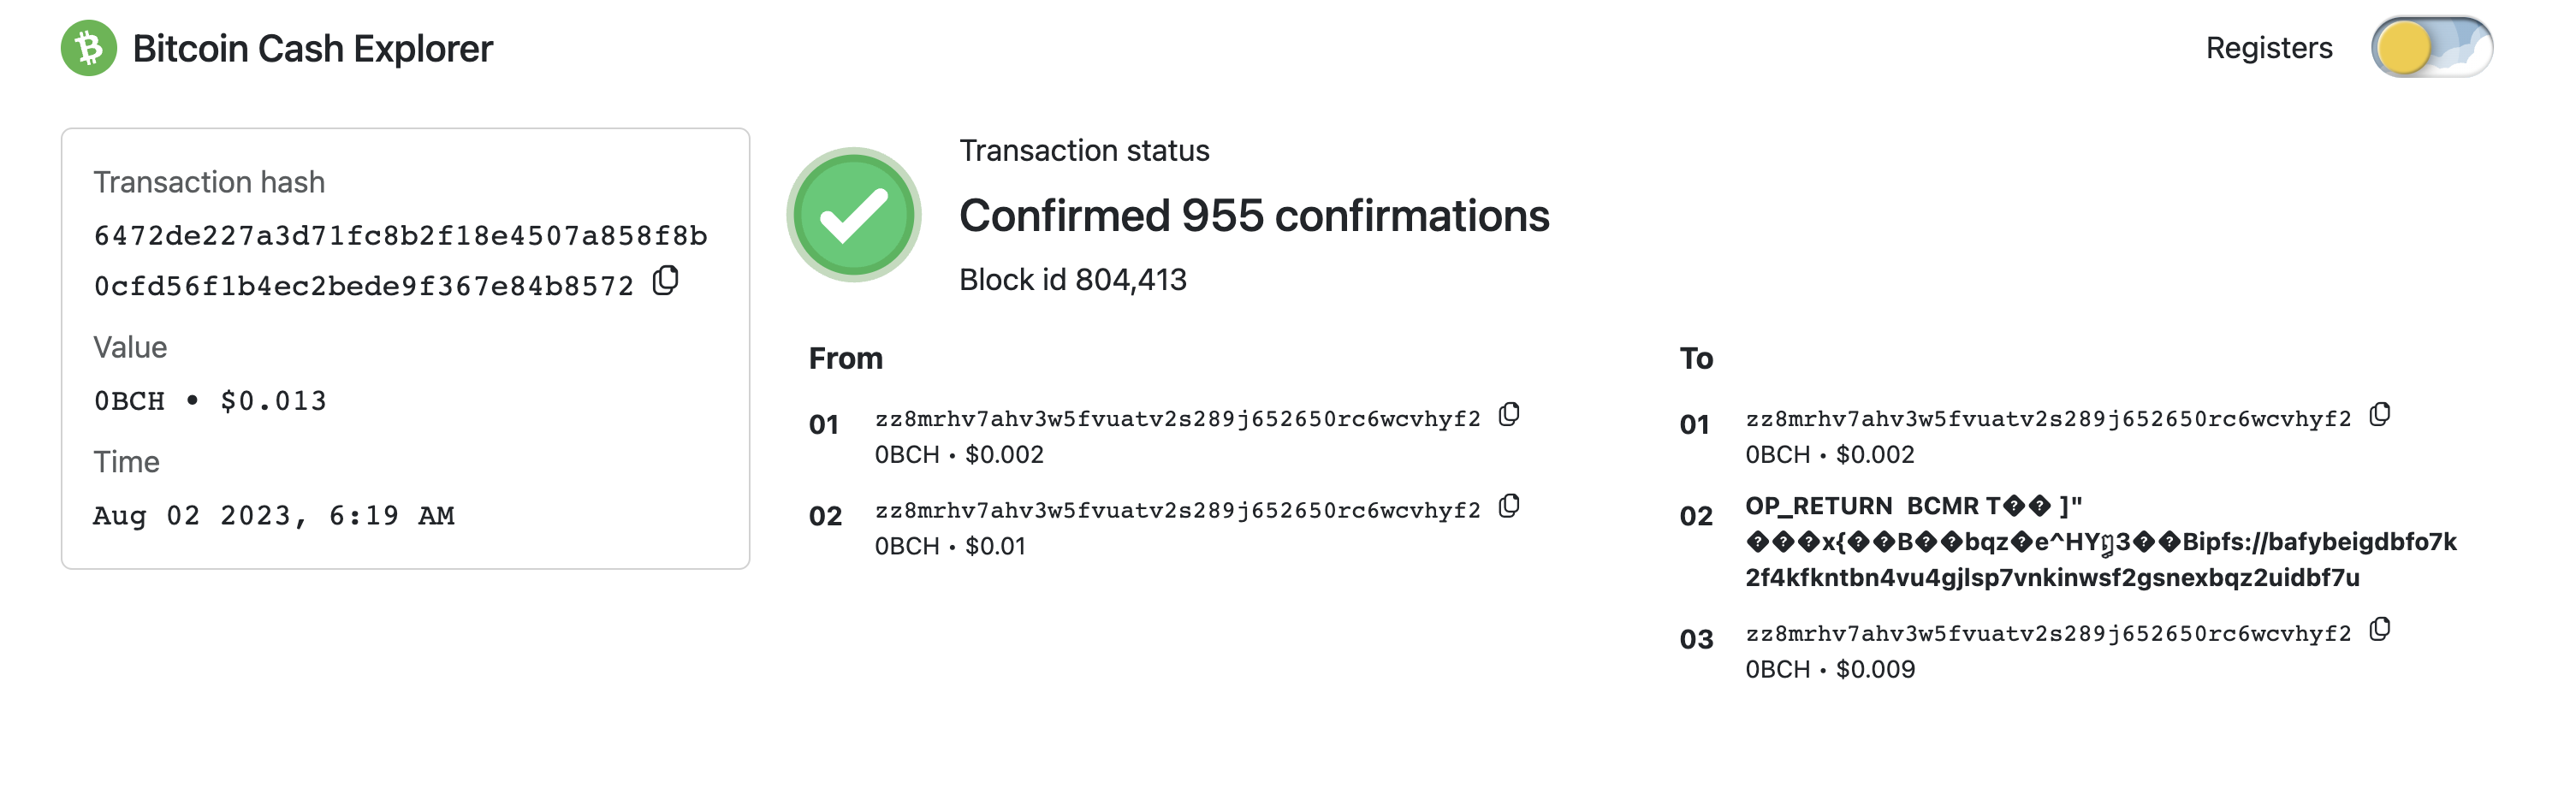
And here it is on Blockchair. Scroll down to see the decoded OP_RETURN.
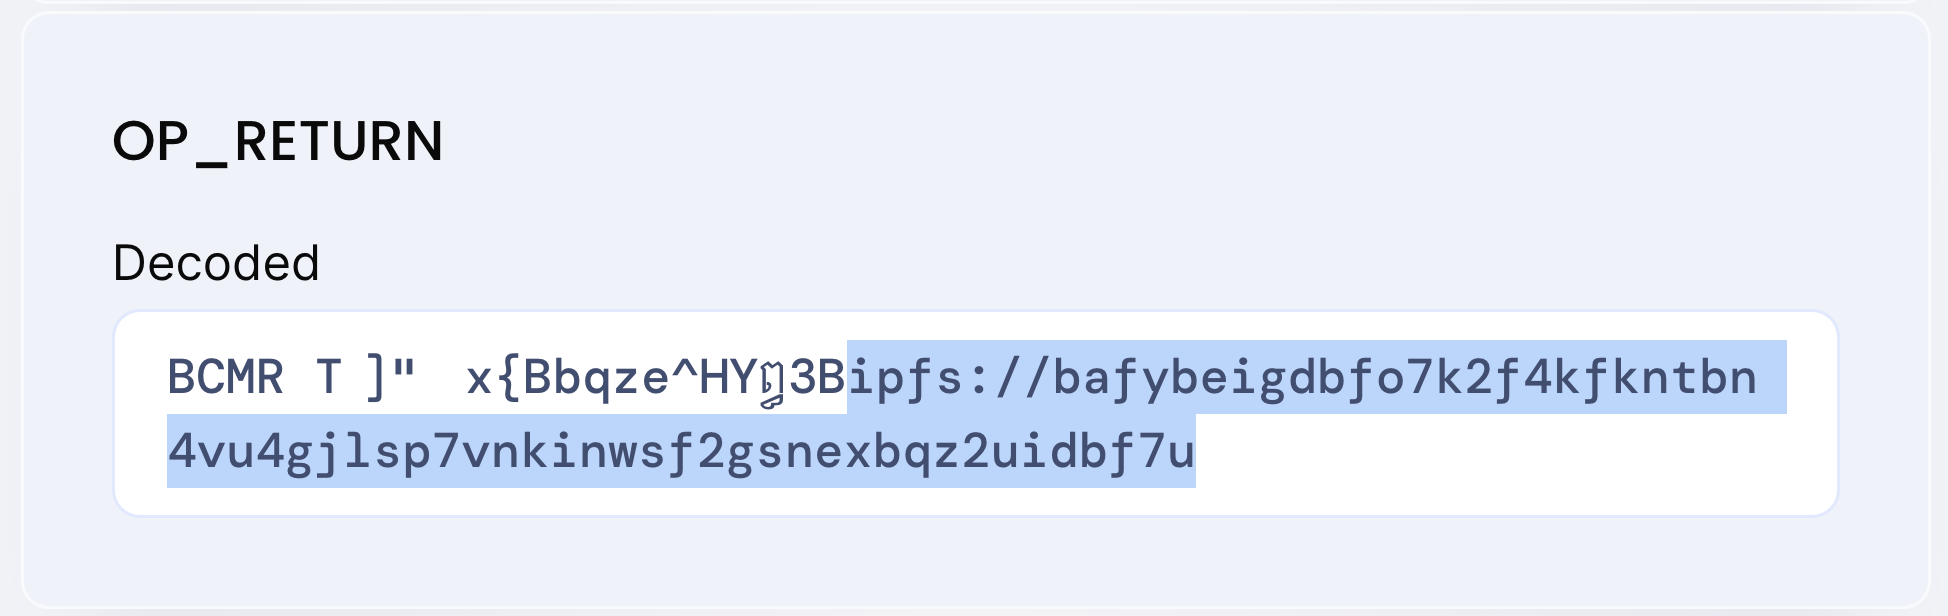
The highlighted IPFS url is the latest update to the BCH Gurus metadata, at time of writing. To see it, grab the IPFS CID (explained in Tutorial 1), put https://ipfs.io/ipfs/ ahead of it and visit the resulting URL:
We’ll search in this JSON file for “098f”, the commitment value of my BCH Guru # 2447 NFT, and find this. This is the BCMR metadata for my NFT.
    "098f": {
    "name": "BCH Guru #2447",
    "description": "Guru #2447 from the BCH Guru NFT collection",
    "uris": {
      "icon": "ipfs://bafybeiarpxly2a5edilhb53bkurmuw2ddudn5keifxoixf46qsyghtfzra/2447-icon.png",
      "image": "ipfs://bafybeiarpxly2a5edilhb53bkurmuw2ddudn5keifxoixf46qsyghtfzra/2447.png"
    },
    "extensions": {
      "attributes": {
        "Background": "Mountain Top Scene",
        "Tone": "Tone 3",
        "Ear Right": "",
        "Ear Left": "",
        "Clothes": "Tang Suit Guru",
        "Mouth": "Drooling",
        "Eyes": "Raised Eyebrow Left",
        "Head": "Ninja Hat",
        "Glasses": "Rectangle Shades",
        "Crystal Ball": "Crystal Gaze Oracle",
        "Asset": "Bitcoin Cash",
        "Hand Right": "Digital Watch",
        "Hand Left": "",
        "Lyrics": ""
      }
    }
  },
Using the Chaingraph Indexer
You can also track down the authhead with Chaingraph, a BCH indexer with a GraphQL API.
Visit try.chaingraph.cash and run this query:
query GetTransactionDetails {
  transaction(where: { hash: { _eq:
  "\\xf54ce0297a4017cc922aacde5f7abe7a8397a1058b879f5eb9e2a643d4ec2301"
  } } ) {
    authchains {
      authchain_length
      authhead_transaction_hash
      authhead {
        block_inclusions {
          block {
            height
          }
        }
      }
      migrations {
        migration_index
        transaction {
          hash
        }
      }
      unspent_authhead
    }
}
}
Here is the Chaingraph output at the time of writing:
{
  "data": {
    "transaction": [
      {
        "authchains": [
          {
            "authchain_length": 4,
            "authhead_transaction_hash": "\\x6472de227a3d71fc8b2f18e4507a858f8b0cfd56f1b4ec2bede9f367e84b8572",
            "authhead": {
              "block_inclusions": [
                {
                  "block": {
                    "height": "804413"
                  }
                }
              ]
            },
            "migrations": [
              {
                "migration_index": "0",
                "transaction": [
                  {
                    "hash": "\\xf54ce0297a4017cc922aacde5f7abe7a8397a1058b879f5eb9e2a643d4ec2301"
                  }
                ]
              },
              {
                "migration_index": "1",
                "transaction": [
                  {
                    "hash": "\\x13e44d46044deeb677854165b57d1070ccb3ccdd1e0ca9e81afb7e8966d51333"
                  }
                ]
              },
              {
                "migration_index": "2",
                "transaction": [
                  {
                    "hash": "\\x7f970e6b92a926df1251466611105f6775520487b957c2fc07191453b027ad17"
                  }
                ]
              },
              {
                "migration_index": "3",
                "transaction": [
                  {
                    "hash": "\\x6472de227a3d71fc8b2f18e4507a858f8b0cfd56f1b4ec2bede9f367e84b8572"
                  }
                ]
              }
            ],
            "unspent_authhead": true
          }
        ]
      }
    ]
  }
}
This shows the full authchain and, as you can see, the authhead_transaction_hash is the same value as what the Paytaca BCMR indexer gave us.
N.B. The results you get from these indexers may have changed at your time of reading, as BCH Gurus frequently updates their metadata to include newly-minted Gurus.
Future tutorials will cover Chaingraph in more depth, but, as you can see, its output — as well as that of the BCMR metadata files — is very human-readable!
If Chaingraph interests you, consider joining the Chaingraph_dev Telegram channel.
Understanding Commitments
BCH Cash Tokens’ NFTs can be thought of as strings, i.e., a sequence of characters. Contrast this with the fungible tokens being numbers. At one level, it really is that simple.
Yes, you can create, sell and trade the JPEG NFTs we’ve all come to know and love. That said, the greater purpose of these NFTs is to leverage the hashpower of the BCH blockchain and the irreversibility of BCH transactions to create commitments.
These NFT commitments, byte-strings of about 40 characters, can not be impersonated and are irrevocable, meaning that other contracts can read and confidently act based on them. In this way, Cash Tokens NFTs permit on-chain contracts to “call” other contracts.
Contracts can interoperate on-chain in groups that trustlessly work together. Thus, contracts become building blocks, DeFi Legos if you will, that can collaborate, even if they were developed and deployed by different people and at different times. Each UTXO does its own thing—sometimes even in parallel.
NFTs that have the same category can have identical commitment values, however one can also enforce uniqueness with covenants, which we will certainly cover in this series.
The most important thing to remember about commitments is that they are on-chain messages. While they may seem mysterious at first glance, that is all they are. Of course, the ability to pass short messages on-chain is wonderfully powerful and can be used in a plethora of amazing ways!
This is a little abstract, I know! But it will all become clear as this tutorial series progresses. We will explore what can be done with the commitment field in future tutorials. It’s more than you might imagine!
Emerald DAO
Emerald DAO is a pioneering CashTokens project by developer BitcoinCashAutist that aims to be a template for building DAOs (decentralized autonomous organizations) on BCH with CashTokens.
When you buy an Emerald DAO NFT (sorry, minting has ended), you are getting an on-chain “safe deposit box” of sorts with some BCH in it that is time-locked. Once the time lock expires, you can open it, or not.
Let’s take a look at what Emerald DAO did with its NFT commitments.
By visiting emerald-dao.cash, we can get the genesis transaction:
00003c40fa202816c357350eaa2e7ec2b47766209604941789ecf814f98ba4a6
Here it is on SalemKode.
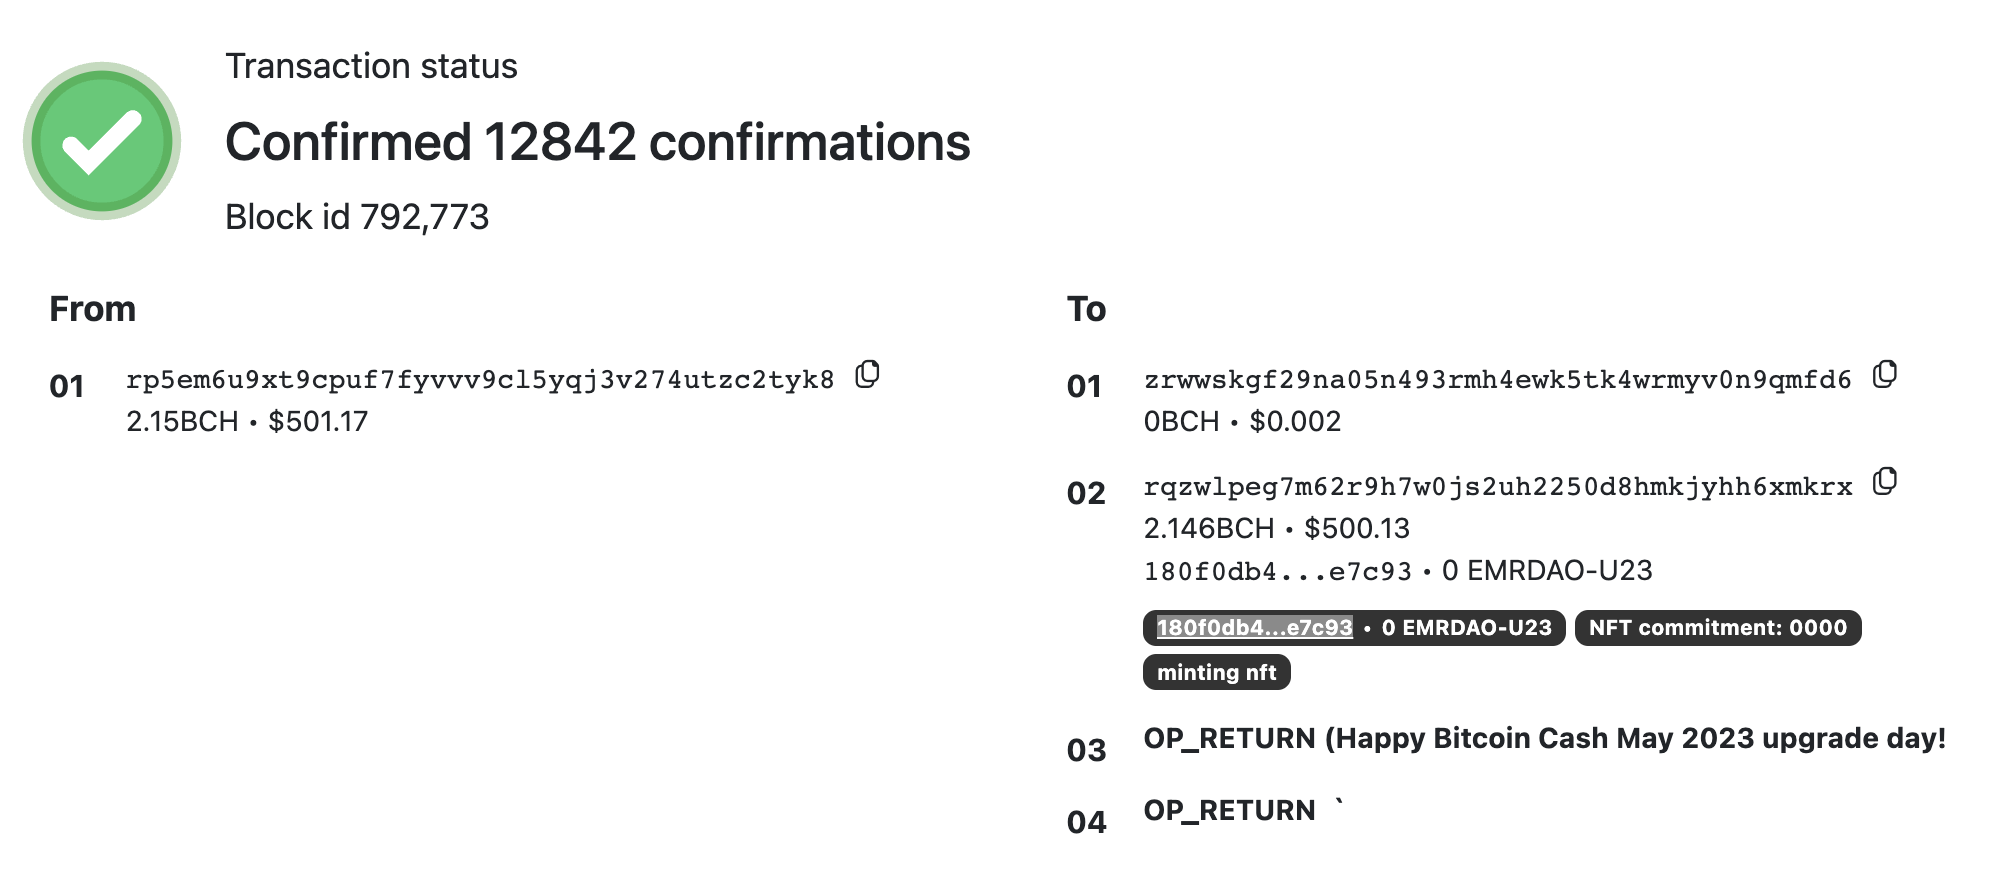
Looking at the outputs of this transaction, you can see that this explorer shows the category, commitment and capability:
category:180f0db4465c2af5ef9363f46bacde732fa6ffb3bfe65844452078085b2e7c93commitment:0000(“0” in base-10)capability:minting
This is where the Emerald DAO Minting NFT — the one that was used to create all the others — was minted.
Click through to the category page and this will show you all of the child NFTs in this category, with their corresponding commitments.
You can see that some have commitments of a 2-byte hexadecimal number (e.g., 0700 or 0b00), while others are much longer and include these 2 bytes at the beginning of their commitments. The shorter ones are “keycards” that open the corresponding ones that start with the same hexadecimal number. The remaining digits are the amount of satoshis locked into the NFT.
If there is interest, we can cover the Emerald DAO in a future tutorial. I just wanted to show you another example of how commitments can be used.
NFT Metadata
As you can see, there is a lot of important information that is not on-chain! This is where metadata come in, in particular the BCMR standard, or Bitcoin Cash Metadata Registries.
To review what basic BCMR metadata looks like, see Tutorial 1 in this series. NFT metadata is quite similar but there are a couple noteworthy differences:
- There is no
token.decimalsfield (since NFTs are not divisible). - There is a
token.nftsfield that has several subfields and can hold many NFTs. We’ll see examples of this below.
Two types of NFTs are contemplated within the BCMR standard:
- Sequential: These NFTs use a positive integer for their
commitment. See, for example, above, where thecommitmentfor my BCH Guru # 2447 is just “098f” (which is hexadecimal for “2447”). - Parsable: These NFTs have parsable subfields (i.e., components that can be broken down for analysis). Parsable NFTs can encode more data and thus are less efficient and require more locked BCH and higher transaction fees. However, you can do a lot of fun things with them!
Don’t worry! We’ll go into depth on BCMR metadata and parsable NFTs in a future tutorial.
BCH Guru Metadata
Let’s take a look at the metadata update we found before by looking for the Gurus’ authhead. Note that category, symbol and uris are the same as for fungible tokens (FTs).
  "identities": {
    "f54ce0297a4017cc922aacde5f7abe7a8397a1058b879f5eb9e2a643d4ec2301": {
      "2023-07-30T21:35:28.982Z": {
        "name": "BCH Gurus",
        "description": "BCH Guru Collectible NFTs, associated with the bch.guru price-prediction game.",
        "token": {
          "category": "f54ce0297a4017cc922aacde5f7abe7a8397a1058b879f5eb9e2a643d4ec2301",
          "symbol": "GURU",
          "nfts": {
            "description": "BCH Guru Collectible NFTs, associated with the bch.guru price-prediction game.",
            "parse": {
              "types": {
                "10": {
                  "name": "BCH Guru #16",
                  "description": "Guru #16 from the BCH Guru NFT collection",
                  "uris": {
                    "icon": "ipfs://bafybeigw5korsj6gfjc54xetmatbmas7dev5l52jnmavnotzn2zkbqqnee/16-icon.png",
                    "image": "ipfs://bafybeigw5korsj6gfjc54xetmatbmas7dev5l52jnmavnotzn2zkbqqnee/16.png"
                  },
                  "extensions": {
                    "attributes": {
                      "Background": "Cloud Scene",
                      "Tone": "Tone 1",
                      "Ear Right": "",
                      "Ear Left": "Pearl Earring",
                      "Clothes": "Casual Guru",
                      "Mouth": "Bubblegum",
                      "Eyes": "Eye Patch Left",
                      "Head": "Pork Pie Hat",
                      "Glasses": "",
                      "Crystal Ball": "Fiery Fortune Oracle",
                      "Asset": "Bitcoin Cash",
                      "Hand Right": "",
                      "Hand Left": "",
                      "Lyrics": ""
                    }
                  }
                },
...
As you can see under token.nfts, there is an entry for each individual child NFT. Shown here is BCH Guru #16, identified by the value 10, which is hexadecimal for “16”. Each NFT has uris for icon (400px x 400px) as well as image, which has much larger dimensions.
Under extensions are the NFT attributes. This data can be parsed and shown in wallets, on tapswap.cash, etc.
Let’s take a closer look at the metadata for my BCH Guru # 2447.
        "098f": {
          "name": "BCH Guru #2447",
          "description": "Guru #2447 from the BCH Guru NFT collection",
          "uris": {
            "icon": "ipfs://bafybeiarpxly2a5edilhb53bkurmuw2ddudn5keifxoixf46qsyghtfzra/2447-icon.png",
            "image": "ipfs://bafybeiarpxly2a5edilhb53bkurmuw2ddudn5keifxoixf46qsyghtfzra/2447.png"
          },
          "extensions": {
            "attributes": {
              "Background": "Mountain Top Scene",
              "Tone": "Tone 3",
              "Ear Right": "",
              "Ear Left": "",
              "Clothes": "Tang Suit Guru",
              "Mouth": "Drooling",
              "Eyes": "Raised Eyebrow Left",
              "Head": "Ninja Hat",
              "Glasses": "Rectangle Shades",
              "Crystal Ball": "Crystal Gaze Oracle",
              "Asset": "Bitcoin Cash",
              "Hand Right": "Digital Watch",
              "Hand Left": "",
              "Lyrics": ""
            }
          }
        },
The attributes data is the same data that is displayed at nfts.bch.guru for this NFT.
Mint Your First NFT!
The wait is over! It’s time to commence making our own on-chain commitments with BCH CashTokens! Here are the steps:
Step 0. Set up your Wallet
This tutorial assumes you already have your wallet set up. Feel free to review Tutorial 1 for details on this.
(a) If you Want to Use Chipnet…
If you don’t want to spend real BCH to make your NFTs the first time, you can try out the process using chipnet. Chipnet is a BCH testnet.
- In the Cashonize wallet, click the gear menu.
- Where it says “Change network”, select “chipnet”.
- Use the tbch.googol.cash faucet to get some tBCH chipnet coins that you will need to do the minting.


Step 1. Ready your Art
Let’s ready your art in a folder on your desktop. Each NFT needs a small icon. If it also has a higher quality version in a higher resolution, that’s a great idea as well! I’ll assume you’re starting from a set of square high-res images.
- Prep the Art: Manually or otherwise cause your high-res images to be in a folder and number them
1-img.png,2-img.png, etc. The best file format to use is SVG, however AVIF, WebP and PNG are also fine. Number your smaller icons (400 px x 400 px)1.png,2.png, etc.- Remember, you also need an
imageandiconto represent the series itself.
- Remember, you also need an
(a) Easily Create your Icons
If you already have your icon-sized images, you can skip this step. Otherwise, we will create new 400 px x 400 px images suitable for use as icons on an Ubuntu 23.04 machine with a Python3 script, the Pillow library, the tinify library and the TinyPNG API.
If you want to know how to do this on another OS, request support in the Panmoni Telegram. We’re glad to help.
- You can use Cyberduck to upload the files to a server using SFTP.
- Set up a Python virtual environment:
- (as root)
apt update&&apt install python3-venv. cdto the directory where your image files are. I assume this is a directory callednftSeriesFolderin your non-privileged user’s home folder.- (as the non-privileged user) Create the virtual environment :
python3 -m venv myenv.
- (as root)
- Enter the virtual environment:
source myenv/bin/activate. - Install the tinify and Pillow Python libraries
pip install tinify Pillow. - Use your favorite editor (I like vi but nano is recommended for new users) to create the script
createIcons.pyor upload it. See the code below.- Edit the script to fill in your TinyPNG API key (get one here) as well as the path to the folder with your images. Where you see the number “26”, you can change that to the number of images in your collection plus one. Save the edited script.
- Create the icons:
python3 createIcons.py(this will take a moment). - Exit the virtual environment:
deactivate. If you’re done with this virtual environment, delete it, the script and thetempfolder:rm -rf temp myenv createIcons.py. - You can use Cyberduck to download the folder to your desktop and review the quality of the end result.
# createIcons.py
import tinify
import os
from PIL import Image

# Set up tinify API key
tinify.key = "YOUR_TINYPNG_API_KEY"

input_folder = '/home/YOUR_USERNAME/nftSeriesFolder'
temp_folder = '/home/YOUR_USERNAME/nftSeriesFolder/temp'
output_folder = '/home/YOUR_USERNAME/nftSeriesFolder'

# Ensure the temp and output folders are created
for folder in [temp_folder, output_folder]:
    if not os.path.exists(folder):
        os.makedirs(folder)

for i in range(1, 26):
    # Try the filename with a leading zero first
    input_filename = f"{str(i).zfill(2)}-img.png"
    input_path = os.path.join(input_folder, input_filename)

    output_filename = f"{str(i).zfill(2)}.png"

    # If the file doesn't exist with a leading zero, try without the leading zero
    if not os.path.exists(input_path):
        input_filename = f"{i}-img.png"
        input_path = os.path.join(input_folder, input_filename)

        output_filename = f"{i}.png"

    temp_path = os.path.join(temp_folder, output_filename)
    output_path = os.path.join(output_folder, output_filename)

    # Resize the image first with PIL
    with Image.open(input_path) as img:
        img_resized = img.resize((400, 400), Image.LANCZOS)
        img_resized.save(temp_path, "PNG", quality=95)

    # Use tinify to optimize
    source = tinify.from_file(temp_path)
    source.to_file(output_path)

print("Resizing and optimization complete!")
Step 2. Upload your Art
Now that your art is ready, you can upload it to the server that will host it. It’s important this server remain online, as your art will be displayed in wallets, marketplaces and in other places by other BCH builders. That’s why it is recommended to upload to IPFS. We will use nft.storage again, which is expected to always be free.
- Login/register to nft.storage, download their desktop client (“NFT UP”) for your OS, install and open it. Feel free to refer back to Tutorial 1 where we first discussed nft.storage.
- You may need an nft.storage API key, which you can get here at no cost.
- Click on the NFT UP window and select the folder you want to upload. It’s a good idea to throw into the folder the high-res image and the icon that represent your whole series.
- Once it completes uploading, it will give you the data you need:
- CID: Content Identifier (unique).
- IPFS URL: It’s just “ipfs://“ and the CID. You will need this for the metadata file.
- Gateway URL: This is an https link where you can see your uploads. Feel free to visit it and see all of your images!

Step 3. Write your Metadata
I’d like my NFT series to be accepted by the otr.cash BCMR registry, so I checked their listing requirements. These requirements are quite specific and I found them a bit strict. However, my recommendation is to give them a look before creating your metadata, especially when choosing your ticker (symbol).
BCH CashTokens can be adopted to tokenize many assets, including stocks, bonds, bets, real estate and more. In order to achieve this, we will do well as a community to be guided by the otr.cash requirements to ensure we’re not creating new obstacles, such as creating a token with ticker “AAPL” when, later, we want to create synthetic Apple stocks.
- Visit Mathieu Geukens’ BCMR Generator and fill in your data. Feel free to share your data in the Panmoni Telegram group and we’ll give you feedback on it.
- You can refer to images in your IPFS upload with the IPFS url and the filename, like this:
ipfs://YOUR_IPFS_CID/YOUR-FILENAME.EXT - Be sure to enable the “Has NFTs” and “Has High-resolution Image for NFTs (besides 400x400px icon)” options.
- To get your “TokenId”, visit the Cashonize wallet and select the “CreateTokens” tab. Copy the “Planned tokenId” that it suggests to you there. If you don’t see one, you may not have a BCH balance or you may have to do a consolidating transaction, as described in Tutorial 1.
- Once you are happy with the data, click “Download BCMR json file” to download the BCMR JSON file for your series.
- Open the file in a text editor such as VSCode and carefully edit it to customize the metadata file to suit your needs and preferences.
Take a look at my BCMR data for reference. Here’s what I entered in the BCMR Generator:

And here is (the beginning of) my final product, after I performed some edits:
{
  "$schema": "https://cashtokens.org/bcmr-v2.schema.json",
  "version": {
    "major": 0,
    "minor": 1,
    "patch": 0
  },
  "latestRevision": "2023-08-12T21:41:35.901Z",
  "registryIdentity": {
    "name": "BCMR for BCH Vision NFT Series 2021",
    "description": "Self-published BCMR for BCH Vision NFT Series 2021."
  },
  "identities": {
    "792eb291fee60820bc04fcdde48c73fa23a2a35756fe01c7164f5b5ce783f5f2": {
      "2023-08-12T21:41:35.901Z": {
        "name": "BCH Vision Series 2021",
        "description": "The BCH Vision Series is a collection of 25 social media images that were first published in 2021. They lay out a vision for the future development of Bitcoin Cash.",
        "token": {
          "category": "792eb291fee60820bc04fcdde48c73fa23a2a35756fe01c7164f5b5ce783f5f2",
          "symbol": "BCHNFT-BCHVISION2021",
          "nfts": {
            "description": "The BCH Vision Series is a collection of 25 social media images that were first published in 2021. They lay out a vision for the future development of Bitcoin Cash.",
            "parse": {
              "types": {
                "01": {
                  "name": "BCH Vision 2021 NFT Series #1",
                  "description": "NFT #1 from the BCH Vision 2021 NFT Series.",
                  "uris": {
                    "icon": "ipfs://bafybeiax6xk6fb4u5cbgursnizylo7kcjtbxhjd6cadyq23iett653nyxi/1.png",
                    "image": "ipfs://bafybeiax6xk6fb4u5cbgursnizylo7kcjtbxhjd6cadyq23iett653nyxi/1-img.png"
                  },
                  "extensions": {
                    "attributes": {
                      "Title": "Bitcoin Cash Thinks Big"
                    }
                  }
                },
...
To see the whole file load this URL in your browser.
(a) Generating NFT Series BCMR
If you have trouble with the BCMR generator, you can always take a generic BCMR file, such as the example from Tutorial 1, drop it into VSCode, remove the FT-specific parts and add in the NFT-specific parts.
This Python script will help you generate the individual sections for each of your NFTs, if you decide to go this route.
- Be sure to change 26 to your number of unique NFT images plus one.
- Replace “YOUR NFT SERIES” with your branding.
- Replace “YOUR_IPFS_CID” with your IPFS CID.
- Once it’s complete, run,
python3 genNFTsBCMR.pyand it will output anoutput.jsonfile in the same directory.
#genNFTsBCMR.py
import json

def generate_sections():
    sections = {}

    for i in range(1, 26):
        hex_value = format(i, '02x')
        sections[hex_value] = {
            "name": f"YOUR NFT SERIES #{i}",
            "description": f"NFT #{i} from YOUR NFT SERIES.",
            "uris": {
                "icon": f"ipfs://YOUR_IPFS_CID/{i}.png",
                "image": f"ipfs://YOUR_IPFS_CID/{i}-img.png"
            }
        }

    return sections

def main():
    sections = generate_sections()

    # Writing the result to a JSON file
    with open('output.json', 'w') as json_file:
        json.dump(sections, json_file, indent=4)

    print("JSON output has been saved to output.json")

if __name__ == "__main__":
    main()
(b) Upload your BCMR file to IPFS
Once you’re happy with your BCMR file, you can upload it to IPFS using nft.storage. Grab the CID from the “Actions” menu on the files page. You’ll need it in the next step.
Confused? Let us know in the Panmoni Telegram. We are ready to help you with any question or concern!
Step 4. Minting Time!
Return to Cashonize.com and you should still be on the “CreateTokens” tab.
(a) Create your Minting NFT
- Expand where it says “Optionally link metadata to this token”.
- Where it says “Select which method to use:” select IPFS (recommended).
- Paste your CID from your BCMR file into the text area.
Here is what the form looks like before I submitted it:

Here is the success message:

Check out the genesis transaction at Blockchair. Here is the relevant tokenData from the new Minting NFT. Note that it says its capability is “minting”. This means it can make more of the same category and with any commitment you like.
"tokenData": {
"category": "792eb291fee60820bc04fcdde48c73fa23a2a35756fe01c7164f5b5ce783f5f2",
"amount": "0",
"nft": {
"capability": "minting",
"commitment": ""
}
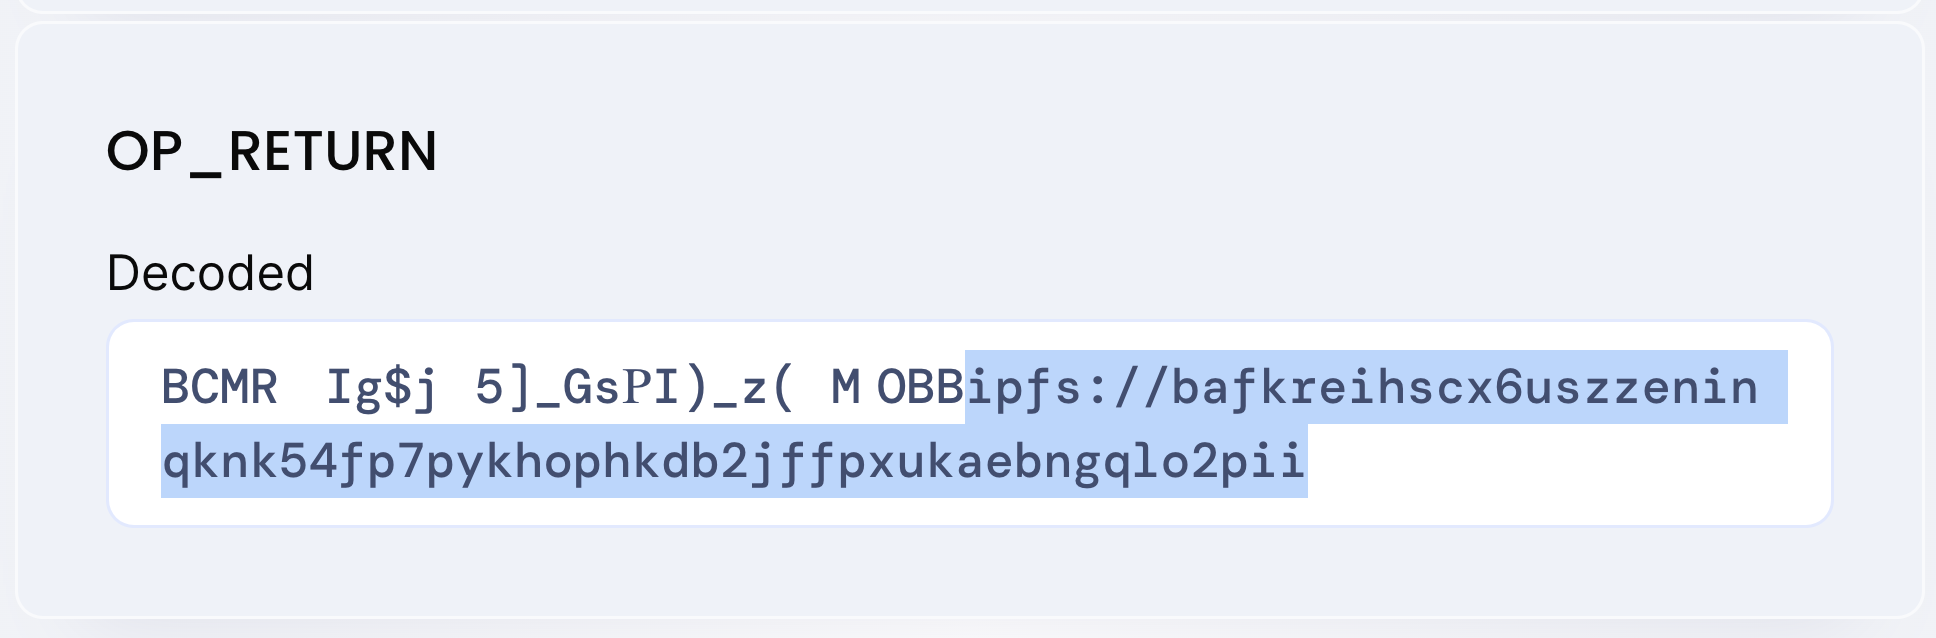
}Here is the OP_RETURN with the BCMR metadata, i.e., the current authhead. And since it is the genesis transaction, it will always be the authbase, even after I update the authhead by changing some metadata and updating the file on-chain.
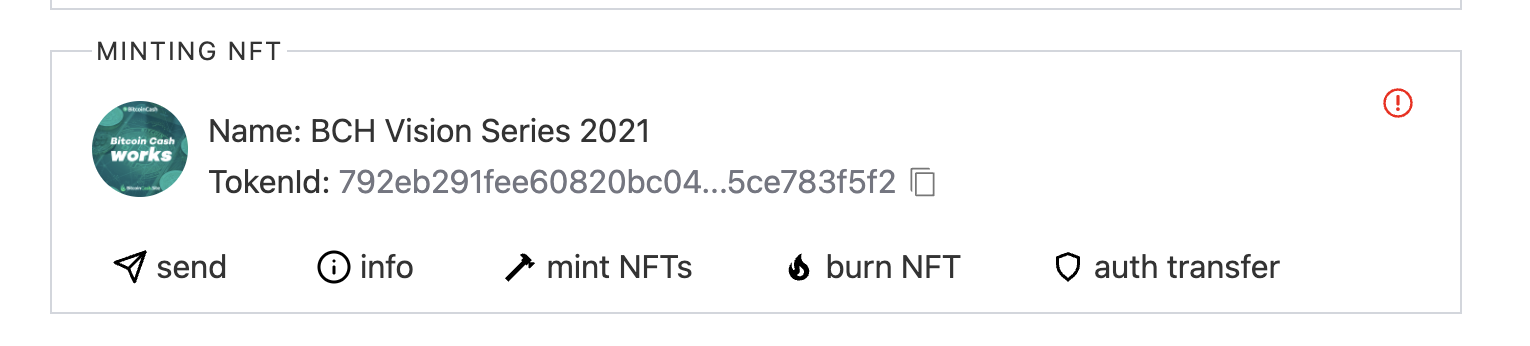
In the Cashonize web wallet, click on the “MyTokens” tab and you will find your Minting NFT there. Click “info” to see some of your NFT series’ metadata.
You did it! Nice work! Now on to creating the child NFTs!
(b) Create your Immutable Child NFTs
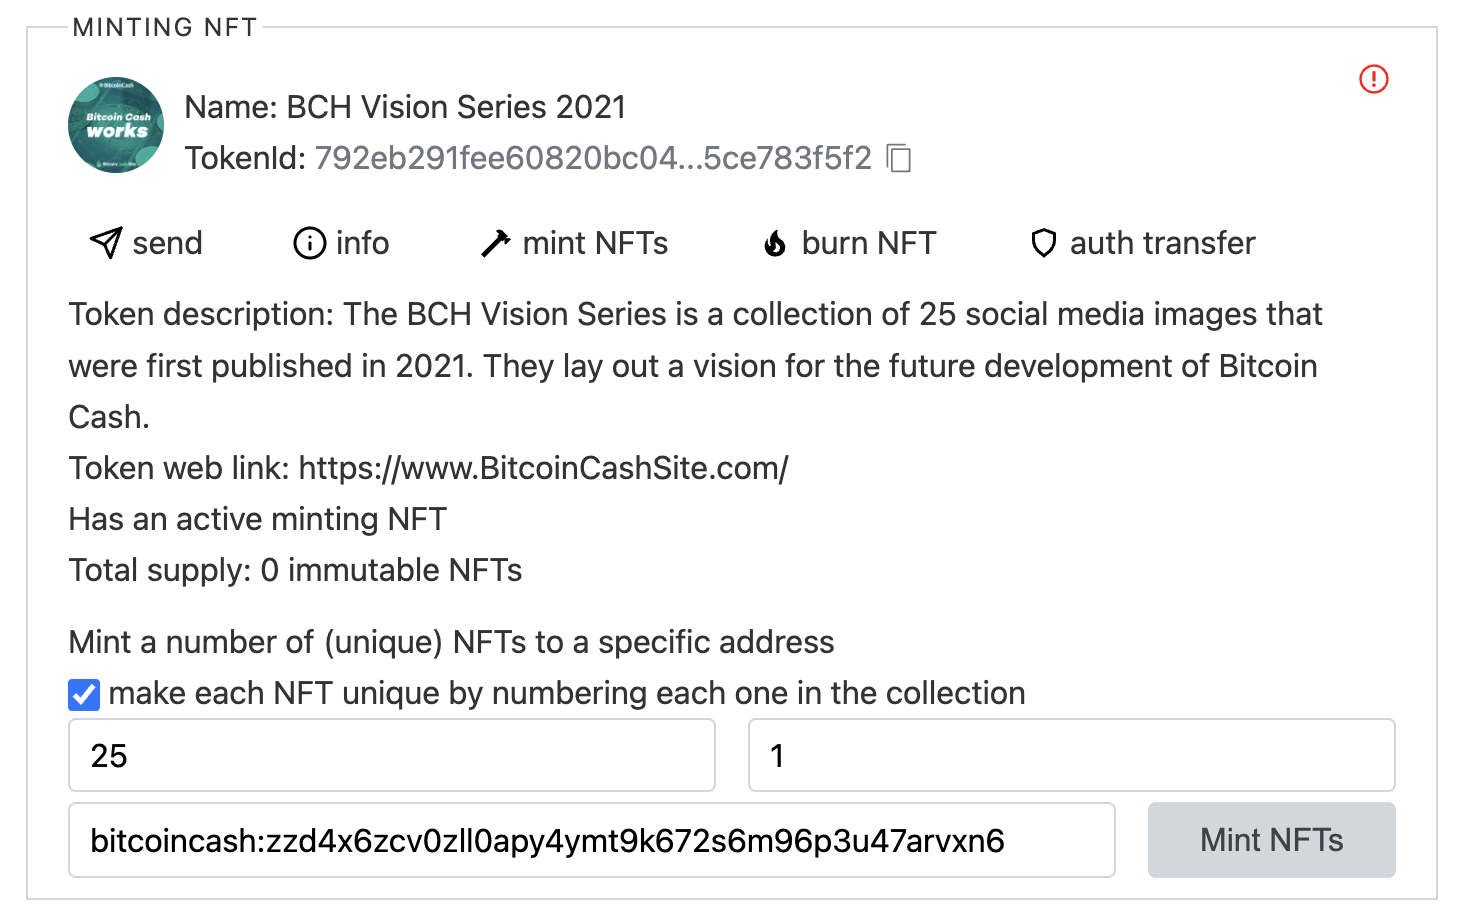
- On Cashonize, on the “MyTokens” page, find your Minting NFT and click on “mint NFTs” underneath it.
- Enter the number of NFTs in your series, the number you are starting from and an unused address from your wallet. Be sure to select the token-aware version of the address (starts with a “z”).
- Click “Mint NFTs”.
Here’s what mine looks like:
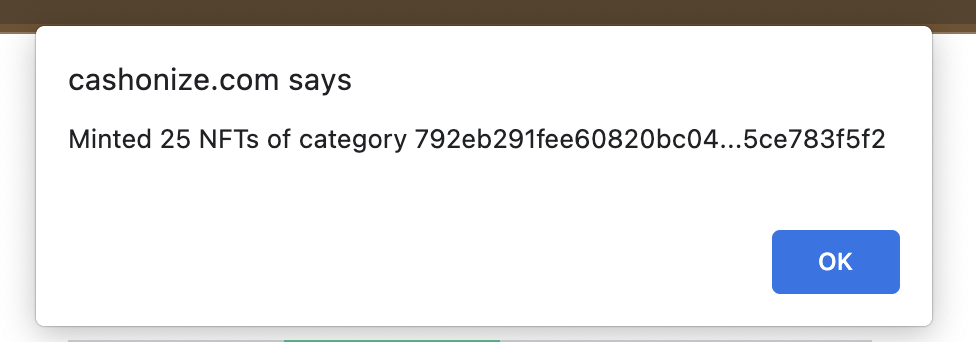
Here is an example success message from Cashonize:
A future tutorial will cover how to mint NFTs programmatically, and will make available a script, so you don’t have to do this manually with your own collection.
(c) Check out your New NFTs!
- Copy your
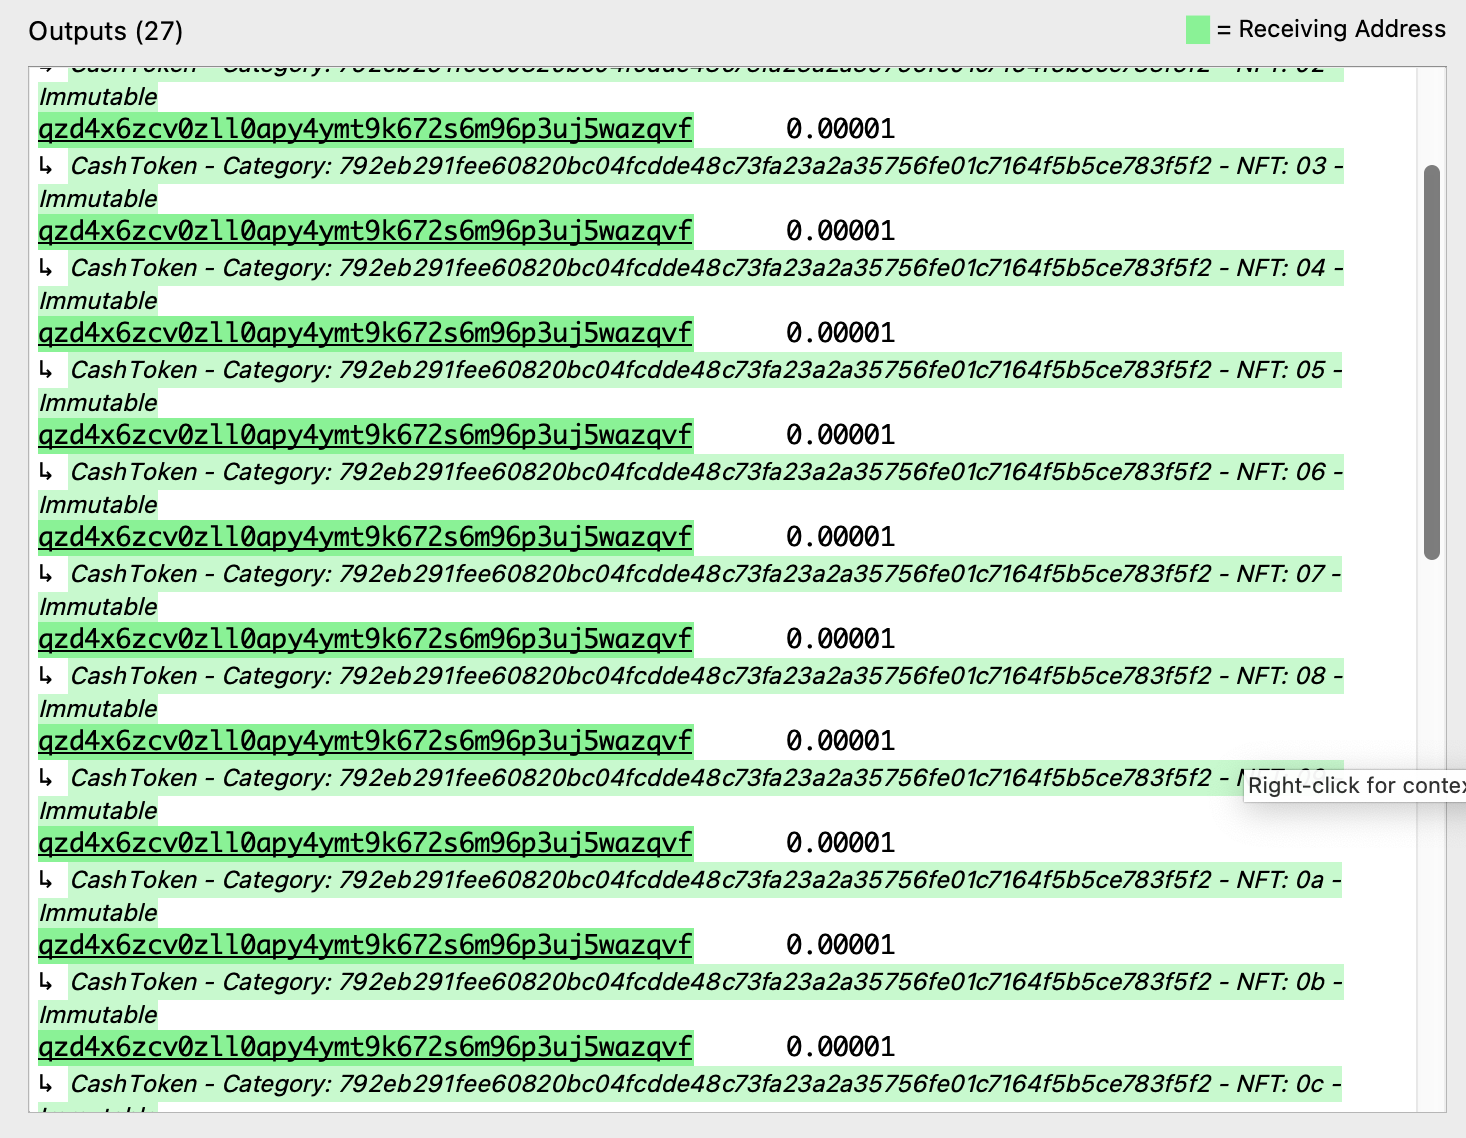
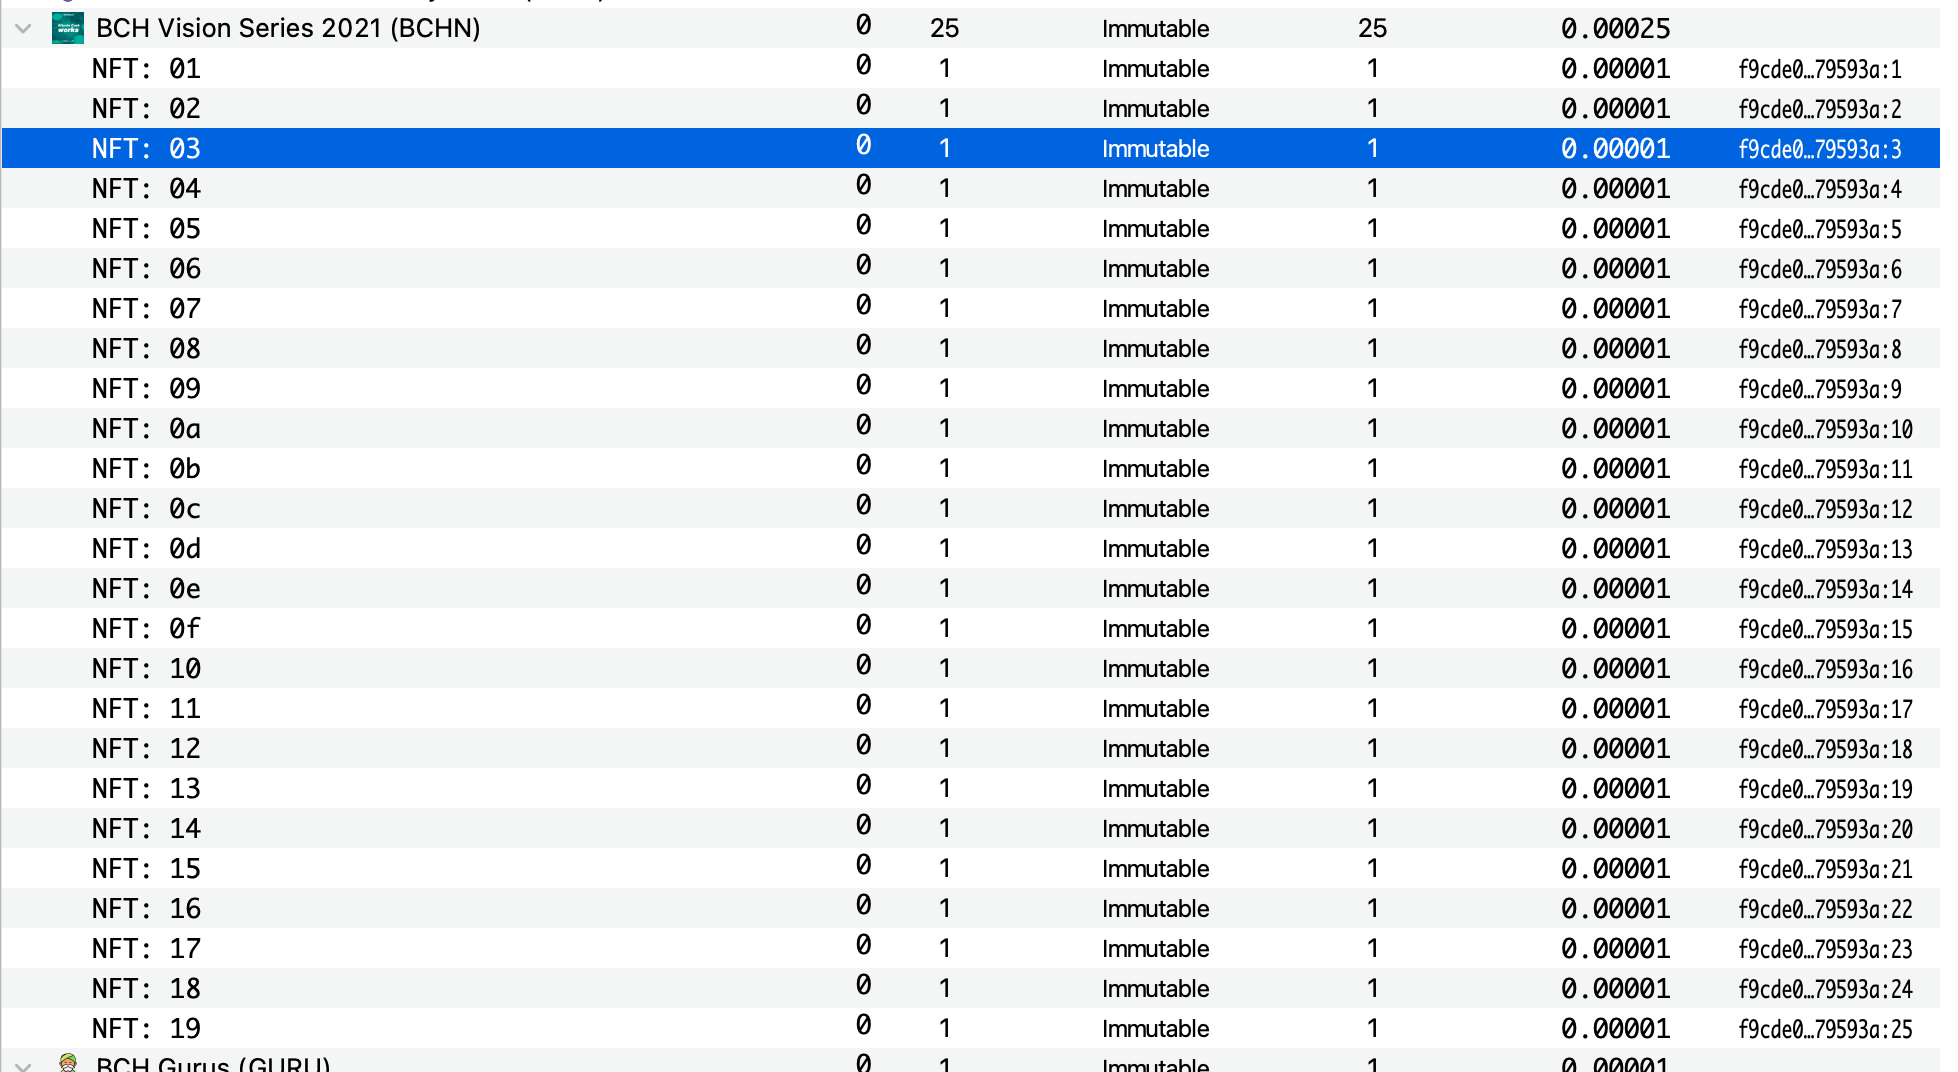
category, visit explorer.salemkode.com and paste it into the search box. Click on “Open token page” on the left and check out all your new NFTs! Scroll through them and check out the commitment values. - Grab the latest transaction ID for your new NFT
categoryand paste it into Blockchair.com. Examine the raw transaction.
Here’s mine, which has 27 outputs. Here’s my NFT series’ SalemKode page as well. And here is the tokenData for one of my new NFTs. Note that the capability is none (“Immutable”) and the commitment corresponds to NFT #8 in my series, as you can tell from the metadata file above.
            "tokenData": {
                "category": "792eb291fee60820bc04fcdde48c73fa23a2a35756fe01c7164f5b5ce783f5f2",
                "amount": "0",
                "nft": {
                    "capability": "none",
                    "commitment": "08"
                }
Nice job! But we’re not done yet!
(d) Secure the authbase
As discussed in Tutorial 1, it’s important to move your authbase and then secure it so that you don’t lose control of the metadata for your new NFT series.
N.B. Whereas the
authheadis the latest update to theauthchainfor a givencategory, theauthbaseis the OP_RETURN where you first defined the metadata (BCMR) for your token in the token’s genesis transaction.
(e) Oops! authUpdate.js to the Rescue!
If, like me, you fat-fingered your BCMR file, you can fix the mistakes, thanks to Mathieu Geukens’ new and wonderful AuthUpdate script.
If everything is perfect with your metadata, you can skip this step!
- Upload your updated and corrected BCMR file to IPFS (or wherever you prefer) and copy its CID (it’s not possible to edit files on IPFS).
- Decide where you want to run the script. In my case, I will start from the home directory of my non-privileged user on my Ubuntu 23.04 machine.
- Download the AuthUpdate repository:
git clone https://github.com/mr-zwets/AuthUpdate.git. - Enter the git repo:
cd AuthUpdate. - Install the dependencies (especially mainnet-js):
npm install. - Edit the script with your favorite text editor:
vi authUpdate.js.- For the
tokenIdvariable, enter thecategoryof the NFT series you want to update. - If your new BCMR file is hosted at an https link, enter that link where it says
bcmrURL. If you are using IPFS, enter just the CID for variablebcmrIpfsCID. Only fill in one of these two variables. - For variable
seedphase, enter your text BIP39 seed phrase. You can copy this from Electron Cash (see Tutorial 1 for instructions). Take great care to protect your seed phrase! - If your address with the
authbaseis not on index 0 of your wallet, change thederivationPathAddressfrom “m/44’/145’/0’/0/0” to “m/44’/145’/0’/0/X” where X is the index number of the address in Electron Cash. See Tutorial 1 for more information about address indices.
- For the
- Make sure the
authbaseaddress has UTXOs totaling more than 1347 satoshis. If not, just send sufficient satoshis to that address. - run
node authUpdate.js.
Possible Errors
If you don’t have enough BCH on that address, you may get an error such as: required: 1347n, available: 1000n. Just send more satoshis to that address.
If you use a wallet or enter a derivation path that is incorrect, you may get an error like this: wallet does not hold the authority to update the metadata. Double-check that your variables are correct.
When you succeed, you will get a message like this:
wallet address: bitcoincash:qzmz2smphv3pt6yzxxpjc54ezxz006qw8ye57ulqzk
Bch amount in walletAddress is 0.00051bch or 51000sats
The authHead is the first output of the transaction with id 32c1bbc0a657cb7413d571cf43263d655bc38ae0b6f155353fa70e7e5f473a32
{
  txid: '32c1bbc0a657cb7413d571cf43263d655bc38ae0b6f155353fa70e7e5f473a32',
  vout: 0,
  satoshis: 1000,
  height: 0,
  token: undefined
}
Published Auth update in tx 32c1bbc0a657cb7413d5...7e5f473a32, returned Auth to bitcoincash:qzmz2smphv3pt6yzxxpjc54ezxz006qw8ye57ulqzk
$https://explorer.bitcoinunlimited.info/tx/6632ec4e851b51aa02e8c9b8a272a8a30f3d5ac2bda76a4b874dab6ab7eeadcfqzmz2smphv3pt6yzxxpjc54ezxz006qw8ye57ulqzkis the address I transferred theauthbaseto earlier.32c1bbc0a657cb7413d5...7e5f473a32is the new transaction that caused theauthheadto get updated.- Visit the Bitcoin Unlimited Explorer link to see the transaction. As you can see, output 1 is an OPRETURN and it has an IPFS link.

- You can also enter your
categoryinto the SalemKode explorer. It should show you a green symbol for your AuthChain bottom left and your images should show up with your child NFTs.
N.B. Edit
authUpdate.jsagain when you’re all done and delete your seed phrase, or delete the whole folder you were working in. This is important to protect your wallet’s seed phrase!
Step 5. Send some NFTs!
Cashonize, as mentioned in Tutorial 1, is a single-address wallet, so let’s look at these new NFTs in a couple other wallets.
(a) NFTs in the Electron Cash Wallet
In Electron Cash, I can inspect the minting transaction and see that my NFTs are there with their respective commitments.
As explained in Tutorial 1, you can manually add the metadata for your NFT series into your Electron Cash wallet. However, even under the CashTokens tab, you won’t see much more than this for now in Electron Cash.
Let’s send NFT # 15 to my Paytaca wallet.
- Go to the CashTokens tab and right-click on the NFT you want to send.
- On the next screen, paste your token-aware address from your Paytaca wallet, and be sure to select the NFT. I recommend you send 800 satoshis (0.000008 BCH) along with the NFT to be sure it can be sent again.
- Now Preview, Sign and Broadcast the transaction.

Here’s my transaction where I sent BCH Vision 2021 # 15. And here is the important part from the outputs where it shows the 800 satoshis and the NFT’s tokenData.
{
            "value": 0.000008,
            "n": 0,
            "scriptPubKey": {
                "asm": "OP_DUP OP_HASH160 df18b53126ca56807c3f7485b93c81d67415d4fc OP_EQUALVERIFY OP_CHECKSIG",
                "hex": "76a914df18b53126ca56807c3f7485b93c81d67415d4fc88ac",
                "reqSigs": 1,
                "type": "pubkeyhash",
                "addresses": [
                    "bitcoincash:qr033df3ym99dqru8a6gtwfus8t8g9w5lsve42m0df"
                ]
            }
        },
        {
            "value": 0.000008,
            "n": 1,
            "scriptPubKey": {
                "asm": "OP_DUP OP_HASH160 df18b53126ca56807c3f7485b93c81d67415d4fc OP_EQUALVERIFY OP_CHECKSIG",
                "hex": "76a914df18b53126ca56807c3f7485b93c81d67415d4fc88ac",
                "reqSigs": 1,
                "type": "pubkeyhash",
                "addresses": [
                    "bitcoincash:qr033df3ym99dqru8a6gtwfus8t8g9w5lsve42m0df"
                ]
            },
            "tokenData": {
                "category": "792eb291fee60820bc04fcdde48c73fa23a2a35756fe01c7164f5b5ce783f5f2",
                "amount": "0",
                "nft": {
                    "capability": "none",
                    "commitment": "0f"
                }
            }
        },
As you can see, it has a commitment of 0f (15 in base-10) and it has the correct category.
(b) NFTs in the Paytaca Wallet
In your Paytaca wallet, click on “Apps” in the bottom row, then “Collectibles”. Your NFT should be there. Here’s mine:

Even the BCMR metadata is shown:


N.B. I recommend creating a fresh wallet for Paytaca as it can sometimes produce unexpected results with imported wallets.
Step 6. Burn the Minting NFT (optional)
If you’re done minting your series, you can go into Cashonize > “MyTokens” and find your Minting NFT. Where it says “burn NFT”, click it. Be sure you are clicking for the right Minting NFT. When you are certain that you don’t want to mint any more NFTs in this category, click the red “burn NFT” button. There is no way to undo this action, so take your time and perhaps even put it off for another day.

Step 7. Build Community Trust and Awareness
To build community trust, be sure your NFT series has a website and that new NFT buyers can find the category of your NFT series easily on the front page.
To build awareness of your new NFT series, tweet about it and tag @BitcoinCashSite so I can RT you.
Bonus: Grab your BCH Vision NFTs!
Want one of the BCH Vision NFT Series? I’m giving these away FREE to whoever posts their token-aware address first in this thread on r/cashtokens.
You may have to wait 24 hours to receive them, as I’m making them available to some of my biggest funders first.
If you can get one, try listing it on tapswap.cash for sale. Who knows? Anything can happen!
Earn XRBF!
Be sure to take advantage of all the learning tasks in this series so that you can earn some XRBF while you’re building your BCH developer profile!
XRBF is one of the most prominent and best-performing CashTokens fungible tokens. XRBF holders may, in the future, be able to form a DAO to support the Real Bitcoin Fam mission of attracting and supporting new BCH builders!
- Tutorial 1: earn up to 110 XRBF.
- Tutorial 2: earn up to 1,000 XRBF by creating an NFT.
Share your work in the Panmoni Telegram group and we’ll help you get the XRBF you deserve!
Next
Lots more tutorials are coming! Vote here for your favorite tutorial topics!
Support the “Token Pioneers” Tutorial Series
Want more tutorials? I accept donations to fund this critical work of educating new BCH builders about how to build permissionless, unstoppable dapps with Cash Tokens on Bitcoin Cash.
BCH address: bitcoincash:qz3pxmwda8gd42wa8k9yfxcwhcaapeuhygjc8mc4m8
Token-aware address: bitcoincash:zz3pxmwda8gd42wa8k9yfxcwhcaapeuhyg4j59kny5
Community Love Included!
For each 2 BCH donation in support of this tutorial series, you can select 1 tutorial or marketing video to sponsor. Sponsors get a text + image mention embedded in the deliverable, subject to reasonable limits.
I’m also working on an additional 68+ short tutorial videos (examples 1, 2) beyond what is mentioned in the Token Pioneers flipstarter, and these are also available for sponsorship at the rate of 0.25 BCH per video (negotiable). For these videos, you can influence the content. I can even make tutorials about your product, service or project.
Selection of sponsored deliverables is on a first-come, first-serve basis. If you wish to take advantage of this offer, please fill out this form.
Thank You
Thanks to toorik, anonymous, William Patrick, S0me_N0b0dy and na for their support of the flipstarter that makes this “Token Pioneers” tutorial series possible. Please visit BitcoinCashSite.com/about to see the complete list of 55+ community members who have funded my work since 2019.
Thank you also to the creators of important tooling, without which this tutorial would have been a lot more difficult to create—and maybe impossible:
- Mathieu Geukens (Cashonize, authUpdate.js, BCMR Generator)
- Paytaca (wallet, BCMR indexer)
- Jason Dreyzehner (CashTokens, the BCMR standard, otr.cash, Chaingraph)
- mainnet_pat (mainnet.js, tapswap.cash)
- Electron Cash
- The SalemKode explorer by Salem Shamakh
- Emerald DAO by BitcoinCashAutist
- Blockchair.com
- The BU explorer
- BCH Gurus
- nft.storage
- tbch.googol.cash
- the Chipnet miners
If I left anyone out, please let me know!
Your Feedback Matters
After this tutorial undergoes some community revision and feedback, I’ll publish a video to go with it. Your feedback and ideas are important to me. Reach out anytime. Email [email protected] or join the Panmoni Telegram channel.